How to describe your requirements to a marketplace developer
Before you can start development, your developer needs to know how your marketplace will work and look. Learn how to create a marketplace requirements specification in four simple steps.

Last update

In the previous article, you learned how to find the right developer to build your marketplace. Now, we'll focus on describing your requirements to the developer in a way that allows you to get the most out of your budget.
Developers typically have a standard hourly rate and charge for the number of hours they work. To get a reliable cost estimate for getting your marketplace launch-ready, you need to give your developer clear requirements. Based on them, the developer will estimate how many hours it will take them to complete the work.
"It's an Airbnb for cars" or "It's a website where people can sell their old furniture" are great ways to describe your marketplace to most people. Your developer will need much more detail than that. You will need to describe the exact workflows and how each page on your website or app will look like.
If you haven't specified requirements for a software product before, the task can seem daunting. However, once you get the hang of it, it's actually quite straightforward. It starts with creating a requirements specification. It is a set of documents that describes what your software will do and how you expect it to perform.
In this article, I'll give you a framework for creating a great marketplace requirements specification following these four steps:
- Understand your user journeys.
- Describe your information architecture.
- Create wireframes.
- Create pixel-perfect design.
As an example, we're going to go through each step and create a specification for an Airbnb-like peer-to-peer marketplace for saunas. Hailing from Finland, a country of 5.5 million people and three million saunas, I strongly think such a marketplace should exist. We'll call our marketplace Saunatime.
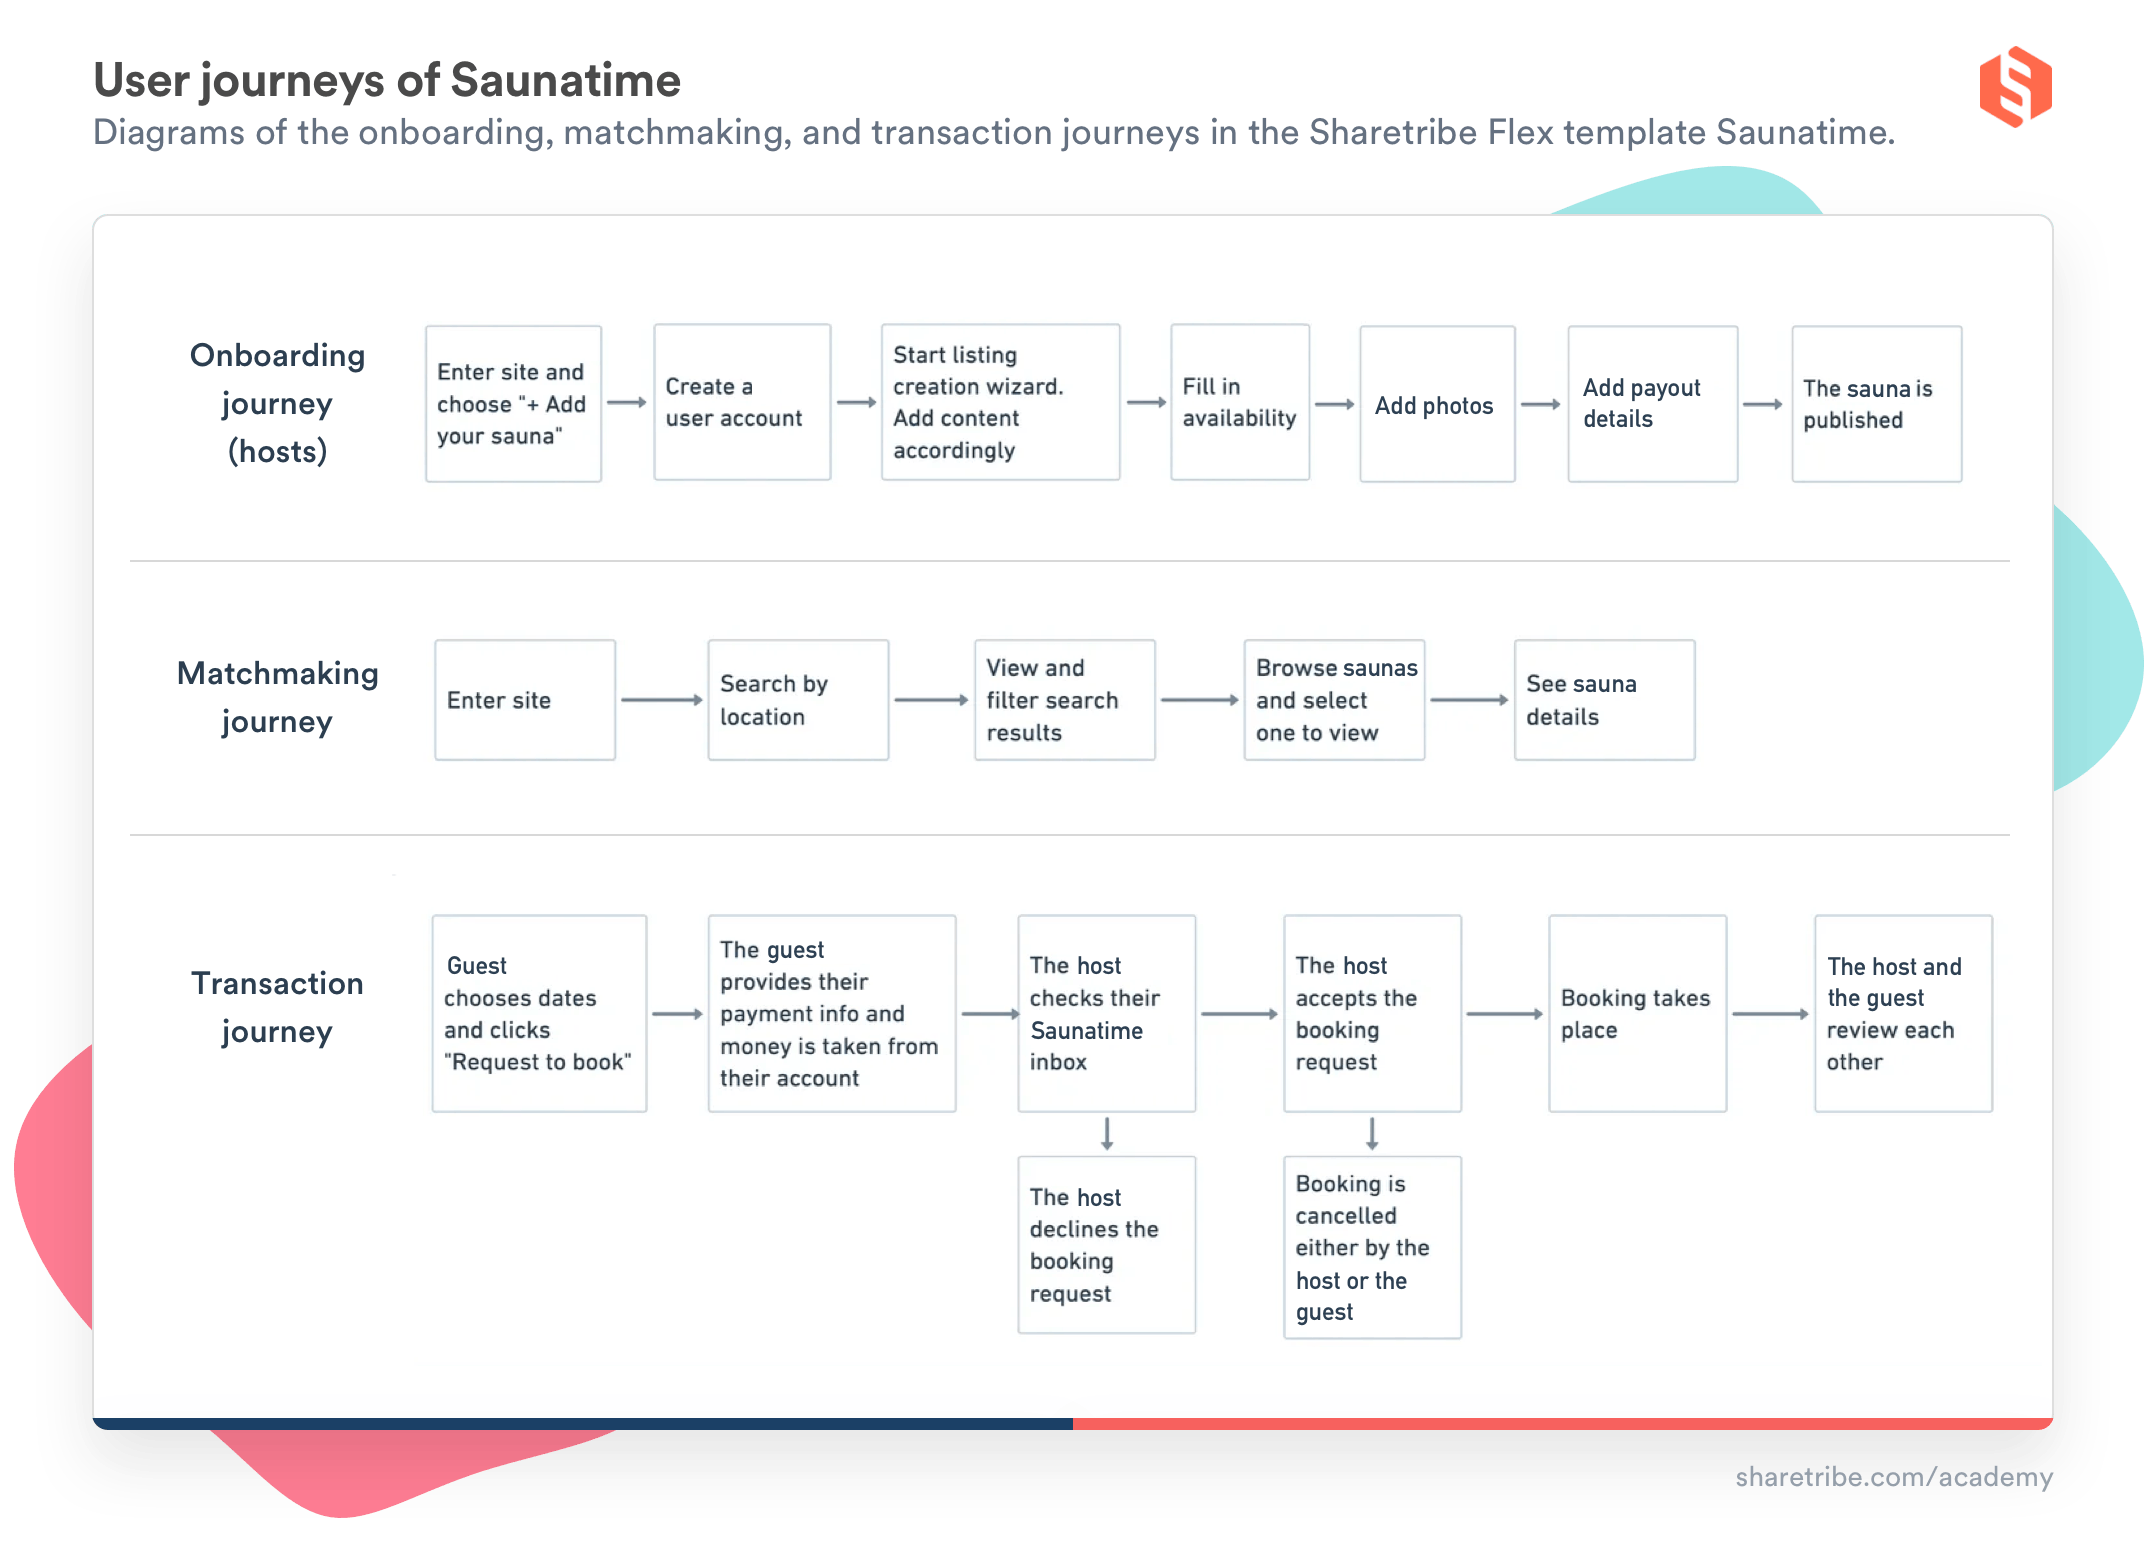
A great way to start compiling your requirements specification is by mapping your user journeys. These are the paths people will take to complete tasks on your marketplace.
A marketplace typically has three core user journeys: onboarding, matchmaking, and transaction. Onboarding is the process through which your users sign up, create their profiles, and (if they’re providers) list their products or services. Matchmaking is the experience through which your customers discover your providers. Transaction means the process of exchanging value between the customer and the provider.
A flowchart is the best way to map these user journeys. You can draw a flowchart on paper, use a tool you are already familiar with like Powerpoint or use a dedicated flowchart tool. At Sharetribe, we create our flowcharts using Whimsical, which has a free version for getting started.
Remember you'll need to create different user journeys for your providers and customers. In Saunatime, we call them hosts and guests, respectively. The transaction flow involves actions from both sides.
Each step of a user journey should consider the following things:
1. What are the next steps the user can take? For example, in matchmaking, you might offer both a keyword search and a browse-by-category option. Meanwhile, if a customer makes a booking, you might offer them the option to cancel it. Here are the core user journeys of Saunatime:
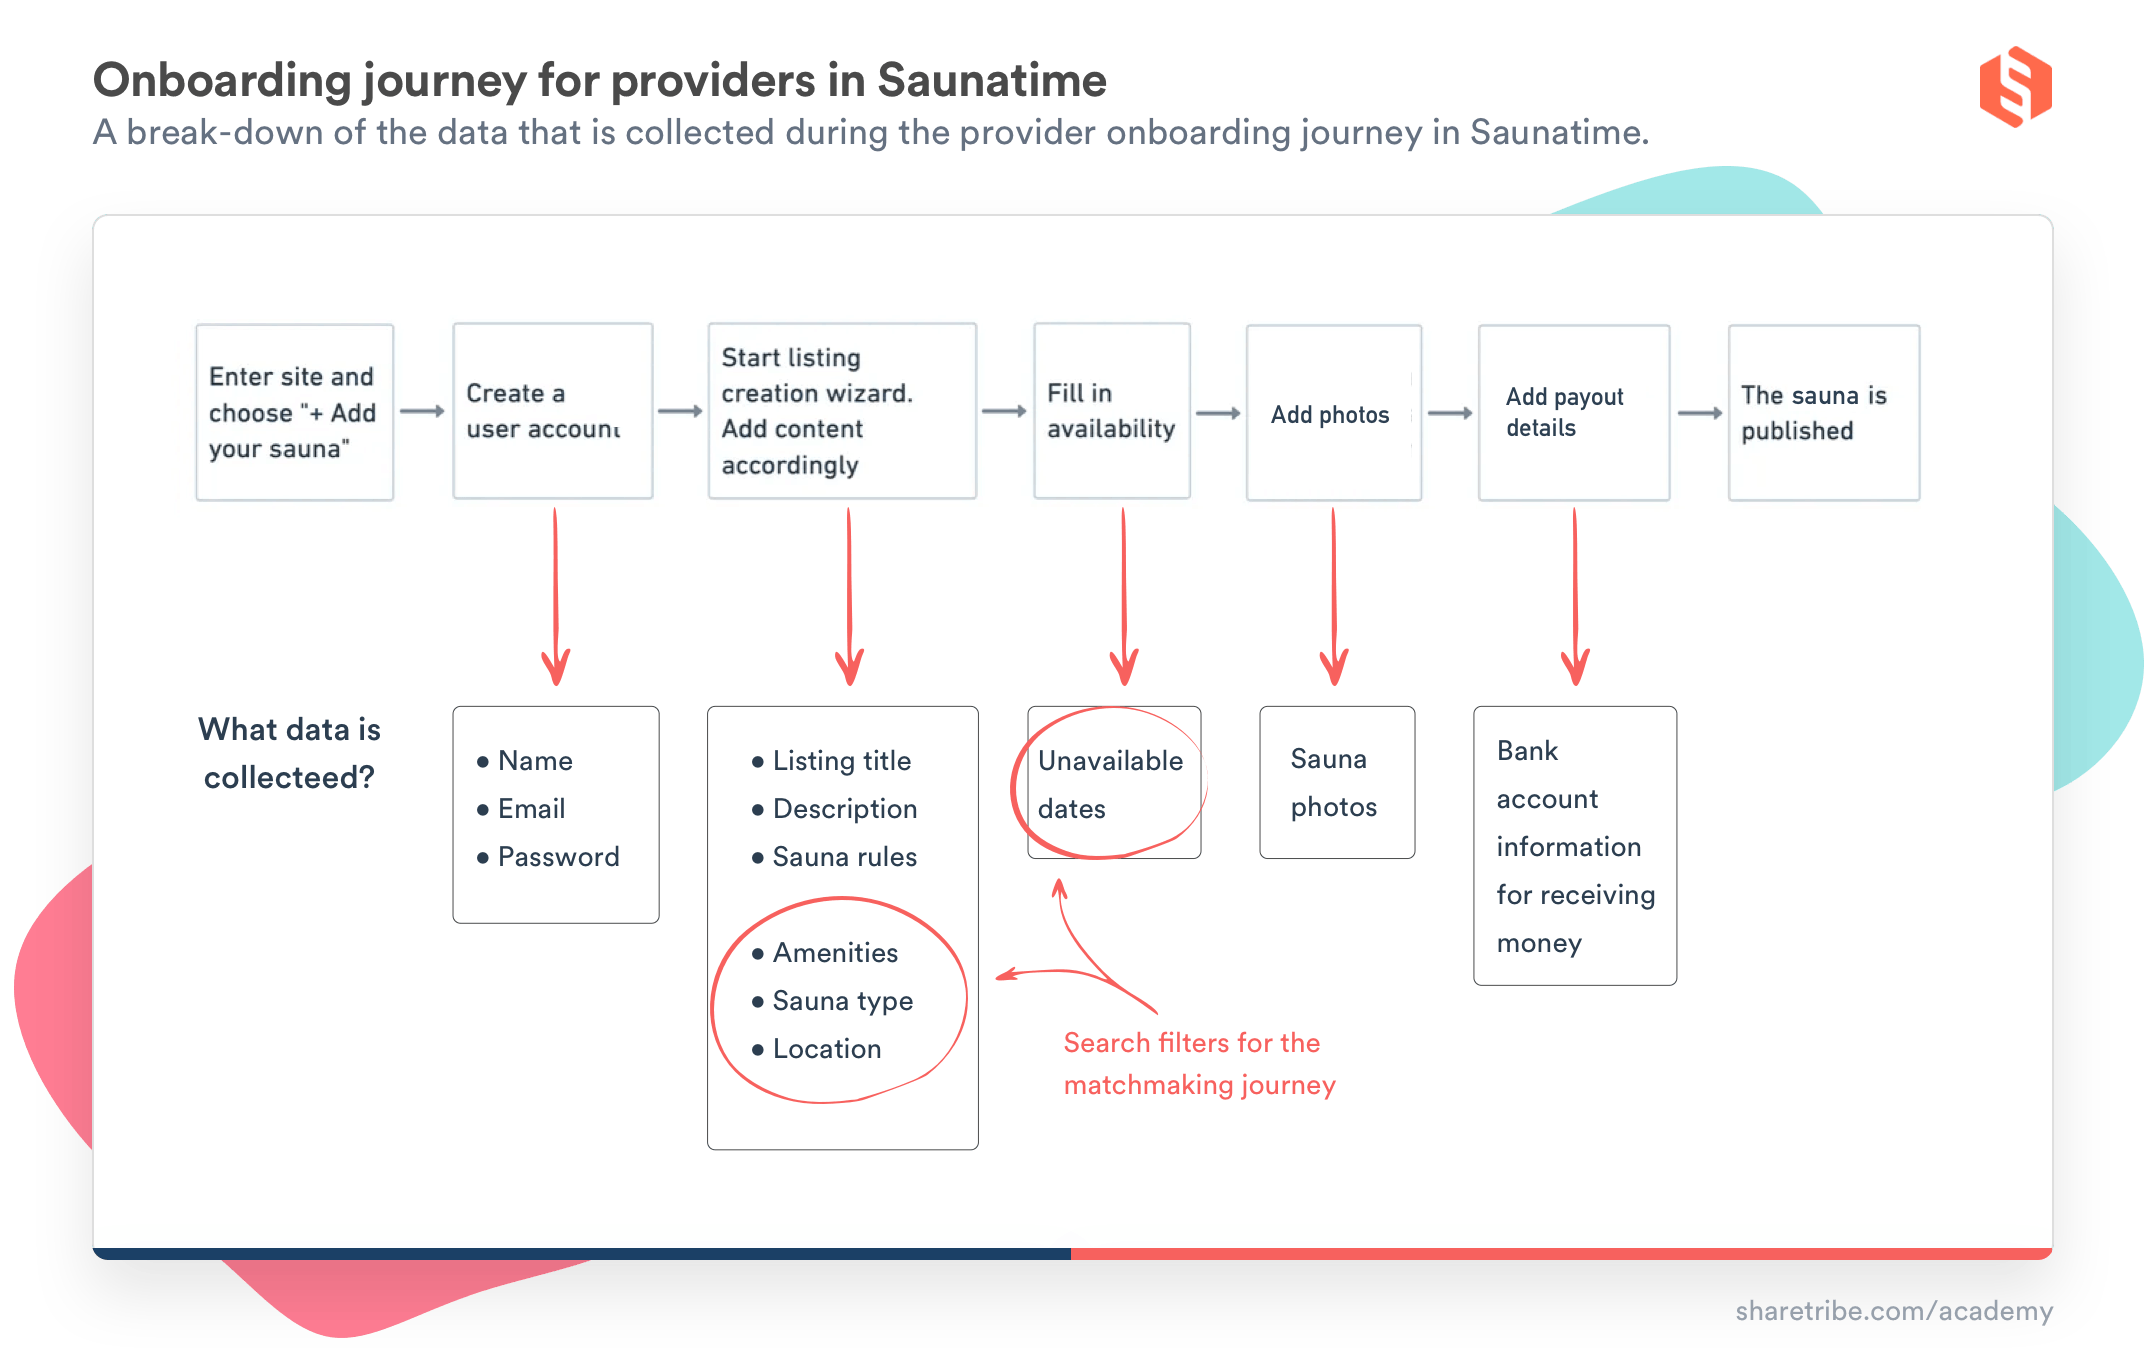
2. Which data is collected at each step? For example, if you want your customers to be able to filter shoes by size, you need to collect size information in the provider onboarding flows. Meanwhile, if you want to send an SMS notification to the providers when a customer make a purchase, you need to collect the providers' mobile number. List all the data you need to collect at each step to your flowchart.
This is the provider onboarding journey of Saunatime broken down by which data is collected:
User journey flowcharts or diagrams make it a lot easier for the developers to understand what is required. We've noticed that many experienced Experts who build marketplaces with Sharetribe can give relatively accurate estimates based on user journey diagrams only. Having them ready is already plenty for your first call with a developer.
If you're using a marketplace software solution like Sharetribe as the backbone of your custom marketplace development project, you don't need to figure out your user journeys from scratch. Sharetribe provides you with example user journeys. You can explore them and list the change’s you’d like to make for your use case. This makes it a lot easier to get started if you're new to user journeys.
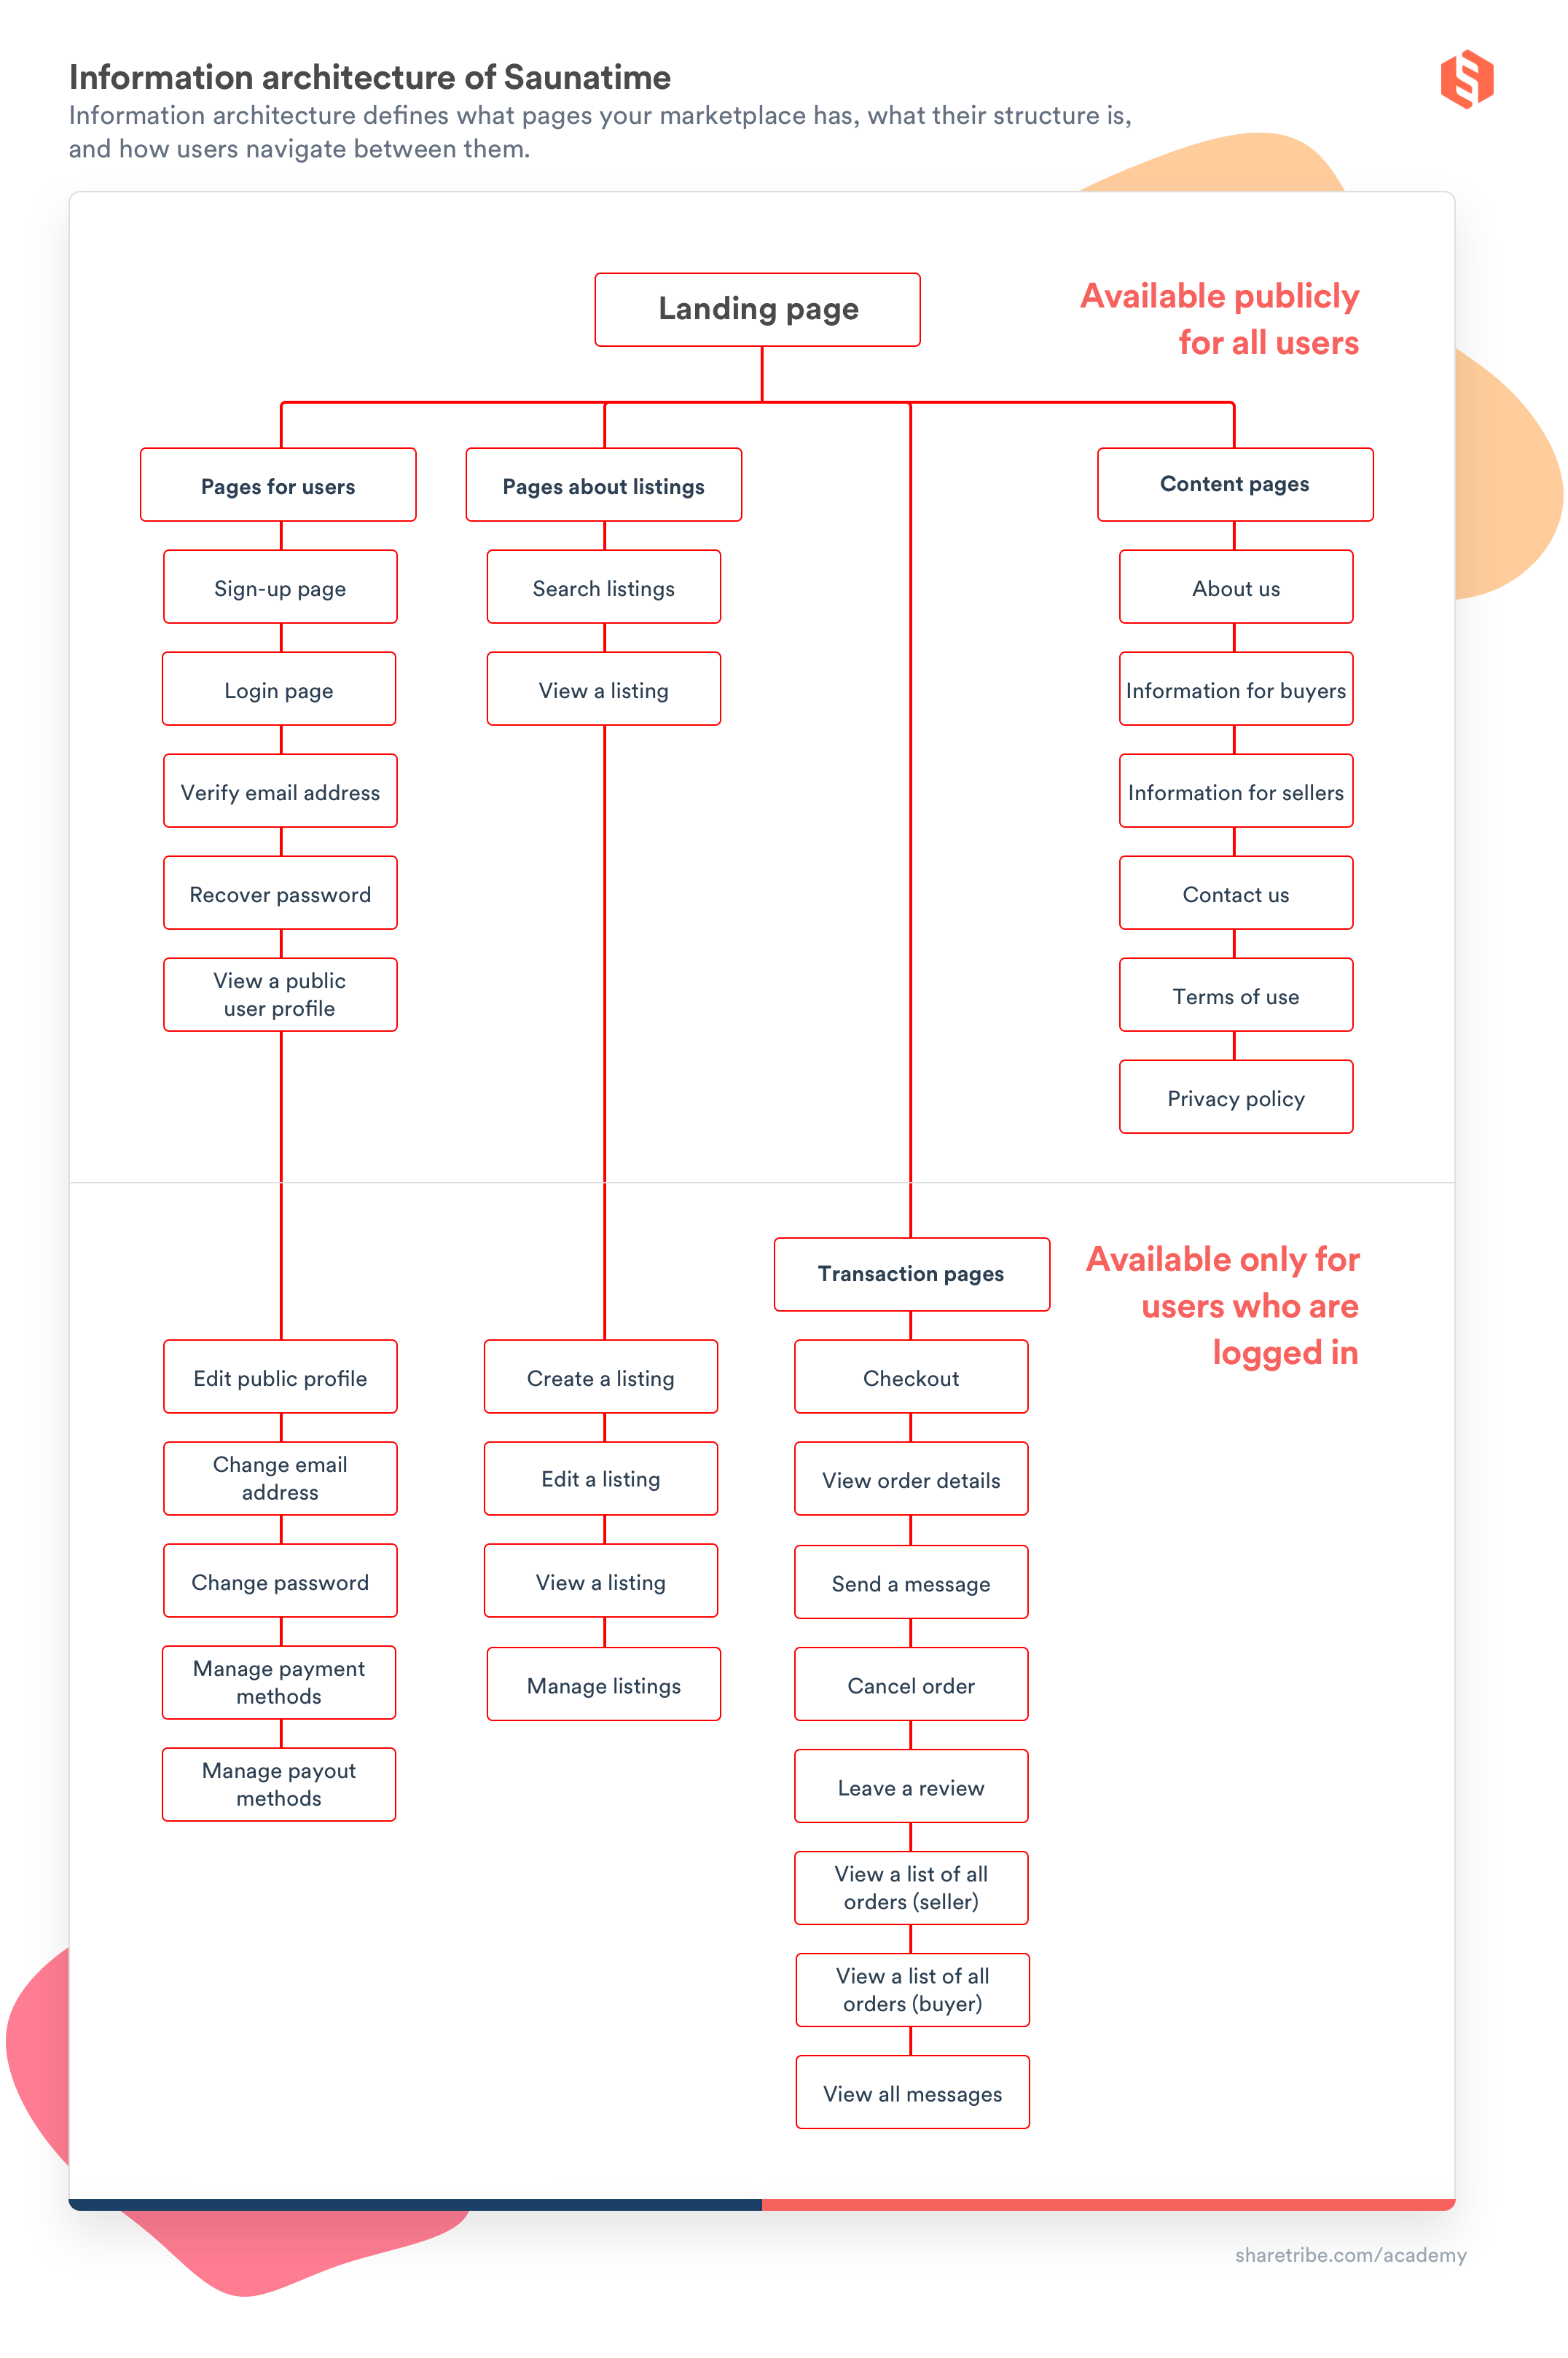
Once you have your user journeys, the next step is to describe your information architecture: what kind of pages (or screens in a mobile app) will your marketplace contain, what is their structure, and how will users navigate between them?
A simple way to describe the information architecture of a marketplace is to create a list of all its pages. In addition to the core user journeys, you might have additional user journeys too. For example, a section where your users can learn more about your platform and find answers to their questions or a section where they can contact you if they have questions.
Here's the information architecture of our Saunatime website with all its pages and their hierarchy.
Even the simplest possible marketplace will likely have quite a few pages. If you're not sure about what kind of pages your marketplace should have, you can consider asking your developer for help. If you're working with an agency that employs designers, you can work together with them to figure out the architecture. This naturally comes with an extra cost.
A marketplace software solution like Sharetribe can help you a lot when you're figuring out your information architecture. With Sharetribe, you get a set of existing pages out of the box. If you’re not happy with that exact set, you can remove some pages and add others. Regardless, the amount of work required is likely significantly less than if you would build all these pages from scratch.
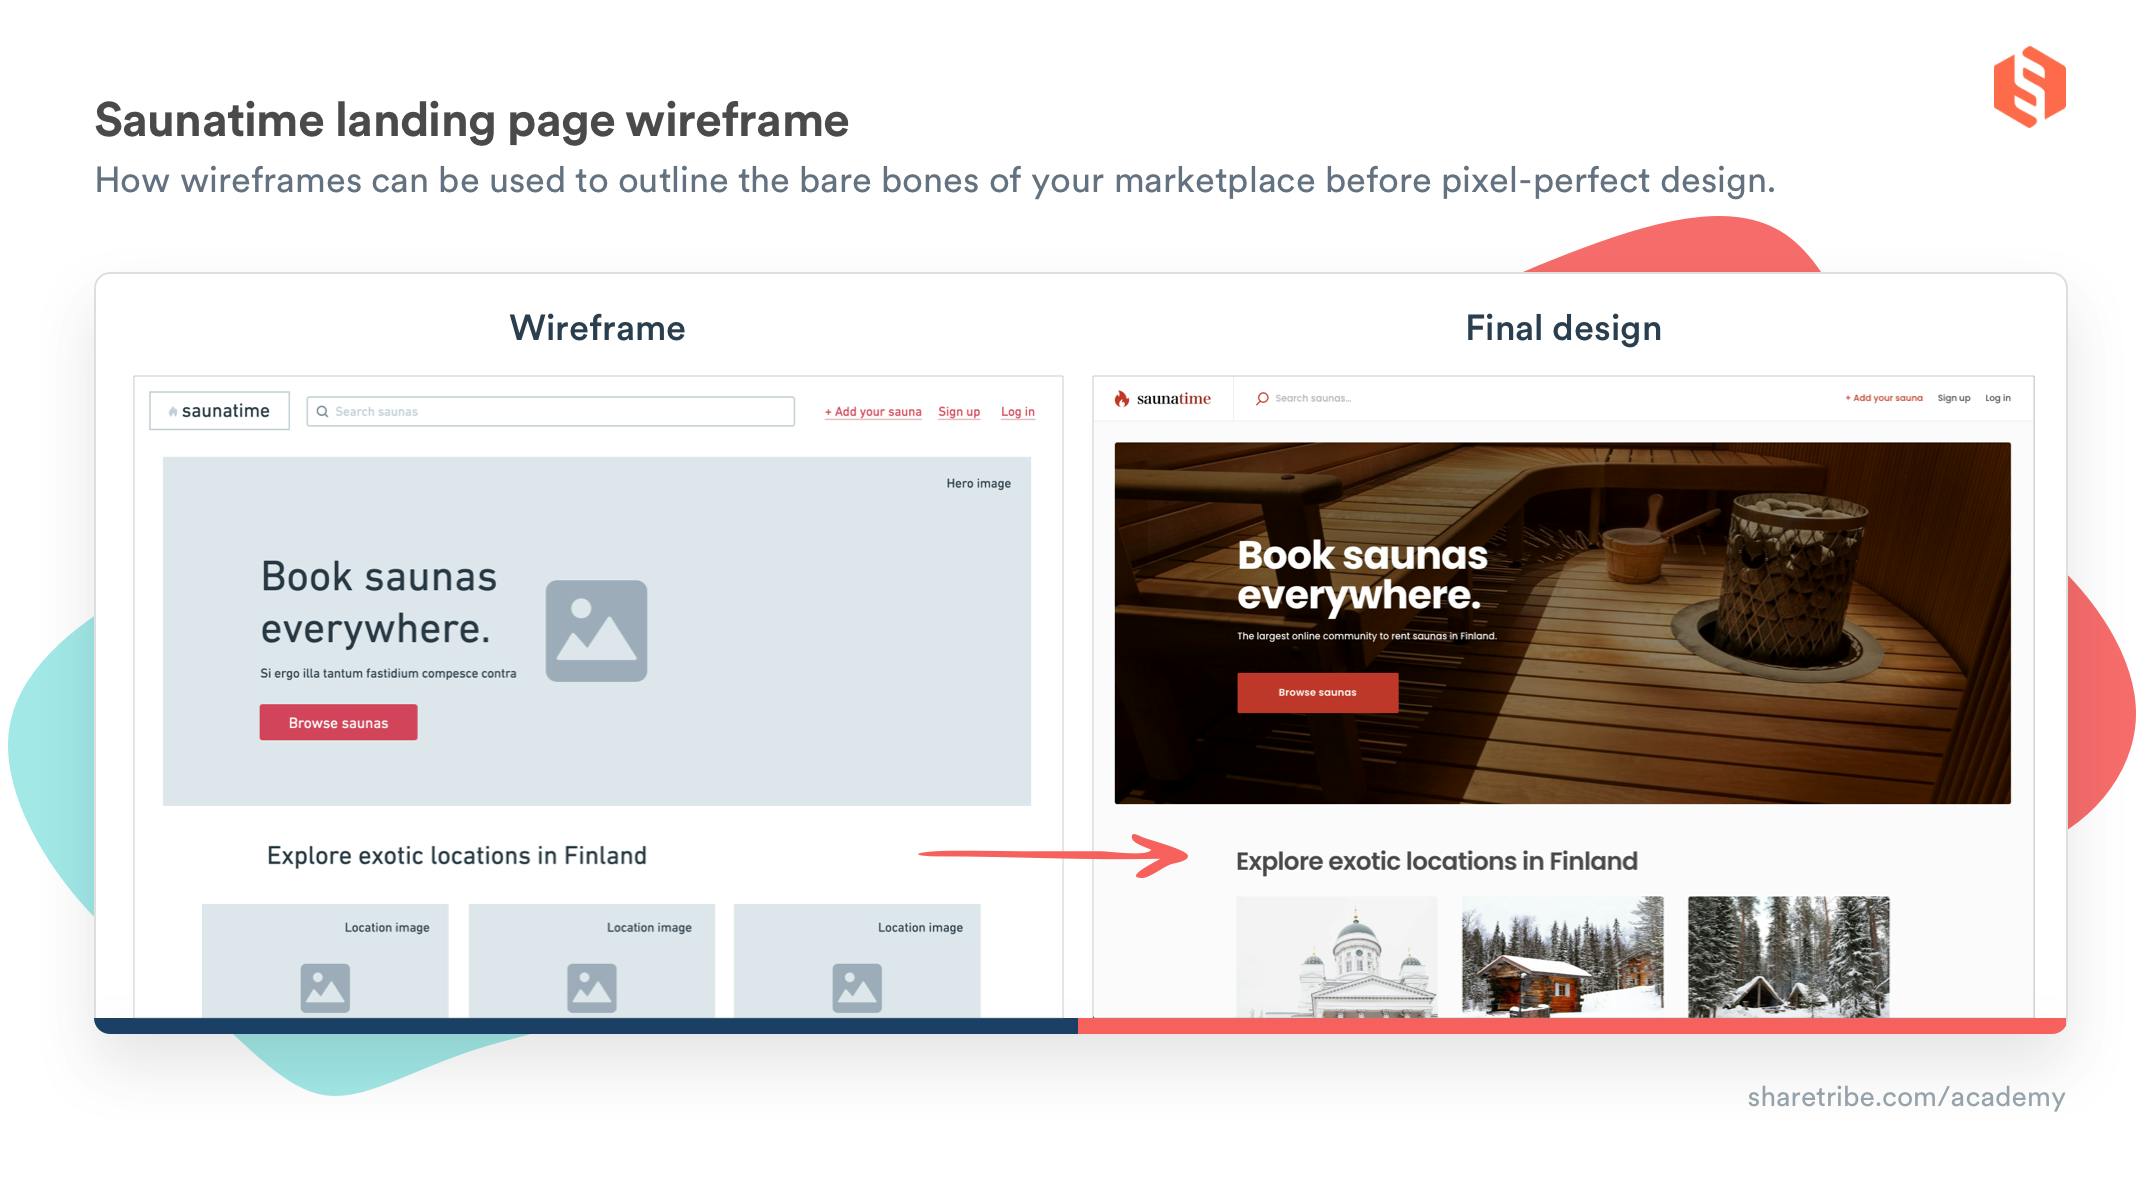
Once you know the pages you need to build, you need to figure out how they will look. What kind of images, text, forms, and buttons will your users see on your marketplace?
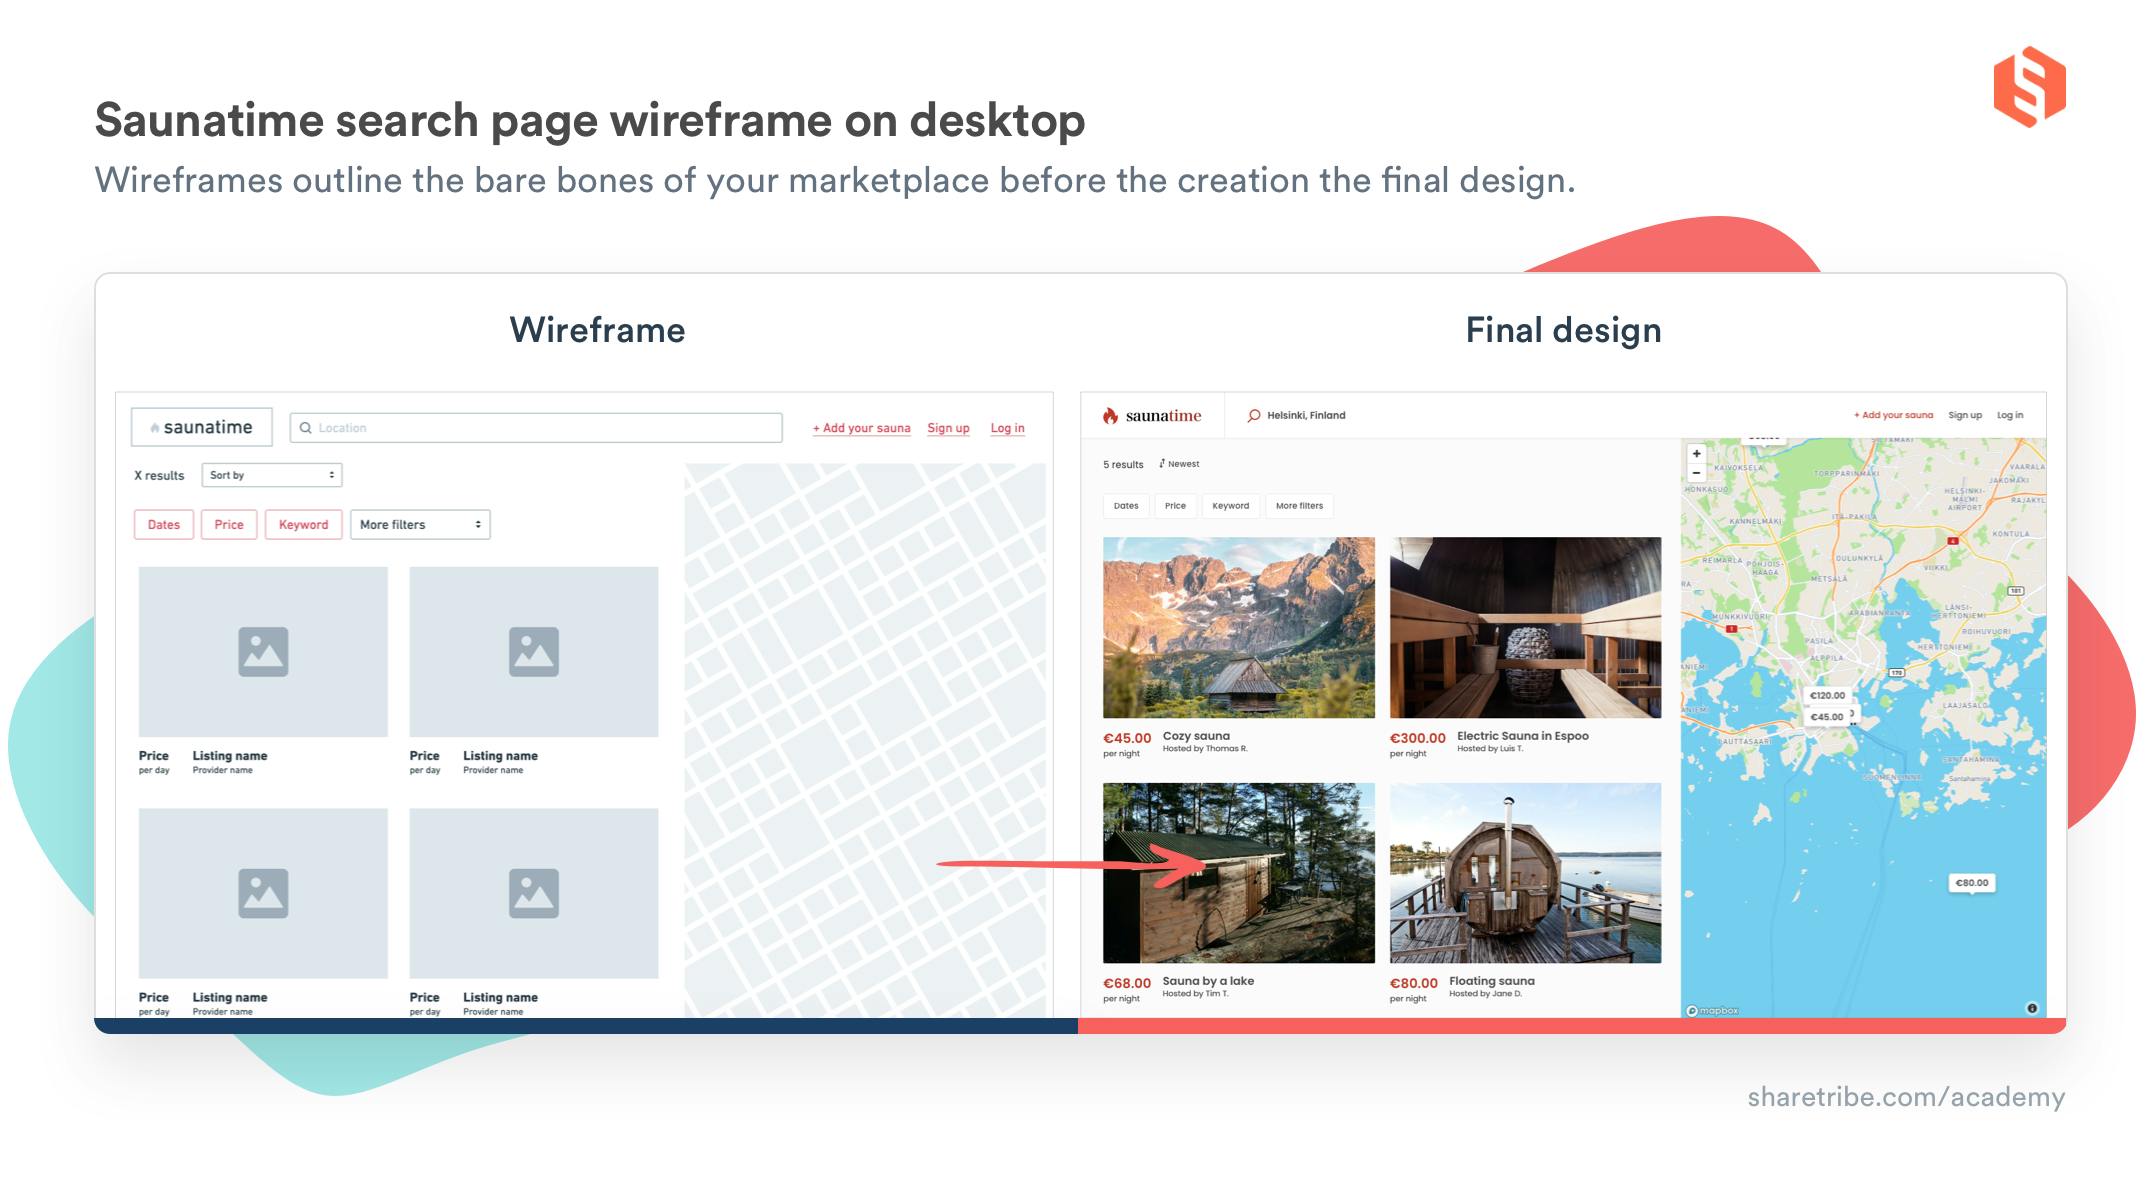
The best way to communicate this to your developer is with wireframes: skeletal representations of the pages on your site. You don't need to be a designer to create wireframes: they are low-fidelity guidelines that don’t contain visual details like the exact fonts, colors, or spacing.
You don't necessarily need any special tools to create wireframes. Powerpoint will do just fine, if you're comfortable with it. At Sharetribe, we use Whimsical for most of our wireframing needs, and it's really easy and intuitive for anyone to learn. There are other wireframing solutions out there, like Miro, MURAL and Balsamiq.
The wireframe below, describing the Saunatime search page on a desktop computer, was created in Whimsical.
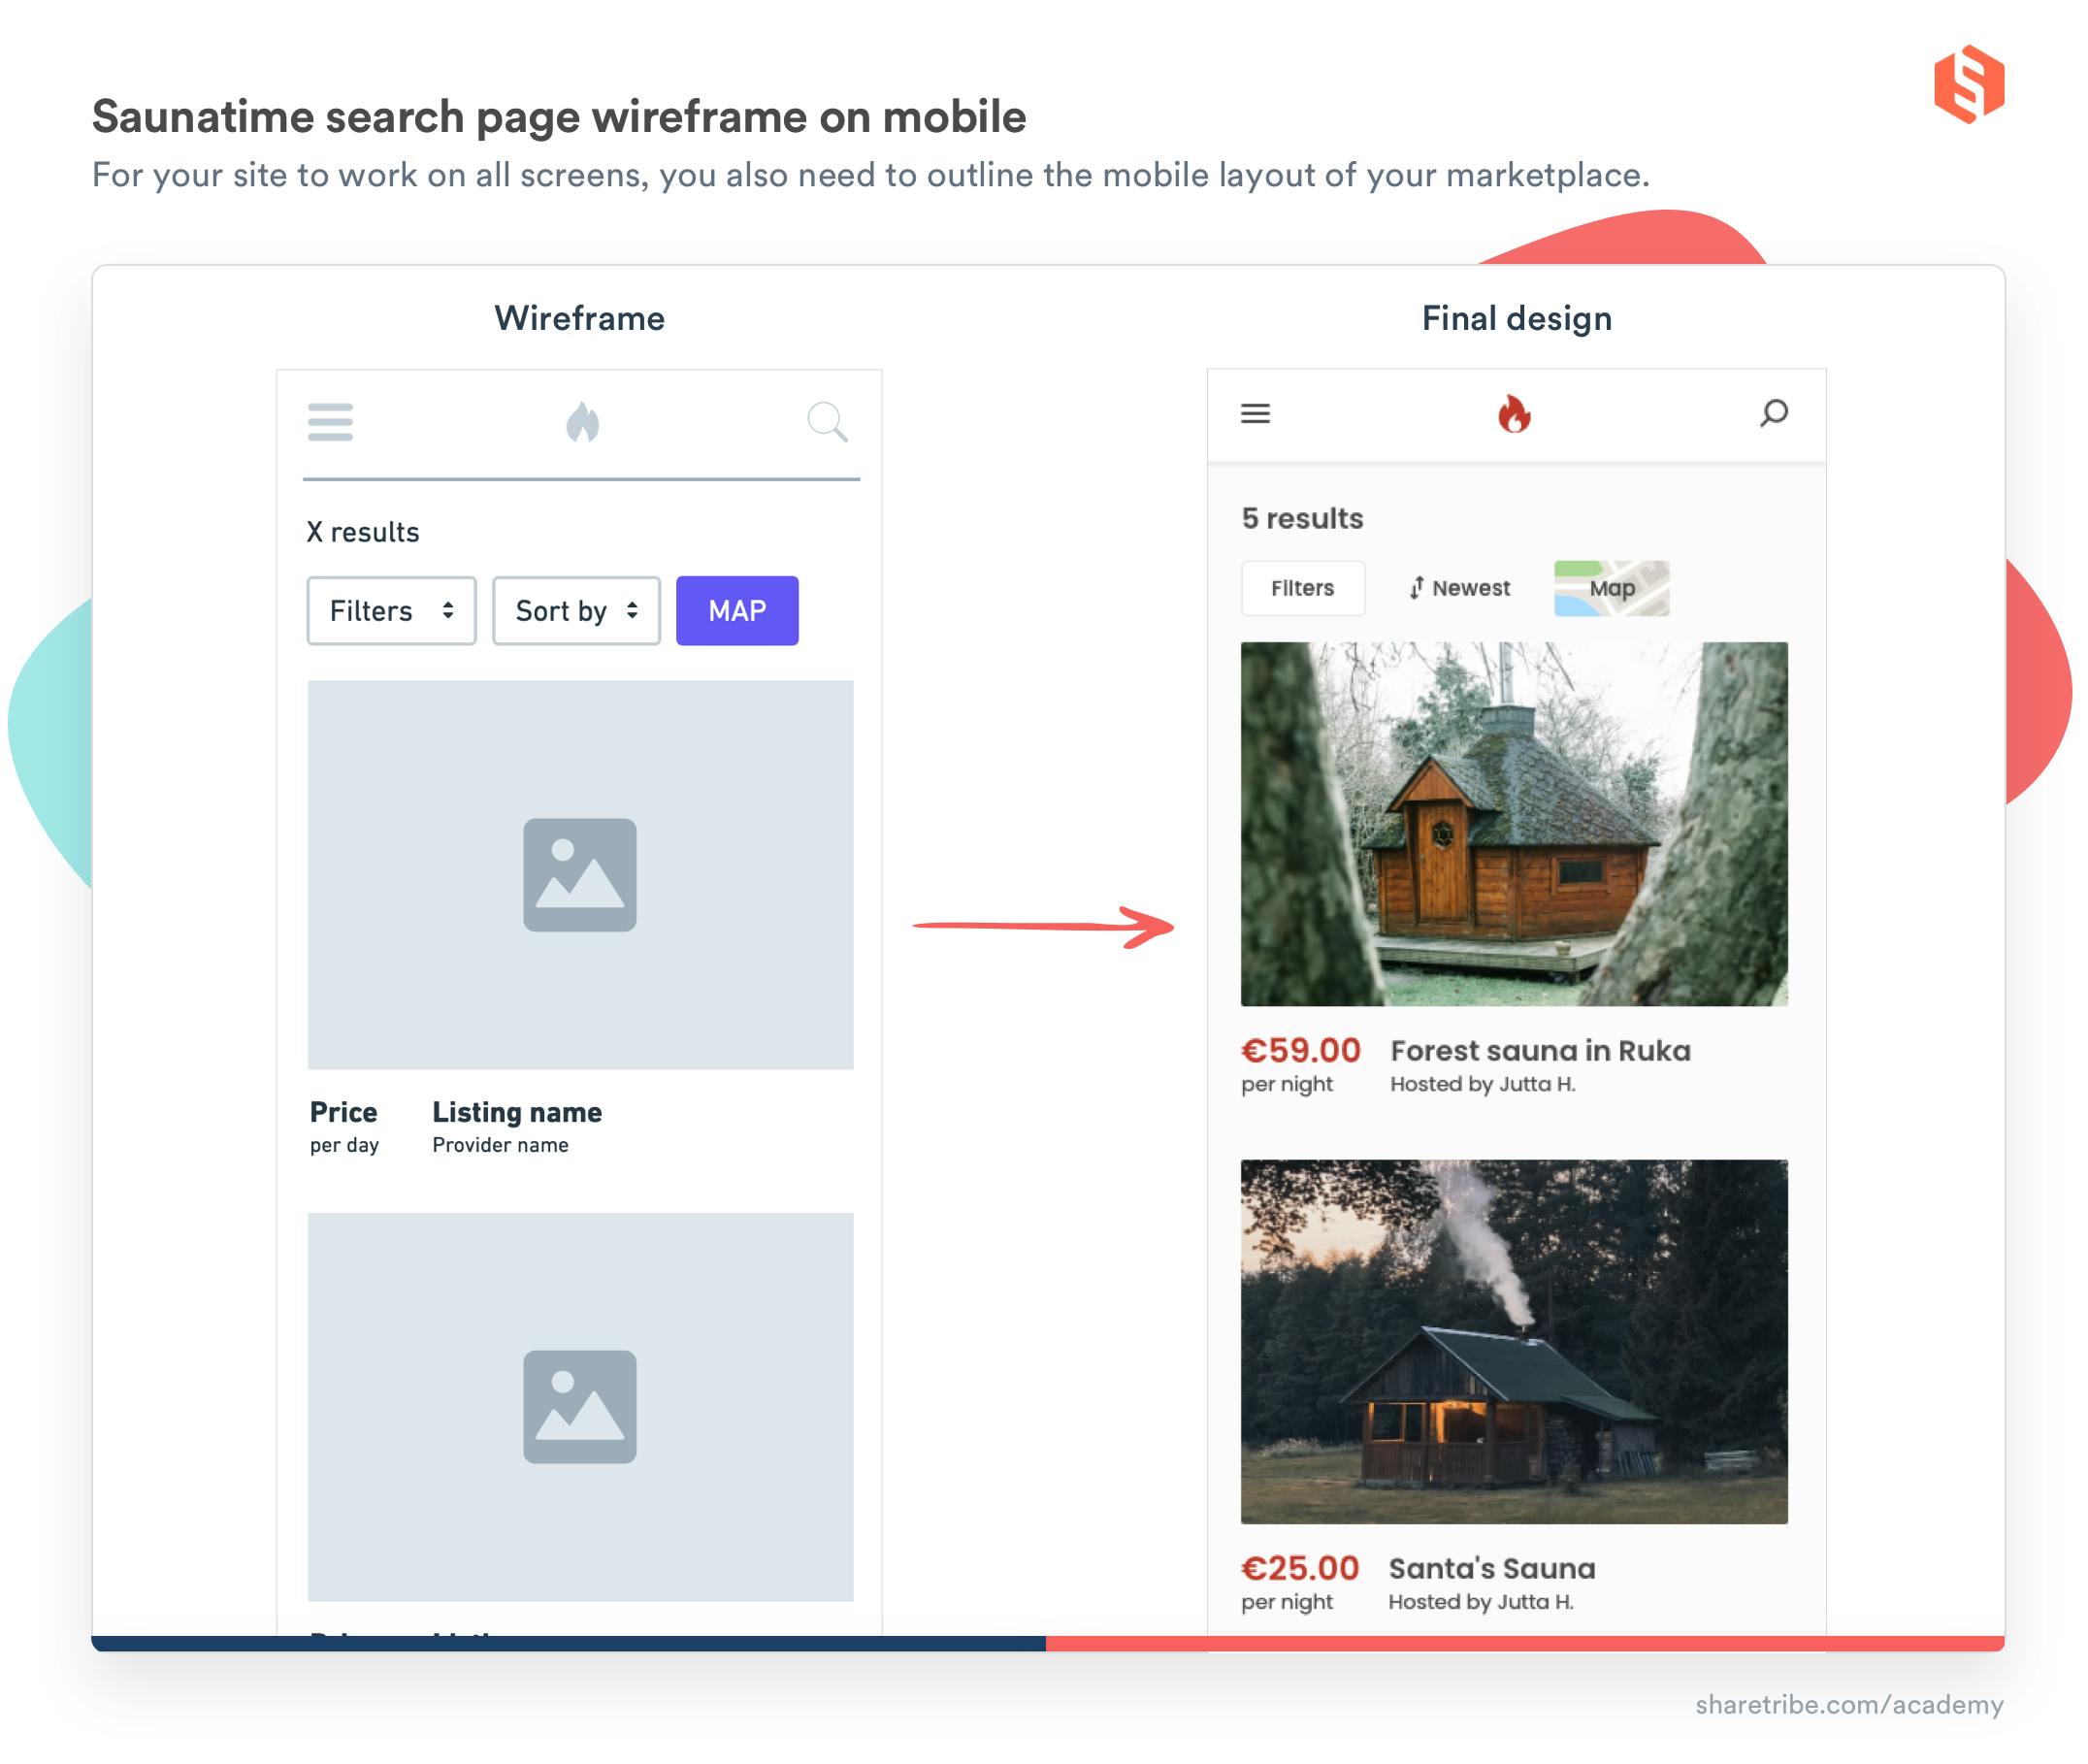
Keep in mind that your users will likely access your marketplace different kinds of devices: some people will use desktop computers, others will have a laptop, smartphone, or a tablet. You need to ensure that your website works great on screens, of all sizes. This is called responsive web design. This is the same example wireframe from above, viewed on a smartphone screen.
While a set of wireframes of your most important pages (like the landing page, search, listing page, and checkout) may be enough to improve the accuracy of a developer’s quote, eventually, they will need wireframes for all your pages.
In addition to static wireframes, you will need to describe interactive elements. If a user opens a dropdown menu, what kind of options will it have? If they insert inadequate information into a form, what kind of an error message do they receive, and where will it be displayed? Your developer will eventually need to know all these details.
If you're using a solution like Sharetribe, and its template is close to what you have in mind, you only need to create wireframes for the pages you want to change in the Template. This can be as simple as taking screenshots of the Template's pages, adding them to a Powerpoint presentation, and adding boxes and text to mark any changes.
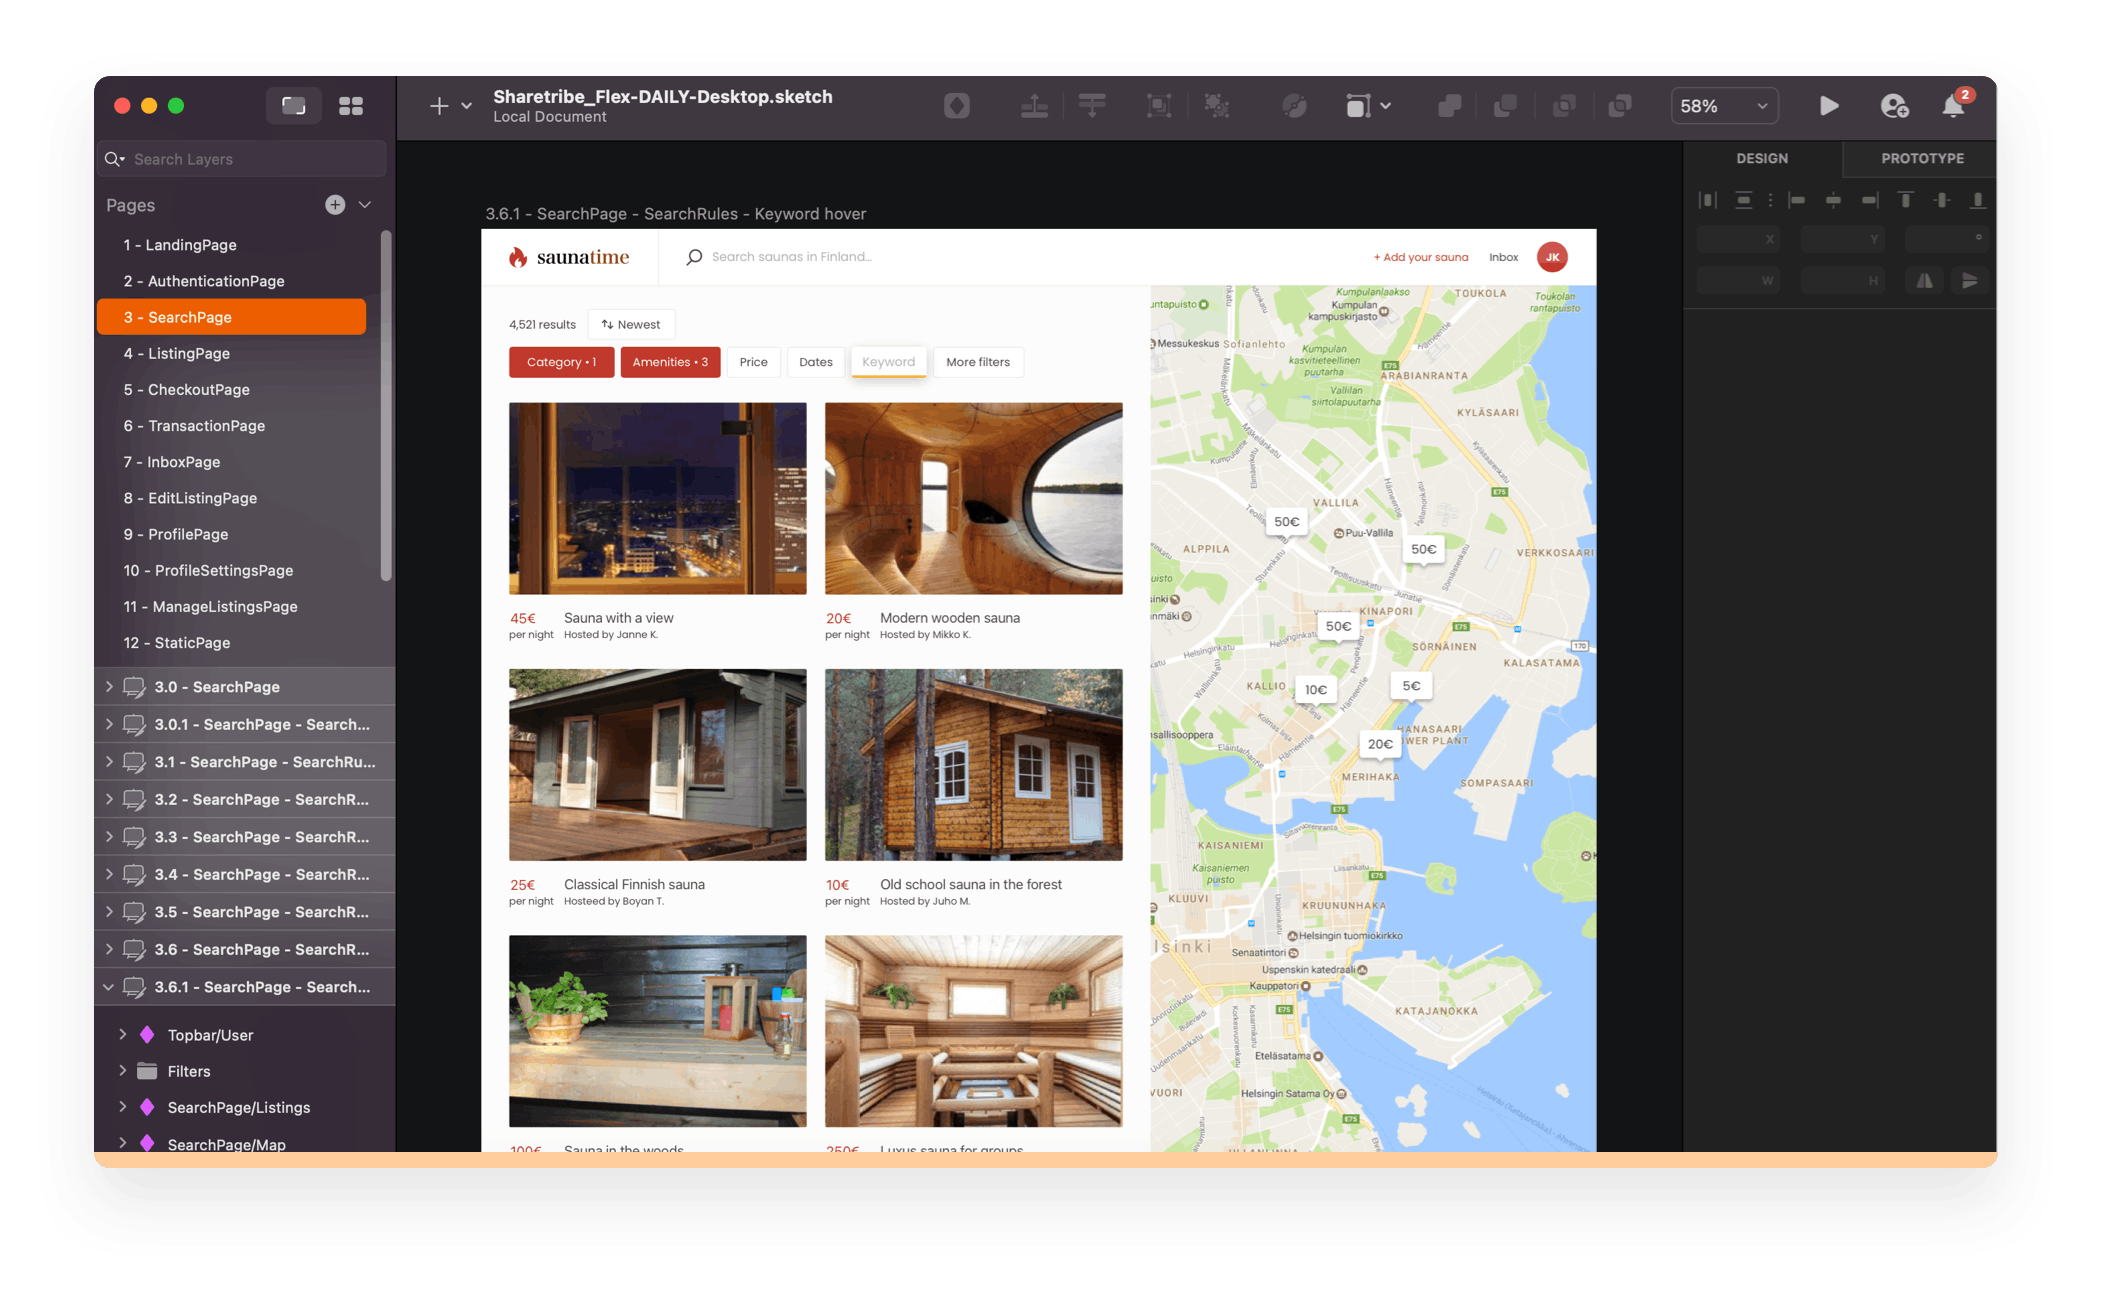
Your wireframes should be enough for the developer to give you an accurate quote. After this, there's one more step to complete before coding can start: pixel-perfect design. This means describing exactly how every page or screen should look like. What are the colors and fonts? What's the exact size of each element in pixels? How much space is there between them? If you hover your mouse over a button, does its color change? Are there shadows, animations, or other special elements that will make your design feel more alive?
Pixel-perfect designs are typically created with dedicated design software like Sketch, Figma, or Adobe XD. Here’s an example of the pixel-perfect design of Saunatime’s search page, created with Sketch.
If you're not a professional designer, it’s a good idea to hire help for creating pixel-perfect design. If your developer is also a designer or works with one, they're a natural fit. If they can't help you with design, you might need to find a freelance designer to help you out.
The Sharetribe Web Template comes with a predefined visual look that looks great on all screens. If you're happy using this default visual style (in your MVP, at least), you can skip creating pixel-perfect design and go directly from wireframes to implementing your changes.
Tell your developer to use the existing visual style and design components of Sharetribe or list any changes you’d like to make to the Sharetribe default pages. You’ll get a beautiful website and a functional user experience without having to involve a designer. This can be a huge saving when you're building your Minimum Viable Platform, as hiring a professional designer can cost you quite a bit.
If you want to modify the default visual design of the Template significantly to achieve your desired result, Sharetribe has the resources you need. The Template's design files contain every page of the web application and are available as free downloads for Sketch, Adobe XD, and Figma. Sharetribe Expert Network has several professional designers who have experience working with the Template and can create beautiful custom designs on top of it.
Now your developer knows what they should build. You’ve gone through the process of finding a marketplace software developer and described your requirements to them. Once you get a reliable cost estimate for building your platform, it’s time to sign a contract and start the development process.
Best of luck developing your custom marketplace!

How to hire a software developer to build your marketplace
Find out if it's time for your to find a marketplace developer and, if yes, how to find the right one.

Online marketplace design: the 5 principles of a great marketplace UX
Five key online marketplace design principles and tons of practical tips and examples. Courtesy of marketplace UX designer Fiona Burns.

The 5 questions to ask when choosing marketplace software
There are dozens of marketplace software solutions to choose from. These five questions make the right choice for your marketplace idea.
Start your 14-day free trial
Create a marketplace today!
- Launch quickly, without coding
- Extend infinitely
- Scale to any size
No credit card required