Designing a shopping cart transaction flow
In the default purchase transaction process in a Sharetribe marketplace, the transaction handles payment and stock for one item. In a cart transaction flow, we still want to handle the payment in a single transaction with a single set of line items, but we want to handle stock for each listing separately. In this blog series, we are diving into the ins and outs of building a multi-vendor shopping cart with single-vendor checkout using the Sharetribe Developer Platform.
Mar 11, 2024


Note: The implementation in this article is built on top of Sharetribe Web Template v4.1.0, so if you are working on a later version, you may need to make some adjustments.
In the default purchase transaction process in a Sharetribe marketplace, the transaction handles payment and stock for one item. In a cart transaction flow, we still want to handle the payment in a single transaction with a single set of line items, but we want to handle stock for each listing separately. This means we will have two separate transaction processes, one for the payment and one for managing listing stock.
In addition, we want to allow the customer to dispute a transaction with a partial refund, in case e.g. one of the purchased items is damaged but the others are fine.
To achieve these use cases, we need to make the following changes:
- Modify the default-purchase transaction process: remove stock handling, add transition and state to link child transactions, and add transitions to bypass automatic payout or refund in case of a partial refund
- Add a child transaction process for handling stock for individual listings
- Modify the template transaction process handling to accommodate these process changes
All the code examples used in this guide can be found in this Gist.
In this blog series, we are diving into the ins and outs of building a multi-vendor shopping cart with single-vendor checkout using the Sharetribe Developer Platform. The previous articles in this guide dived into
If you didn't already, read those first!
The default Sharetribe Web Template has transaction process related details in two places. The /ext/transaction-processes folder contains copies of the default transaction processes used in the Sharetribe backend. They are included in the repository so that you can record your transaction process changes in your version control.
However, only making changes to the /ext/transaction-processes files does not apply the changes to the Sharetribe backend directly. You will need to use the Sharetribe CLI to push the changes to your Sharetribe backend. Once you see the transaction process changes in your Console > Build > Advanced > Transaction process visualizer, the changes have been updated into the Sharetribe backend.
The actual transaction process handling on the template side is defined in the src/transactions directory. The transaction.js file defines the main transaction processes that can be used to initiate a transaction, as well as a number of helpers for handling transaction states and transitions. In addition, the directory contains a file for each of the marketplace’s transaction processes, and those files detail the transitions, states, and their relationships within each process.
You can modify a Sharetribe marketplace transaction process with the Sharetribe CLI. A transaction process is defined as an .edn file, and to modify the process, you will need to
- make your changes in the .edn file,
- push your changes with Sharetribe CLI, and
- update the process alias with Sharetribe CLI.
For more in-depth details on how to update a transaction process in Sharetribe, check out our documentation: Edit transaction process with Sharetribe CLI.
In this guide, we’ll assume that you will be working on top of the Sharetribe default-purchase transaction process, and that you have not made any other changes to the process. If you have made custom changes, adjust accordingly when making the following changes.
You can see an example of the default-purchase process with these changes in this Gist.
Remove stock handling
In the cart process, all stock reservations are handled in separate child transactions, so that stock reservations for individual items can be canceled independently. This means that you will need to remove all actions related to stock handling from all transitions in the transaction process:
- :action/create-pending-stock-reservation
- :action/accept-stock-reservation
- :action/decline-stock-reservation
- :action/cancel-stock-reservation
(An alternative approach to stock handling would be to only initiate the main transaction, but handle individual item stock by adding stock adjustments using the Sharetribe Integration API, and saving their details in the transaction. However, that would require building an additional admin interface for updating the stock adjustments in case of a refund.)
Add a transition and state to link child transactions
When starting a transaction on top of a shopping cart, we want to link the child transactions and the parent transaction. We will do that by saving the ids of the child transactions in the parent transaction’s protected data, and vice versa.
The default-purchase process progresses from requesting payment to state/pending-payment, and then with transition/confirm-payment to state/purchased.
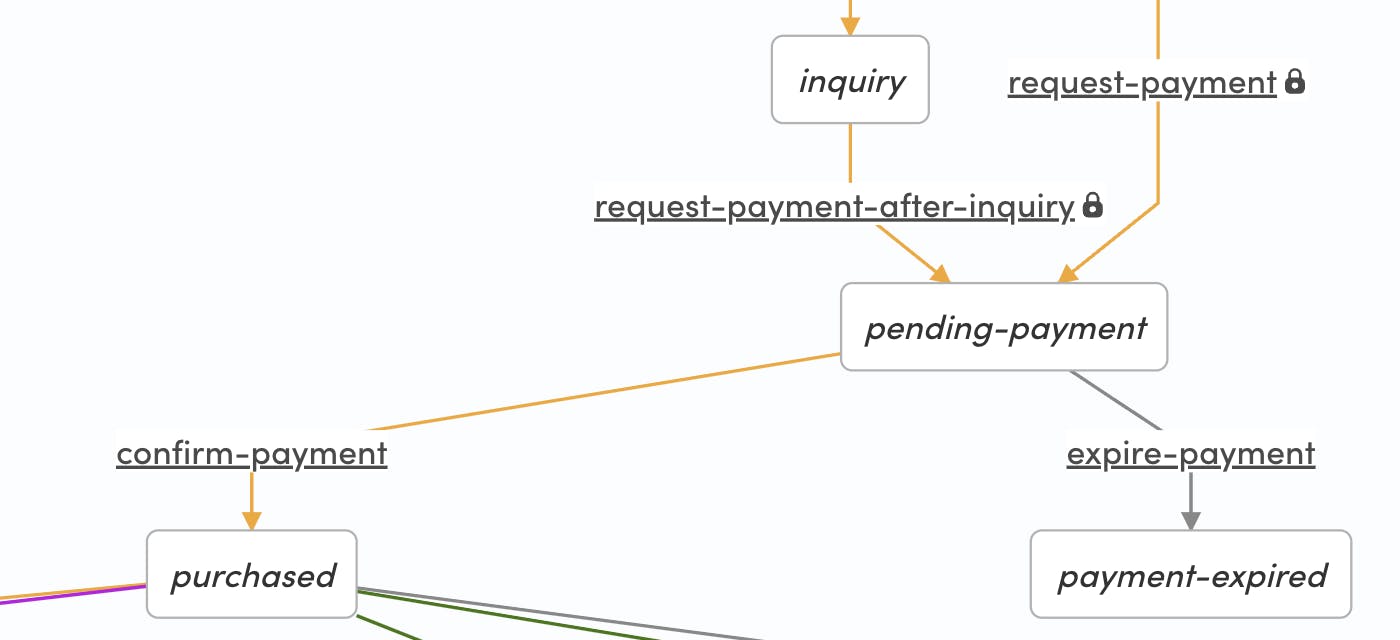
We will add a new state, pending-update-child-transactions, and a new transition, update-child-transactions, to the process.
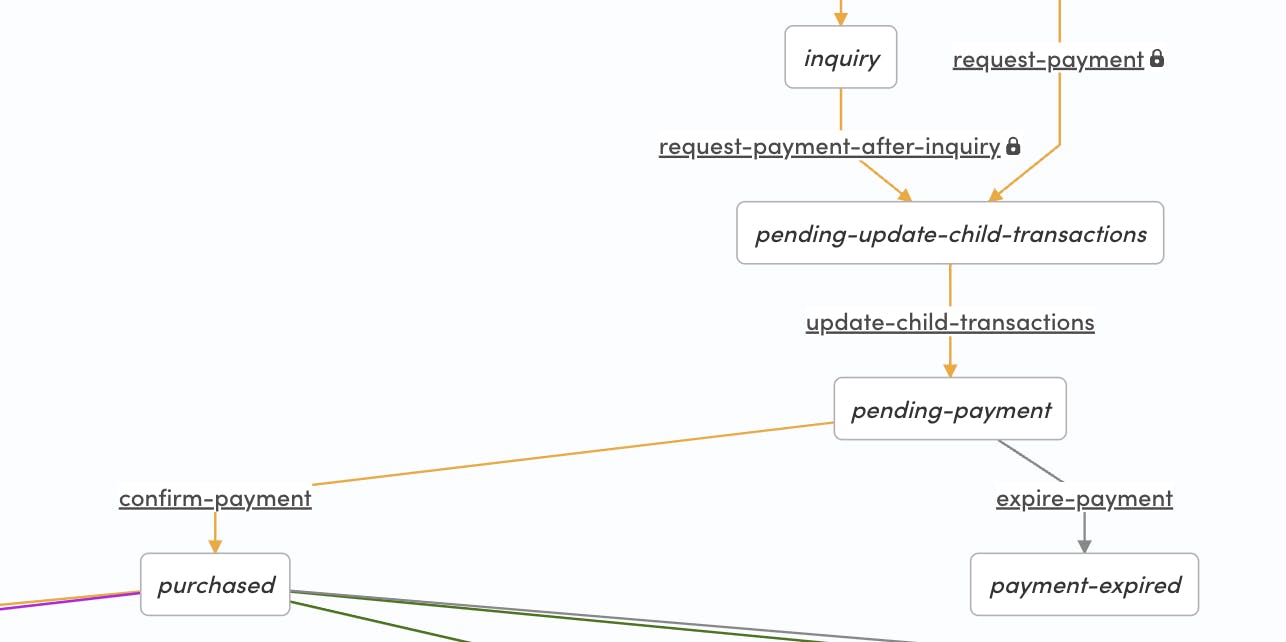
We will do this by changing the :to parameter of the request-payment and request-payment-after-inquiry transitions, and then adding a new transition definition.
  {:name :transition/request-payment,
   :actor :actor.role/customer,
   :privileged? true,
   :actions
   [{:name :action/update-protected-data}
    {:name :action/privileged-set-line-items}
    {:name :action/stripe-create-payment-intent}],
    ;; updated end state
   :to :state/pending-update-child-transactions}
  {:name :transition/request-payment-after-inquiry,
   :actor :actor.role/customer,
   :privileged? true,
   :actions
   [{:name :action/update-protected-data}
    {:name :action/privileged-set-line-items}
    {:name :action/stripe-create-payment-intent}],
   :from :state/inquiry,
    ;; updated end state
   :to :state/pending-update-child-transactions}
   ;; new transition
  {:name :transition/update-child-transactions,
   :actor :actor.role/customer,
   :actions
   [{:name :action/update-protected-data}],
   :from :state/pending-update-child-transactions
   :to :state/pending-payment}
The only action in the new transition is update-protected-data. When we process the transaction in the template, we will initiate the stock reservation child transactions after the request-payment transition, and then call the update-child-transactions transition with the resulting transaction ids before continuing with confirming the payment.
Add transitions and state to bypass default payouts and refunds for managing partial refunds
The default Sharetribe transaction processes handle payouts and refunds within the process, and both payouts and refunds always cover the full transaction price.
This means that if you want to allow partial refunds on your marketplace, you need to add a path to the transaction process that bypasses the default payout and refund behaviors.
It is important to note that in addition to adding this transaction process path, you also need to create a system for actually managing the partial refunds and payouts in Stripe.
As a minimum viable solution, you may be able to handle payouts and refunds manually in Stripe Dashboard, as long as you take great care to calculate the correct payout and refund sums and consider the effect of any commissions.
However, if you expect to have a lot of cases involving partial refunds, for example in a case where you allow customers to return certain items, you will need to build a partial payment integration with Stripe. In that situation, you would likely need to make further modifications to your transaction process, so that you remove all payout and refund actions from your transaction process and handle all payouts and refunds, partial and full, through your custom payment integration.
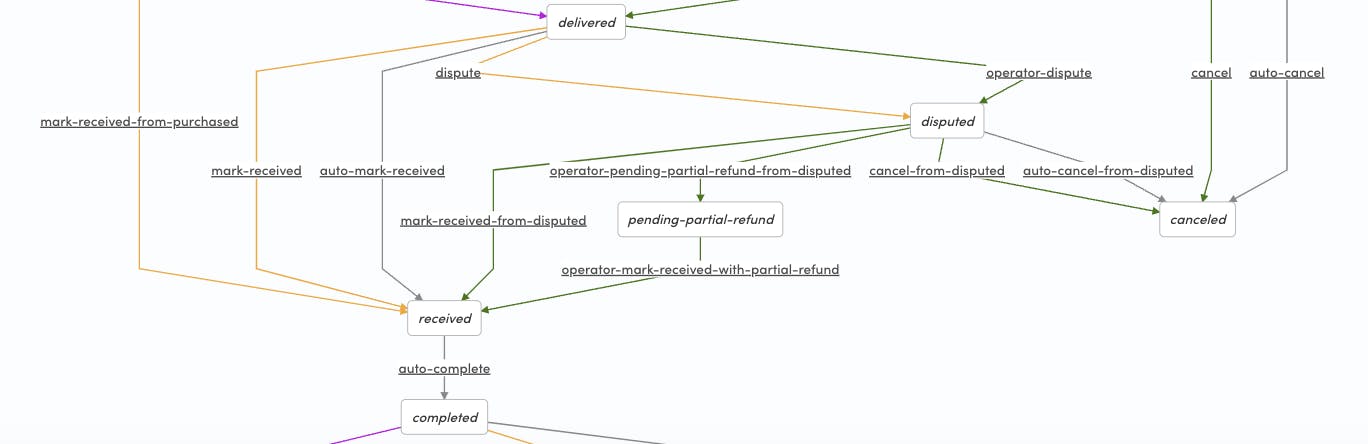
To add the bypass logic to your transaction process, you will need to add two transitions and one new state after state/disputed:
- transition/operator-pending-partial-refund-from-disputed from state/disputed to state/pending-partial-refund
- transition/operator-mark-received-with-partial-refund from state/pending-partial-refund to state/received
  {:name :transition/operator-pending-partial-refund-from-disputed
   :actor :actor.role/operator
   :actions []
   :from :state/disputed
   :to :state/pending-partial-refund}
  {:name :transition/operator-mark-received-with-partial-refund
   :actor :actor.role/operator
   :actions []
   :from :state/pending-partial-refund
   :to :state/received}
In practice, handling a manual refund with this process would work in the following manner:
- The customer disputes the transaction, and communicates with the marketplace operator to find the correct way to handle the situation
- If the operator, customer, and provider agree that a partial refund makes sense, the operator transitions the transaction with transition/operator-pending-partial-refund-from-disputed, so that the transaction does not automatically get canceled with auto-cancel-from-disputed.
- At this point, the operator (or a custom integration, if you have developed one) handles the partial refund, making a refund of some amount to the customer and a payout of another amount to the provider
- Once the refund and payout have been handled, the operator transitions the transaction with transition/operator-mark-received-with-partial-refund to state/received, so that the transaction can continue to the review stage.
If you want to send the participants a notification about the issue being resolved, you can add the notifications inside the :notifications [...] vector. Note that these notifications use an existing email template, and if you want to add a custom email, you will need to add it to the default-purchase/templates directory, and update the :template parameter in the notifications below, before pushing your changes.
  {:name :notification/order-received-from-disputed-partial-refund-customer,
   :on :transition/operator-mark-received-with-partial-refund,
   :to :actor.role/customer,
   :template :purchase-order-received-from-disputed-customer}
  {:name :notification/order-received-from-disputed-partial-refund-provider,
   :on :transition/operator-mark-received-with-partial-refund,
   :to :actor.role/provider,
   :template :purchase-order-received-from-disputed-provider}
You can see an example of the default-purchase process with these changes in this Gist.
You can have multiple different transaction processes in a Sharetribe marketplace. However, a single transaction always only uses the process with which it was started.
Let’s add the child transaction process using the Sharetribe CLI. We will add the process in your web template /ext/transaction-processes directory, so that you can include it in your version control.
When adding a fully new process, take the following steps:
- Create a new folder cart-stock-process inside /ext/transaction-processes
- In the cart-stock-process folder, add a new file process.edn, and copy the contents of this file in the new process.edn file
ext

└── transaction-processes
 		├── cart-stock-process
 		│ 		└── process.edn
 		...
- In your terminal, go to the transaction-processes folder
- In the transaction-processes folder, follow these steps to create a new process called “cart-stock-process” and create the associated alias.
After these steps, you can go to your Console > Build > Advanced > Transaction process visualizer to view the newly created process.
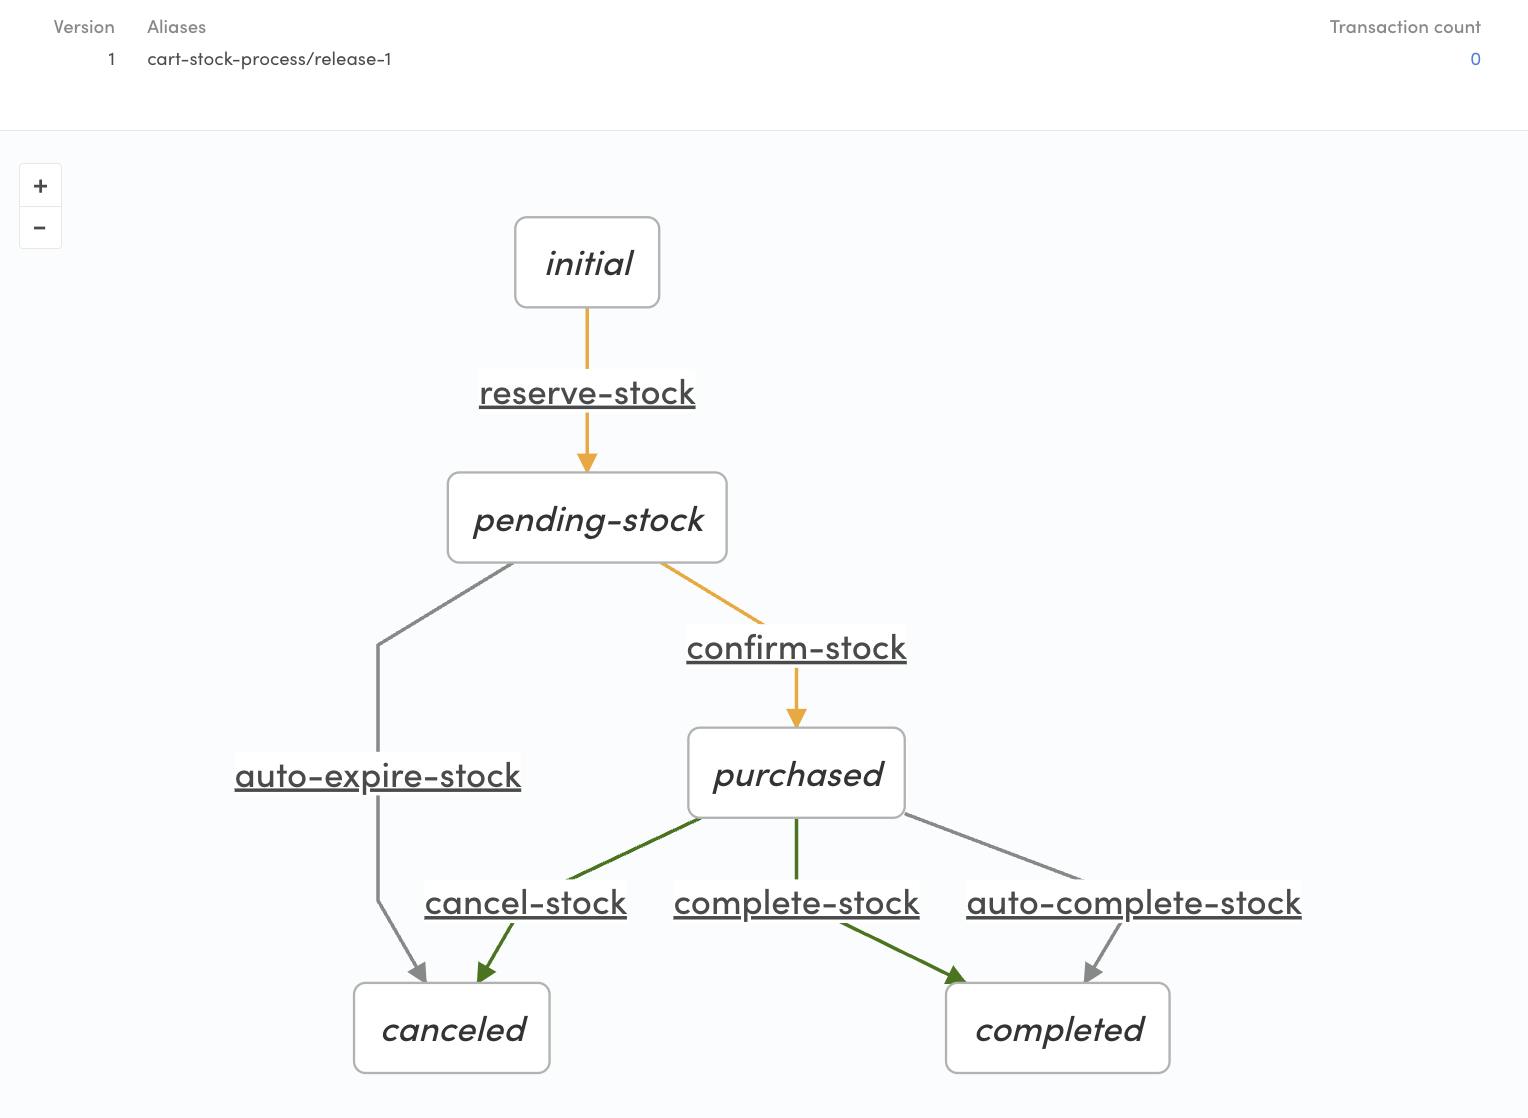
The logic of this process is fairly straightforward:
- When the transaction is first started, stock is reserved so that multiple people cannot purchase the same item at the same time
- If the payment for the main process is successfully confirmed, the stock reservation is also confirmed
- Otherwise, the stock reservation automatically expires in 15 minutes
- From state/purchased, the stock automatically completes in 60 days, and the stock reservation can then no longer be canceled.
- Before the 60 days is up, the operator can either cancel the stock reservation (in case there is a dispute) or complete it (in case there is no dispute and the main transaction completes successfully).
Now that we have made the necessary transaction process changes, we still need to reflect them in the web template itself. We need to
- update the transactionProcessPurchase.js file to include the new states and transitions we added, and
- add a new file transactionProcessCartStock.js for the newly created process.
It is good to note that we will not make changes to src/transactions/transaction.js. The default-purchase process we are modifying is already reflected in that file, and the cart stock process will not get used to initiate new transactions between a customer and a provider.
This has the added upside that the individual cart stock transactions will not show up on InboxPage, because InboxPage only shows transactions with processes listed in the transaction.js file PROCESSES array.
Update transactionProcessPurchase.js
In transactionProcessPurchase.js, we need to add the new transitions, states, and graph elements that we added to the process as well.
In the transitions object, add the following transitions:
export const transitions = {
  ...
  UPDATE_CHILD_TRANSACTIONS: 'transition/update-child-transactions',
  ...
  OPERATOR_PENDING_PARTIAL_REFUND_FROM_DISPUTED:
    'transition/operator-pending-partial-refund-from-disputed',
  OPERATOR_MARK_RECEIVED_WITH_PARTIAL_REFUND:
    'transition/operator-mark-received-with-partial-refund',
  ...
Then, in states, add the following new states:
export const states = {
...
PENDING_UPDATE_CHILD_TRANSACTIONS: 'pending-update-child-transactions',
...
PENDING_PARTIAL_REFUND: 'pending-partial-refund',
...
Finally, update the graph attribute to accurately represent the path between different states and transitions in the new process:
export const graph = {
...
  // States
  states: {
    [states.INITIAL]: {
      on: {
        [transitions.INQUIRE]: states.INQUIRY,
        [transitions.REQUEST_PAYMENT]: states.PENDING_UPDATE_CHILD_TRANSACTIONS,
      },
    },
    [states.INQUIRY]: {
      on: {
        [transitions.REQUEST_PAYMENT_AFTER_INQUIRY]: states.PENDING_UPDATE_CHILD_TRANSACTIONS,
      },
    },
    [states.PENDING_UPDATE_CHILD_TRANSACTIONS]: {
      on: {
        [transitions.UPDATE_CHILD_TRANSACTIONS]: states.PENDING_PAYMENT,
      },
    },
    ...
    [states.DISPUTED]: {
      on: {
        [transitions.AUTO_CANCEL_FROM_DISPUTED]: states.CANCELED,
        [transitions.CANCEL_FROM_DISPUTED]: states.CANCELED,
        [transitions.MARK_RECEIVED_FROM_DISPUTED]: states.RECEIVED,
        [transitions.OPERATOR_PENDING_PARTIAL_REFUND_FROM_DISPUTED]: states.PENDING_PARTIAL_REFUND,
      },
    },
    [states.PENDING_PARTIAL_REFUND]: {
      on: {
        [transitions.OPERATOR_MARK_RECEIVED_WITH_PARTIAL_REFUND]: states.RECEIVED,
      },
    },
...
Since all the transitions and states we added happen behind the scenes in a way where the customer and provider do not need to react to them, we do not need to add them into any of the helper functions in the file.
Add transactionProcessCartStock.js
Since we added a completely new transaction process, we also need to add a new transaction process file. In src/transactions, add a file transactionProcessCartStock.js and copy the contents of this file there.
src
└── transactions
 		├── transactionProcessCartStock.js
We are not using this process to initiate new main transactions between users, so we only export the following attributes:
- transitions
- states
- graph
In practice, we only use the transitions attribute outside this file, but it is a good practice to follow the convention of reflecting the transaction process transitions and states in the template as well.
In this guide, we added the necessary transaction process changes to the Sharetribe backend and the Sharetribe Web Template.
- We modified the default-purchase transaction process: we removed stock handling, added a transition and state to link child transactions, and added transitions to bypass automatic payout or refund in case of a partial refund
- We added a new child transaction process for handling stock for individual listings
- We modified the template transaction process handling to accommodate these process changes
In the next article in this series, we will set up a checkout flow for the cart!