Viewing cart items
Different e-commerce sites have a variety of ways to view the items in your cart. In this blog series, we are diving into the ins and outs of building a multi-vendor shopping cart with single-vendor checkout using the Sharetribe Developer Platform.
Mar 4, 2024

Note: The implementation in this article is built on top of Sharetribe Web Template v4.1.0, so if you are working on a later version, you may need to make some adjustments.
Different e-commerce sites have a variety of ways to view the items in your cart. Some stores have a modal overlay, some stores might have a side panel sliding into and out of view, and some stores have a dedicated page.
In this guide, we will create a dedicated page into the Sharetribe Web Template where customers can view their cart items. As we are working with single vendor checkout, we will show carts grouped by provider, so that we can eventually show an order breakdown with prices, as well as a “Buy now” button for the specified provider’s cart. We will also add the page to our navigation.
We need to make the following changes:
- Add a new container, CartPage, to the application
- Add a CartCard component for viewing individual items
- Add a CartDeliveryForm component for selecting a delivery method for the cart order
- Connect the CartPage container to application state, routing, and navigation
- Remove the toggleCart thunk from ListingPage.duck.js and use the CartPage.duck.js toggleCart thunk instead on ListingPageCarousel.js
You can find all code examples used in this guide in this Gist.
This guide continues from the previous article on adding items to cart – if you have not already, read it first!
To get started, let’s add the following directories and files to your application:
- Add new directory CartPage in src/containers
- In the CartPage directory, add a new directory CartCard
- In the CartCard directory, add CartCard.js and CartCard.module.css
- In the CartPage directory, add CartDeliveryForm.js, CartPage.duck.js, CartPage.js, and CartPage.module.css
src / containers
 	├── CartPage
 			├── CartCard
	 		│ 	├── CartCard.js
		 	│ 	└── CartCard.module.css
 			├── CartDeliveryForm.js
	 		├── CartPage.duck.js
		 	├── CartPage.js
 			└── CartPage.module.css
What do these files do?
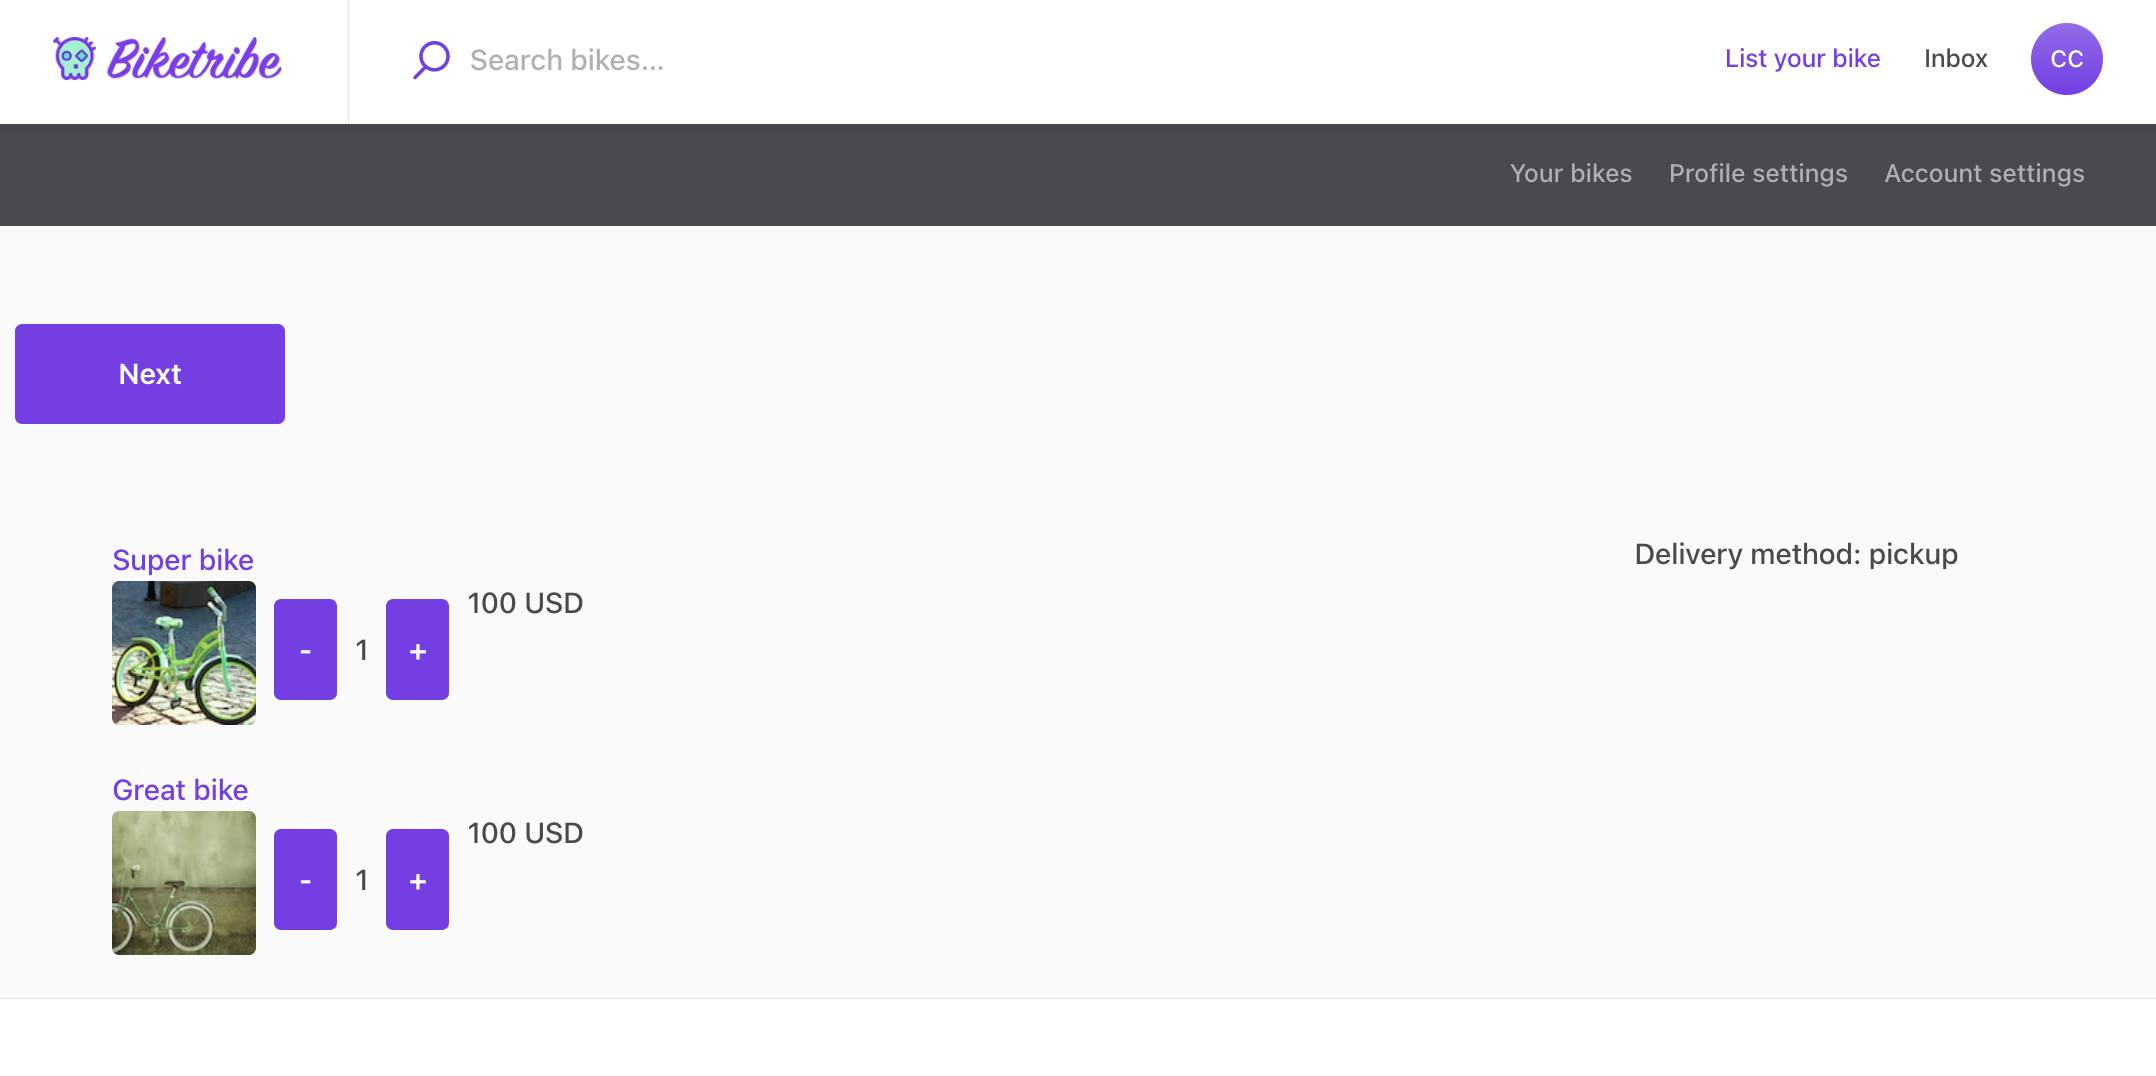
CartPage.js shows the listings you have selected from a specific seller.
- If you have listings in your cart from multiple sellers, you can see a “Next seller” button.
- You can also see a line item breakdown and a “Buy now” button, although these won’t show up until you have updated your line item calculation – we will do this in a future blog post.
- CartPage also checks the delivery options for the listings in the author’s cart. If only one delivery option is available across the listings – for example three listings all allow pickup but only one allows shipping – then the shared one is automatically saved to the cart:
{
  "63e3a8f4-84df-4dd7-995b-a876fec5a3e9": {
    "65ca03f1-9331-429a-b1f5-839bea317bf5": {
      "count": 2
    },
    "deliveryMethod": "pickup"
  }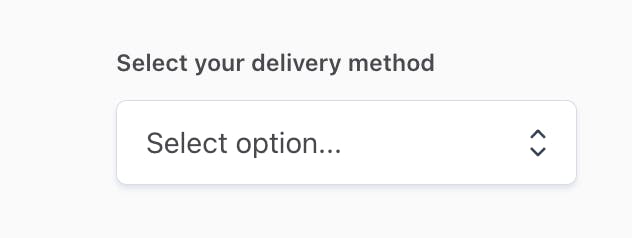
}- If all listings in the cart allow both pickup and shipping, the page shows CartDeliveryForm, and only saves the delivery information after the user has made a selection with the form.

CartPage.duck.js contains all the state management and SDK calls you need to make related to shopping cart handling in the application. They are connected to CartPage.js with mapStateToProps and mapDispatchToProps.
CartPage.module.css contains styling for the CartPage component.
CartDeliveryForm.js renders the delivery method selection input for carts that have both shipping and pickup available.
CartCard.js contains the details of a single listing in the cart, as well as an AddToCartButton to increase or decrease the number of that specific item in the cart

CartCard.module.css contains styling for the CartCard component.
Merely adding the files in your codebase is not enough to take the CartPage container into use. In addition, you will need to make the following changes:
- Import and export CartPage in src/containers/reducers.js
import CartPage from './CartPage/CartPage.duck';
...
export {
  CartPage,
...- Import the cart page loader, and add it to getPageDataLoadingAPI, in src/containers/pageDataLoadingAPI.js
import { loadData as CartPageLoader } from './CartPage/CartPage.duck';…
const getPageDataLoadingAPI = () => {
  return {
    ...
    CartPage: {
      loadData: CartPageLoader,
    },
...- Add an import and a route for CartPage in src/routing/routeConfiguration.js
const CartPage = loadable(() => import(/* webpackChunkName: "CartPage" */ '../containers/CartPage/CartPage'));
...
    {
      path: '/cart',
      name: 'CartPage',
      auth: true,
      authPage: 'LoginPage',
      component: CartPage,
      loadData: pageDataLoadingAPI.CartPage.loadData,
    },
...
At this point, you can also add the necessary marketplace texts used in this guide into your en.json file or your Console Marketplace texts editor.
"CartPage.deliveryShipping": "Delivery method: shipping",
"CartPage.deliveryPickup": "Delivery method: pickup",
"CartPage.deliveryNotSet": "Delivery method not set. Please contact provider.",
"CartPage.nextAuthor": "Next",
"CartPage.optionSelect": "Select option...",
"CartPage.optionShipping": "Shipping",
"CartPage.optionPickup": "Pickup",
"CartPage.pageTitleAuthor": "Your cart from {name}",
"CartPage.pageTitleNoItems": "No items in cart",
"CartPage.selectDeliveryMethod": "Select your delivery method",
"TopbarDesktop.cart": "Cart",
"TopbarDesktop.yourCartLink": "Cart",
"TopbarMobileMenu.cartLink": "Cart",
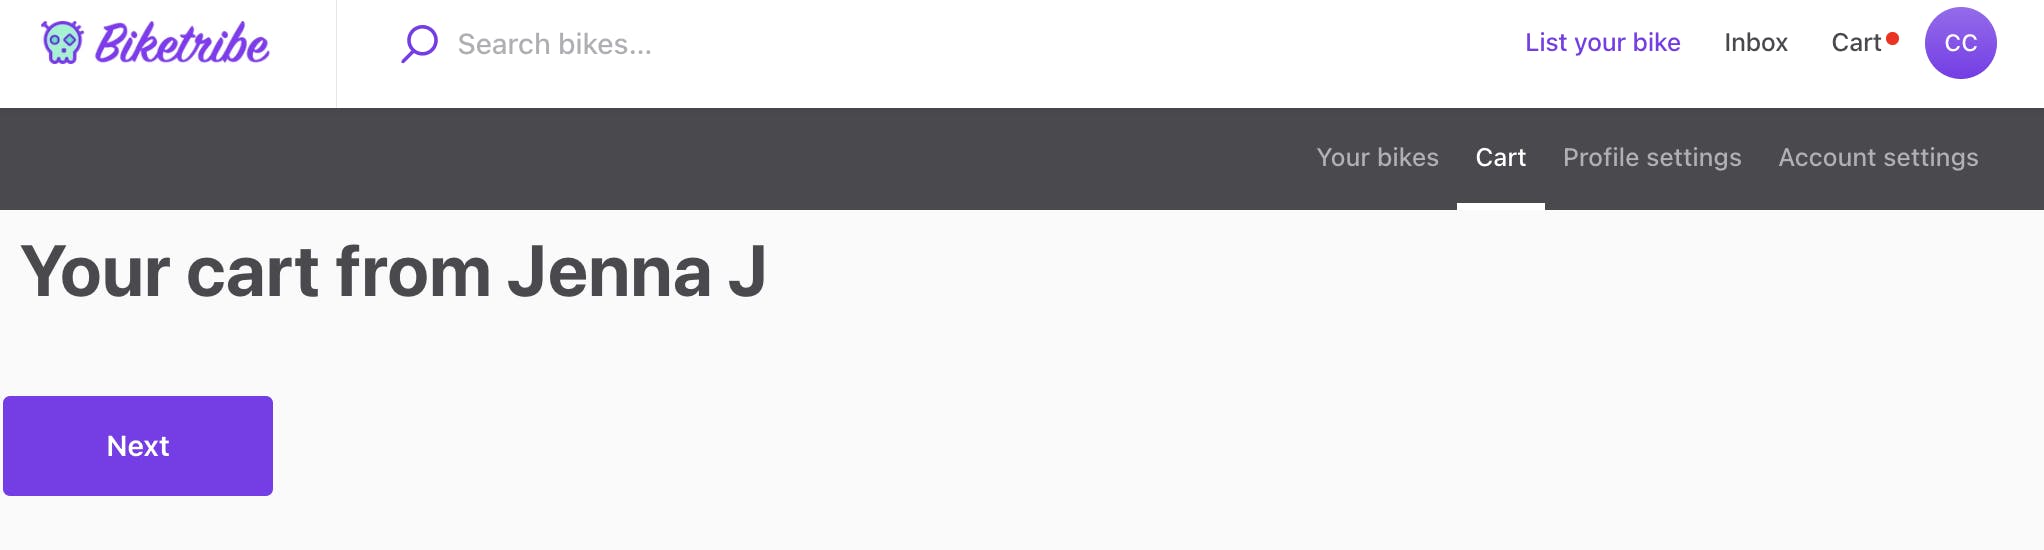
"UserNav.cart": "Cart"Now, if you are running the application with yarn run dev in localhost:3000 and visit localhost:3000/cart, you should see the cart page in action.
Note that at this point you will see an error in dev tools console: “ReferenceError: cartTransactionLineItems is not defined”. This is because we have not yet added line item handling to the application, so the import from /util/api to CartPage.duck.js is commented out. We will add the line item handling and deal with the error in a future blog post.
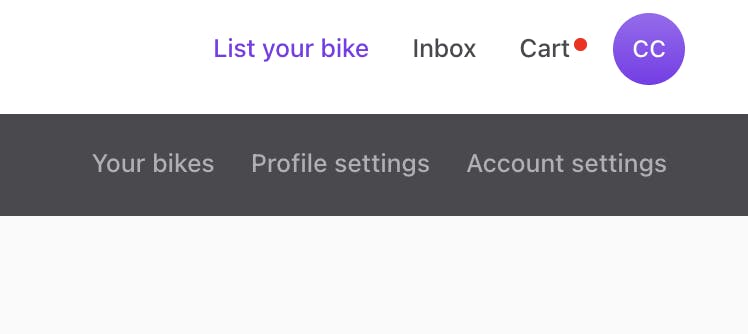
Now that the cart page exists, let’s add it to the app navigation. We will add a cart navigation link into three places:
- In the Top Bar, next to the Inbox link
- In the profile menu that opens when a user clicks on their profile image
- In the user navigation bar, when the user is viewing pages available from the profile menu
Add cart link to top bar
To show a cart link in the top bar, let’s add the following elements in src/containers/TopbarContainer/Topbar/TopbarDesktop/TopbarDesktop.js.
src / containers
	├── TopbarContainer
			├── Topbar
			├── TopbarDesktop
			├── TopbarDesktop.js
First, create a CartLink component alongside the other link components.
const CartLink = ({ notificationCount }) => {
  const notificationDot = notificationCount > 0 ? <div className={css.notificationDot} /> : null;
  return (
    <NamedLink
      className={css.topbarLink}
      name="CartPage"
    >
      <span className={css.topbarLinkLabel}>
        <FormattedMessage id="TopbarDesktop.cart" />
        {notificationDot}
      </span>
    </NamedLink>
  );
};
Then, inside the actual TopbarDesktop component in the same file, parse the user’s cart from their private data and use the CartLink component when necessary.
const { cart } = currentUser?.attributes.profile.privateData || {};
  const cartCount = cart && Object.keys(cart).length || 0
  const cartLinkMaybe = authenticatedOnClientSide ? (
    <CartLink
    notificationCount={cartCount}
    />
  ) : null;
...
  return (
    <nav className={classes}>
	...
      {inboxLinkMaybe}
      {cartLinkMaybe} {/* add cartLinkMaybe */}
      {profileMenuMaybe}
     ...
    </nav>
Now, you can see the cart link in the top bar:
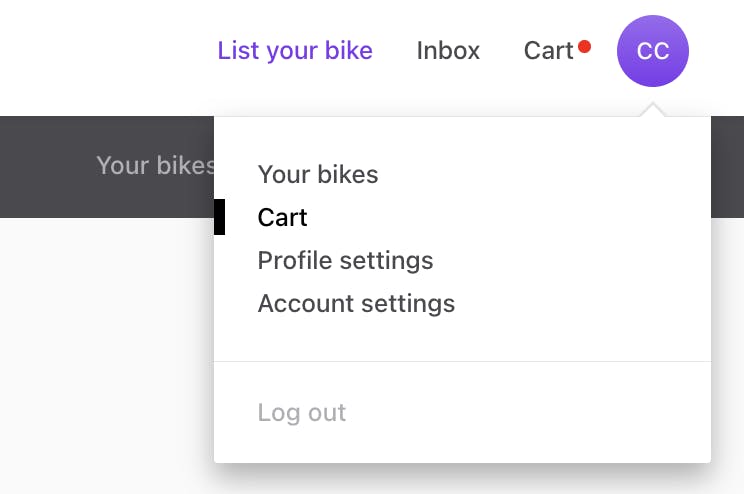
Add cart link to profile menu
In the same TopbarDesktop.js file, add a new MenuItem to ProfileMenu:
```
const ProfileMenu = ({ currentPage, currentUser, onLogout }) => {
  ...
  return (
    <Menu>
      ...
        <MenuItem key="CartPage">
          <NamedLink
            className={classNames(css.menuLink, currentPageClass('CartPage'))}
            name="CartPage"
          >
            <span className={css.menuItemBorder} />
            <FormattedMessage id="TopbarDesktop.yourCartLink" />
          </NamedLink>
        </MenuItem>
      ...
    </Menu>
  );
};
```
Now, when you click open the profile menu, you can see a link to the cart page:
Add cart link to navigation bar
Finally, let’s add the cart page link to the navigation bar that’s visible from the profile menu pages. Add the following snippet to src/components/UserNav/UserNav.js after the ManageListingsPage tab:
src / components
├── UserNav
		├── UserNav.js
  const tabs = [
    {
      ...
    },
    {
      text: <FormattedMessage id="UserNav.cart" />,
      selected: currentPage === 'CartPage',
      linkProps: {
        name: 'CartPage',
      },
    },
...
Now you can see the cart link also in the navigation bar:
In the previous part of this series, we added a toggleCart action in ListingPage.duck.js, and imported it to ListingPageCarousel.js to use in AddToCartButton functionality. The CartPage.duck.js file we added to the component has a slightly enhanced version of toggleCart, so we can use that instead.
Remove the following functions from ListingPage.duck.js:
- toggleCart
- listingIsInCart
- getNewCart
Then, on ListingPageCarousel.js, remove toggleCart from the ListingPage.duck.js import. Add this row to the page:
import { toggleCart } from '../CartPage/CartPage.duck.js';Now, you can navigate to a product listing’s page, and verify that the AddToCartButton still works.
In this guide, we made the following changes:
- We added a new container, CartPage, to the application
- We added a CartCard component for viewing individual items
- We added a CartDeliveryForm component for selecting a delivery method for the cart order
- We connected the CartPage container to application state, routing, and navigation
- We removed the toggleCart thunk from ListingPage.duck.js and use the CartPage.duck.js toggleCart thunk instead on ListingPageCarousel.js
In the next part of this series, we will add the correct price calculations for our shopping cart!