Create a new transaction process
In this tutorial, we’ll create a new transaction process for the Biketribe marketplace. It will be an instant booking process where the booking is accepted automatically upon making the booking, without the provider needing to take action. We will also update the client app to use the new process.
Create a transaction process
First, we will use an existing instant booking process to create a similar but separate transaction process. This will allow us to make changes to the transaction behavior.
Clone Sharetribe example processes repository
Writing a process.edn file and the email templates from scratch is a fairly tedious task. We’ll make our life a bit easier by cloning the Sharetribe example processes repository :
git clone https://github.com/sharetribe/example-processes.gitAnd then we move to that directory:
cd example-processes/There are several processes listed in that directory . The one we are going to use as a basis for our new process is instant-booking.
Create a new process
To get up and running with Sharetribe CLI, see the Getting started with Sharetribe CLI guide in Dev Docs.
Let’s see what the subcommand help gives us about process create:
$ flex-cli help process create
create a new transaction process

USAGE
  $ flex-cli process create

OPTIONS
  --path=LOCAL_PROCESS_DIR          path to the directory where the process.edn file is
  --process=PROCESS_NAME            name for the new process that is created
  -m, --marketplace=MARKETPLACE_ID  marketplace identifier
So, if we would like to create a new process, we need to specify a path to the local directory. That directory should contain process definition (process.edn file) and templates subdirectory containing correct email templates for the email notifications defined in that process. We already have those since we cloned the example-processes repository.
Then we just need to define a name to that process and specify the marketplace environment, where the new process should be created. We’ll use “biketribe-instant-booking”. Our final command for the biketribe-dev marketplace would look like this:
flex-cli process create --path=./instant-booking --process=biketribe-instant-booking --marketplace=biketribe-devYou need to modify the command to use your own dev marketplace ID, which you can find in Sharetribe Console.
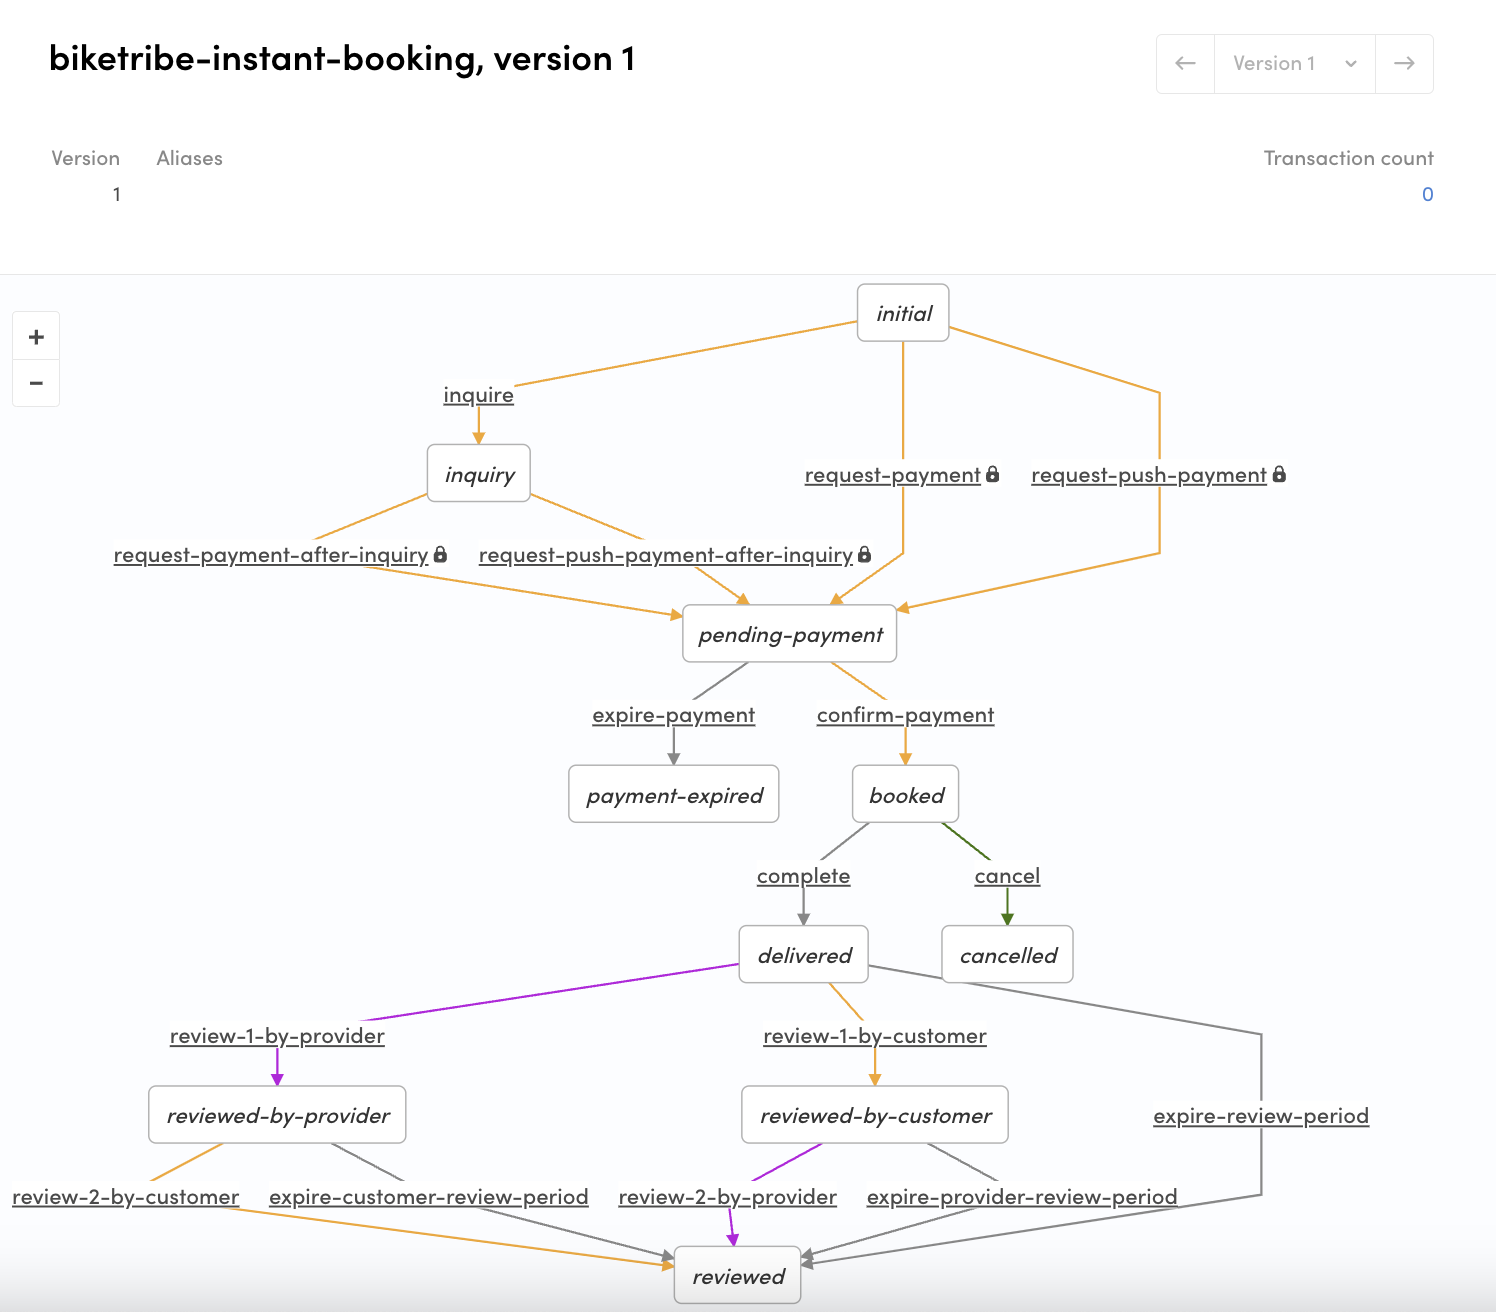
After executing that command, you can go to the Sharetribe Console: Build > Advanced > Transaction process visualizer and see that the “biketribe-instant-booking” process is there.
Create process alias
The process is created, but we still can’t reference that process from our client app, since it doesn’t have process alias set. We can create an alias for our new process with Sharetribe CLI command:
flex-cli process create-alias --process=biketribe-instant-booking --version=1 --alias=release-1 --marketplace=biketribe-devWith that command, we are creating a new alias “release-1” and point it to the previously created process and its version 1.
After that you should see the alias in the Console:
biketribe-instant-booking/release-1.
At this point, we have essentially just copied the default process under a different name.
Modify transaction process
The instant booking process supports both regular and push payments by default. However, since we will not be integrating push payments to our marketplace, we will remove those transitions to simplify the process.
To make this change, we need to update the transaction process.
Pull the existing transaction process
Before we modify our transaction process, it’s better to ensure that we have most the up-to-date version of the process. You can fetch any process version with Sharetribe CLI:
flex-cli process pull --process=biketribe-instant-booking --alias=release-1 --path=./biketribe-instant-booking --marketplace=biketribe-devNow, we can open the process.edn file from the new directory with a text editor and inspect it a bit. You can get familiar with edn format by reading our reference document about it.
The push payment related transitions in the process are
:transition/request-push-payment and
:transition/request-push-payment-after-inquiry. We can remove these
transitions from the process, since we are sure we will not be using
push payments on our marketplace.
  {:name :transition/request-push-payment,
   :actor :actor.role/customer,
   :actions
   [{:name :action/update-protected-data}
    {:name :action/create-pending-booking, :config {:type :time}}
    {:name :action/privileged-set-line-items}
    {:name :action/stripe-create-payment-intent-push}],
   :to :state/pending-payment,
   :privileged? true}
   ;;...
   {:name :transition/request-push-payment-after-inquiry,
   :actor :actor.role/customer,
   :actions
   [{:name :action/update-protected-data}
    {:name :action/create-pending-booking, :config {:type :time}}
    {:name :action/privileged-set-line-items}
    {:name :action/stripe-create-payment-intent-push}],
   :from :state/inquiry,
   :to :state/pending-payment,
   :privileged? true}
Push a new transaction process
Updating a transaction process is a similar process than creating a new one. This time we use push command:
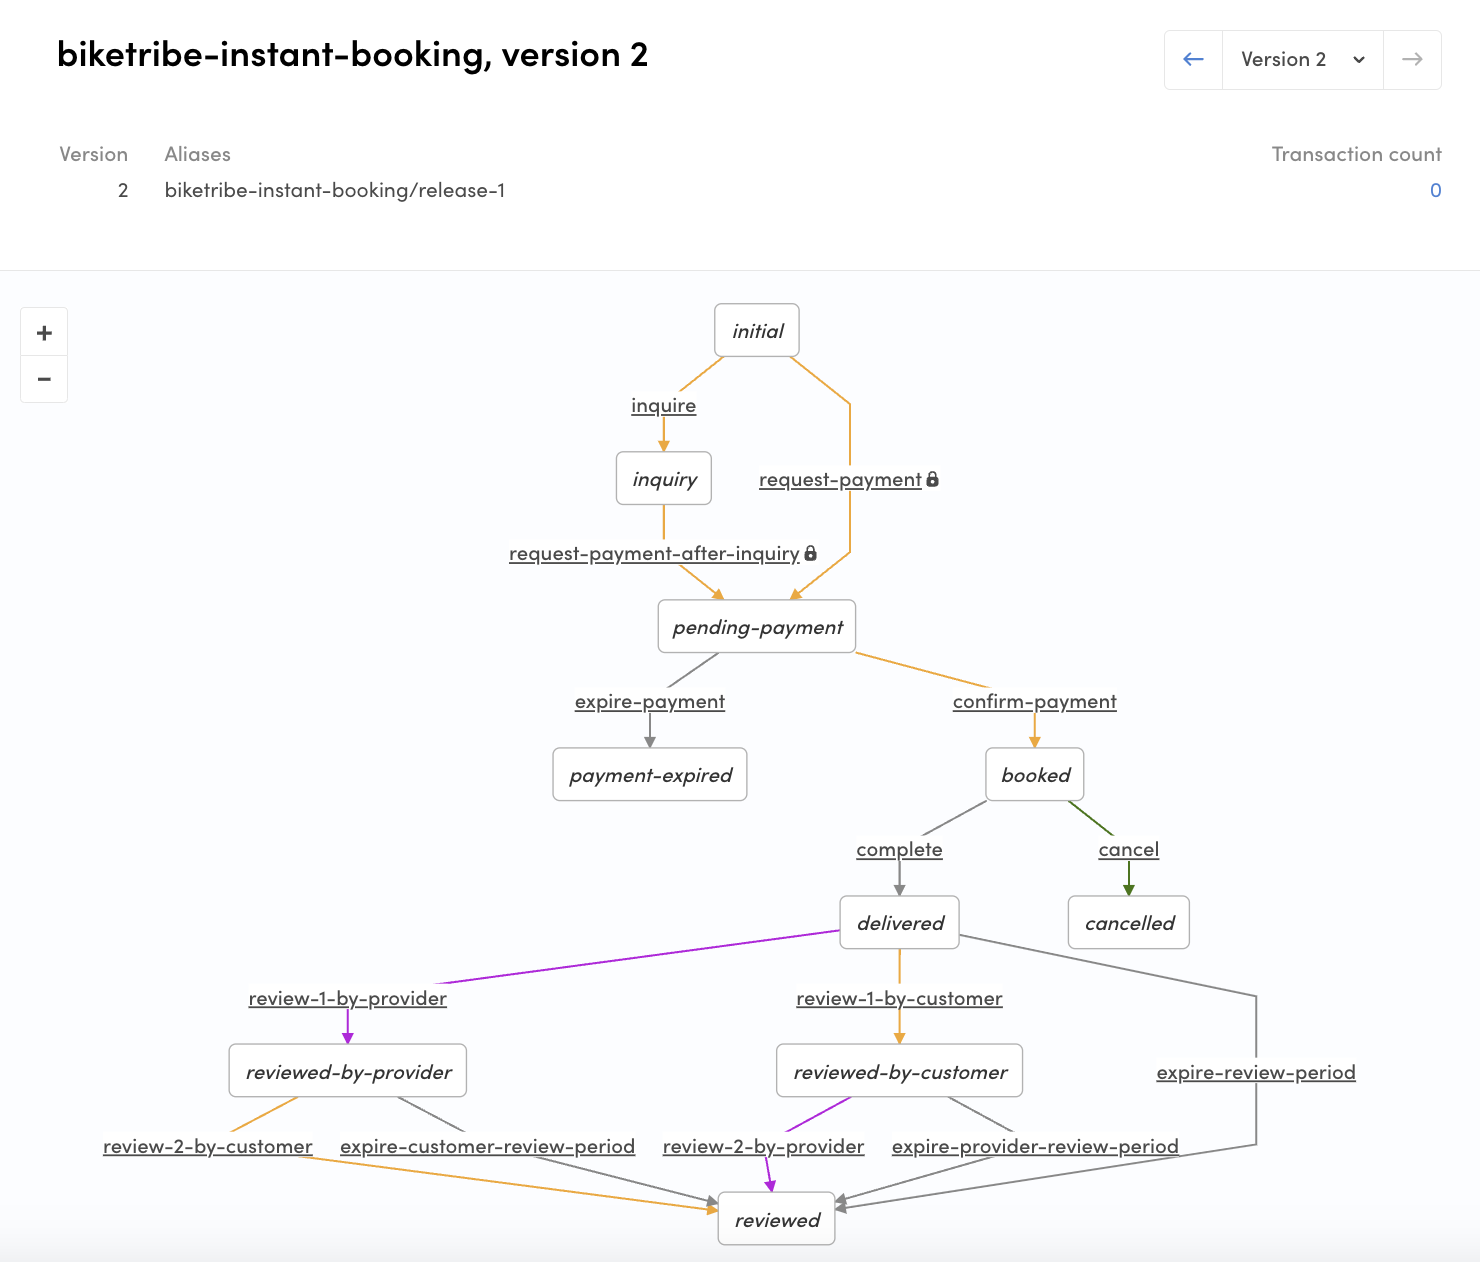
flex-cli process push --process=biketribe-instant-booking --path=./biketribe-instant-booking --marketplace=biketribe-devAnd if you go to Console, you notice that there’s a new version (2) created of the biketribe-instant-booking process. However, the alias is still pointing to the first version. We need to update the alias too:
flex-cli process update-alias --alias=release-1 --process=biketribe-instant-booking --version=2 --marketplace=biketribe-devNow, if you open the process graph from the Sharetribe Console, you’ll see that the push payment transitions have been removed from the process.
Update client app
After we have changed the transaction process, we also need to take the new process into use in our client app.
In this tutorial, we assume that we don’t need to care about ongoing transactions. It is important to consider this before taking a new process version into use. When a transaction is created, it is tied to the version of the process that was in use at that time. Therefore, you might need to update your client app so that it supports several different process versions.
Update configListing.js
└── src
    └── config
        └── configListing.js
The configListing.js file details an array listing types, each with a unique transaction type. The transaction type defines the transaction process and alias being used, as well as the unit type, such as day or night.
export const listingTypes = [
  // // Here are some examples of listingTypes
  // // TODO: SearchPage does not work well if both booking and product selling are used at the same time
  // {
  //   listingType: 'daily-booking',
  //   label: 'Daily booking',
  //   transactionType: {
  //     process: 'default-booking',
  //     alias: 'default-booking/release-1',
  //     unitType: 'day',
  //   },
  //   availabilityType: 'oneSeat',
  //   defaultListingFields: {
  //     location: true,
  //     payoutDetails: true,
  //   },
  // },
  // {
  //   listingType: 'nightly-booking',
  //   label: 'Nightly booking',
  //   transactionType: {
  //     process: 'default-booking',
  //     alias: 'default-booking/release-1',
  //     unitType: 'night',
  //   },
  // },
  /* ... */
Let’s use the new biketribe-instant-booking process as the daily booking process:
-  // {
-  //   listingType: 'daily-booking',
-  //   label: 'Daily booking',
-  //   transactionType: {
-  //     process: 'default-booking',
-  //     alias: 'default-booking/release-1',
-  //     unitType: 'day',
-  //   },
-  //   availabilityType: 'oneSeat',
-  //   defaultListingFields: {
-  //     location: true,
-  //     payoutDetails: true,
-  //   },
-  // },
  {
+   listingType: 'instant-booking',
+   label: 'Instant booking',
+   transactionType: {
+     process: 'biketribe-instant-booking',
+     alias: 'biketribe-instant-booking/release-1',
+     unitType: 'day',
+   },
+   availabilityType: 'oneSeat',
+   defaultListingFields: {
+     location: true,
+     payoutDetails: true,
+   },
  },
Use built-in listing configuration alongside hosted
If the template uses listing type configurations from Sharetribe Console by default, it ignores the changes made in configListing.js. We will need to set the template to use the default listing type configurations alongside the hosted ones next.
└── src
    └── util
└── configHelpers.jsconst mergeListingConfig = (hostedConfig, defaultConfigs) => {
/* ... */
const shouldMerge = mergeDefaultTypesAndFieldsForDebugging(false);
- const listingTypes = shouldMerge
- ? union(hostedListingTypes, defaultListingTypes, 'listingType')
- : hostedListingTypes;
+ const listingTypes = union(hostedListingTypes, defaultListingTypes, 'listingType');
const listingFields = shouldMerge
? union(hostedListingFields, defaultListingFields, 'key')
: hostedListingFields;
/* ... */Now, both the built-in listing types and the Sharetribe Console created listing types are in use. However, the app does not yet know how to handle the new process, so we need to update our transaction process handling to use the process when creating a listing.
Create transaction process graph file
The web app needs to understand how the connected transaction process works and, therefore, the process graph is actually duplicated in the current version of the template.
└── src
    └── transactions
        └── transactionProcessBooking.js
Since our new process is very similar to the default one, we can duplicate the transactionProcessBooking.js file into a new file in the same folder named transactionProcessInstantBooking.js and make the necessary changes.
└── src
    └── transactions
        └── transactionProcessInstantBooking.js
The instant booking process is a simplified version of the default booking process, and it omits a number of states and transitions present in the default process.
Step 1: Update transitions in the transitions object, and states in the states object:
export const transitions = {
  // When a customer makes a booking to a listing, a transaction is
  // created with the initial request-payment transition.
  // At this transition a PaymentIntent is created by Marketplace API.
  // After this transition, the actual payment must be made on client-side directly to Stripe.
  REQUEST_PAYMENT: 'transition/request-payment',

  // A customer can also initiate a transaction with an inquiry, and
  // then transition that with a request.
  INQUIRE: 'transition/inquire',
  REQUEST_PAYMENT_AFTER_INQUIRY:
    'transition/request-payment-after-inquiry',

  // Stripe SDK might need to ask 3D security from customer, in a separate front-end step.
  // Therefore we need to make another transition to Marketplace API,
  // to tell that the payment is confirmed.
  CONFIRM_PAYMENT: 'transition/confirm-payment',

  // If the payment is not confirmed in the time limit set in transaction process (by default 15min)
  // the transaction will expire automatically.
  EXPIRE_PAYMENT: 'transition/expire-payment',

  // Admin can also cancel the transition.
  CANCEL: 'transition/cancel',

  // The backend will mark the transaction completed.
  COMPLETE: 'transition/complete',

  // Reviews are given through transaction transitions. Review 1 can be
  // by provider or customer, and review 2 will be the other party of
  // the transaction.
  REVIEW_1_BY_PROVIDER: 'transition/review-1-by-provider',
  REVIEW_2_BY_PROVIDER: 'transition/review-2-by-provider',
  REVIEW_1_BY_CUSTOMER: 'transition/review-1-by-customer',
  REVIEW_2_BY_CUSTOMER: 'transition/review-2-by-customer',
  EXPIRE_CUSTOMER_REVIEW_PERIOD:
    'transition/expire-customer-review-period',
  EXPIRE_PROVIDER_REVIEW_PERIOD:
    'transition/expire-provider-review-period',
  EXPIRE_REVIEW_PERIOD: 'transition/expire-review-period',
};export const states = {
INITIAL: 'initial',
INQUIRY: 'inquiry',
PENDING_PAYMENT: 'pending-payment',
PAYMENT_EXPIRED: 'payment-expired',
BOOKED: 'booked',
CANCELED: 'canceled',
DELIVERED: 'delivered',
REVIEWED: 'reviewed',
REVIEWED_BY_CUSTOMER: 'reviewed-by-customer',
REVIEWED_BY_PROVIDER: 'reviewed-by-provider',
};Step 2: Update the process graph.
Variable stateDescription
contains the same process graph in Xstate format. As the first thing,
you could also update the id of the graph.
The mandatory change is that we need to add the new state and transition into that process description:
export const graph = {
  // id is defined only to support Xstate format.
  // However if you have multiple transaction processes defined,
  // it is best to keep them in sync with transaction process aliases.
+ id: 'biketribe-instant-booking/release-1',
  /* ... */
  // States
  states: {
    [states.INITIAL]: {
      on: {
        [transitions.INQUIRE]: states.INQUIRY,
        [transitions.REQUEST_PAYMENT]: states.PENDING_PAYMENT,
      },
    },
    [states.INQUIRY]: {
      on: {
        [transitions.REQUEST_PAYMENT_AFTER_INQUIRY]: states.PENDING_PAYMENT,
      },
    },

    [states.PENDING_PAYMENT]: {
      on: {
        [transitions.EXPIRE_PAYMENT]: states.PAYMENT_EXPIRED,
-       [transitions.CONFIRM_PAYMENT]: states.PREAUTHORIZED,
+       [transitions.CONFIRM_PAYMENT]: states.BOOKED,
      },
    },

    [states.PAYMENT_EXPIRED]: {},
-   [states.PREAUTHORIZED]: {
-     on: {
-       [transitions.DECLINE]: states.DECLINED,
-       [transitions.OPERATOR_DECLINE]: states.DECLINED,
-       [transitions.EXPIRE]: states.EXPIRED,
-       [transitions.ACCEPT]: states.ACCEPTED,
-       [transitions.OPERATOR_ACCEPT]: states.ACCEPTED,
-     },
-   },

-   [states.DECLINED]: {},
-   [states.EXPIRED]: {},
-   [states.ACCEPTED]: {
+   [states.BOOKED]: {
      on: {
        [transitions.CANCEL]: states.CANCELED,
        [transitions.COMPLETE]: states.DELIVERED,
-       [transitions.OPERATOR_COMPLETE]: states.DELIVERED,
      },
    },

    [states.CANCELED]: {},
    [states.DELIVERED]: {
    /* ... */
Step 3: Update relevant helper functions.
- isRelevantPastTransition needs to be updated
// Check if a transition is the kind that should be rendered
// when showing transition history (e.g. ActivityFeed)
// The first transition and most of the expiration transitions made by system are not relevant
export const isRelevantPastTransition = (transition) => {
  return [
    transitions.CANCEL,
    transitions.COMPLETE,
    transitions.CONFIRM_PAYMENT,
    transitions.REVIEW_1_BY_CUSTOMER,
    transitions.REVIEW_1_BY_PROVIDER,
    transitions.REVIEW_2_BY_CUSTOMER,
    transitions.REVIEW_2_BY_PROVIDER,
  ].includes(transition);
};
Update transaction.js
We then need to import and use transactionProcessInstantBooking.js in the transaction.js file. This file determines the processes that are supported in the application.
└── src
    └── transactions
        └── transaction.js
Let’s first import the new process and export its name as a constant.
  import * as log from '../util/log';
  import * as purchaseProcess from './transactionProcessPurchase';
  import * as bookingProcess from './transactionProcessBooking';
  import * as inquiryProcess from './transactionProcessInquiry';
  import * as negotiationProcess from './transactionProcessNegotiation';
  import * as downloadProcess from './transactionProcessDownload';
+ import * as instantProcess from './transactionProcessInstantBooking';

  export const ITEM = 'item';
  export const DAY = 'day';
  export const NIGHT = 'night';
  export const HOUR = 'hour';
  export const FIXED = 'fixed';
  export const INQUIRY = 'inquiry';
  export const OFFER = 'offer'; // The unitType 'offer' means that provider created the listing on default-negotiation process
  export const REQUEST = 'request'; // The unitType 'request' means that customer created the listing on default-negotiation process
  export const FILE = 'file';


  // Then names of supported processes
  export const PURCHASE_PROCESS_NAME = 'default-purchase';
  export const BOOKING_PROCESS_NAME = 'default-booking';
  export const INQUIRY_PROCESS_NAME = 'default-inquiry';
  export const NEGOTIATION_PROCESS_NAME = 'default-negotiation';
  export const DOWNLOAD_PROCESS_NAME = 'default-download';
+ export const INSTANT_PROCESS_NAME = 'biketribe-instant-booking';
Then, we will add our new instant process to the array of supported
processes, and allow it to handle all time based unit types. Our new
listing type uses unitType: day, and adding all time-based unit types
in this configuration allows us to create other listing types that use
the same process with other unit types.
const PROCESSES = [
  {
    name: PURCHASE_PROCESS_NAME,
    alias: `${PURCHASE_PROCESS_NAME}/release-1`,
    process: purchaseProcess,
    unitTypes: [ITEM],
  },
  {
    name: BOOKING_PROCESS_NAME,
    alias: `${BOOKING_PROCESS_NAME}/release-1`,
    process: bookingProcess,
    unitTypes: [DAY, NIGHT, HOUR, FIXED],
  },
  {
    name: INQUIRY_PROCESS_NAME,
    alias: `${INQUIRY_PROCESS_NAME}/release-1`,
    process: inquiryProcess,
    unitTypes: [INQUIRY],
  },
  {
    name: NEGOTIATION_PROCESS_NAME,
    alias: `${NEGOTIATION_PROCESS_NAME}/release-1`,
    process: negotiationProcess,
    unitTypes: [OFFER, REQUEST],
  },
  {
    name: DOWNLOAD_PROCESS_NAME,
    alias: `${DOWNLOAD_PROCESS_NAME}/release-1`,
    process: downloadProcess,
    unitTypes: [FILE],
  },
+ {
+   name: INSTANT_PROCESS_NAME,
+   alias: `${INSTANT_PROCESS_NAME}/release-1`,
+   process: instantProcess,
+   unitTypes: [DAY, NIGHT, HOUR, FIXED],
+ },
];
Finally, we need to update the isBookingProcess helper. We need to add the new process name to the list used to determine which processes handle bookings, since we are adding a booking related process.
This helper is used in multiple places in the template, such as in the ListingCard and OrderPanel components, and on checkout page, listing editing page, and transaction page.
export const isBookingProcess = processName => {
const latestProcessName = resolveLatestProcessName(processName);
const processInfo = PROCESSES.find(process => process.name === latestProcessName);
+ return [BOOKING_PROCESS_NAME, INSTANT_PROCESS_NAME].includes(processInfo?.name);
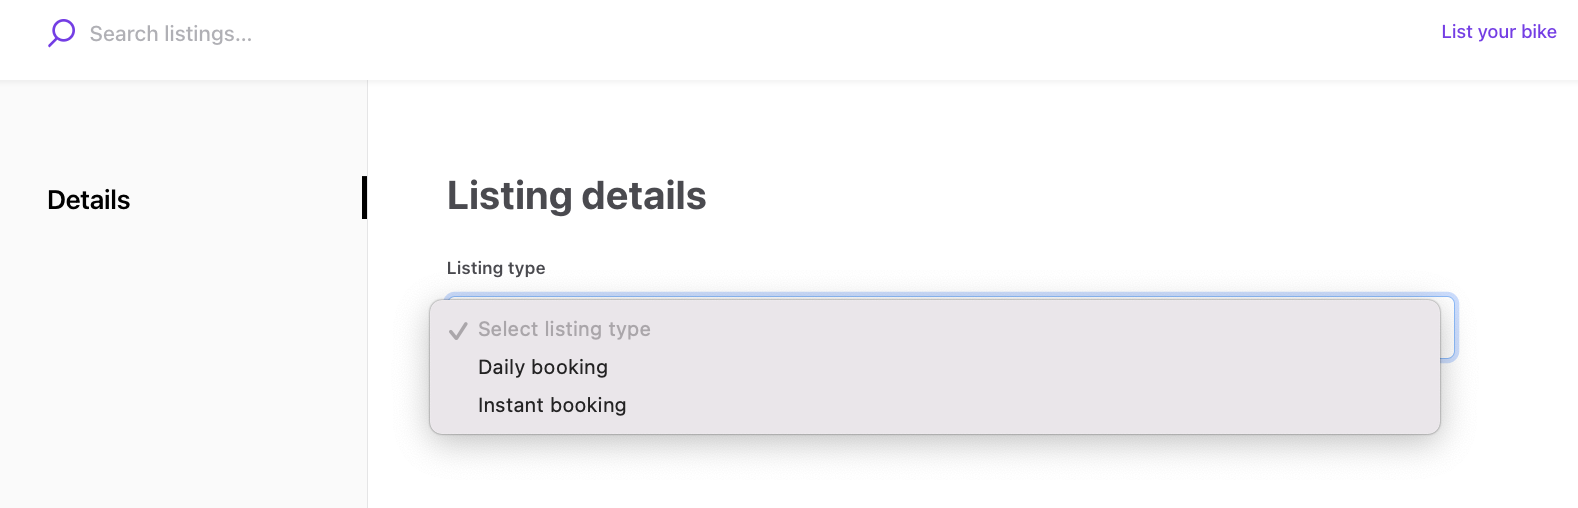
};Now if you start creating a new listing, you will see a dropdown of listing types. One of the listing types comes from Sharetribe Console, and the other comes from our built-in configuration.
The next step is to determine how this transaction process data is used. By default, the template has two pages that use transaction process data to show different UI elements depending on the transaction’s state: InboxPage and TransactionPage.
Update InboxPage and TransactionPage state data
└── src
    └── containers
        └── InboxPage
            └── InboxPage.stateData.js
        └── TransactionPage
            └── TransactionPage.stateData.js
These files compile the transaction process specific state data mappers that check the state of the transaction and inject additional data that is needed in the corresponding container for each state.
Our process change does not add a new state or new transitions. Therefore, we can use the default booking process state data mapper for our new process on both Inbox Page and Transaction Page.
In both these files, we can import the isBookingProcess helper function we modified earlier, so we can update the getStateData function in the file to use the helper.
import {
- BOOKING_PROCESS_NAME,
+ isBookingProcess,
  INQUIRY_PROCESS_NAME,
  PURCHASE_PROCESS_NAME,
  NEGOTIATION_PROCESS_NAME,
  DOWNLOAD_PROCESS_NAME,
  resolveLatestProcessName,
  getProcess,
} from '../../transactions/transaction';
if (processName === PURCHASE_PROCESS_NAME) {
return getStateDataForPurchaseProcess(params, processInfo());
} else if (processName === DOWNLOAD_PROCESS_NAME) {
return getStateDataForDownloadProcess(params, processInfo());
} else if (isBookingProcess(processName)) {
return getStateDataForBookingProcess(params, processInfo());
} else if (processName === INQUIRY_PROCESS_NAME) {
return getStateDataForInquiryProcess(params, processInfo());
} else if (processName === NEGOTIATION_PROCESS_NAME) {
return getStateDataForNegotiationProcess(params, processInfo());
} else {
return {};
}There is one more step left to update for the new transaction process – marketplace text strings. If you now try to create a listing with the new process, you will see marketplace text keys that reference the new process.
We will add the necessary marketplace text strings next.
Add marketplace text strings
A lot of marketplace text strings in Sharetribe Web Template are transaction process specific. In other words, when you create a new transaction process, you will also need to add marketplace texts for the relevant keys in the new process.
In this case, you can locate the marketplace text keys and values that reference default-booking and duplicate them for the new process, for example:
{
  "EditListingWizard.default-booking.new.saveAvailability": "Next: Photos",
  "EditListingWizard.default-booking.new.saveDetails": "Next: Location",
  "EditListingWizard.default-booking.new.saveLocation": "Next: Pricing",
  "EditListingWizard.default-booking.new.savePhotos": "Publish listing",
  "EditListingWizard.default-booking.new.savePricing": "Next: Availability",
  "EditListingWizard.biketribe-instant-booking.new.saveAvailability": "Next: Photos",
  "EditListingWizard.biketribe-instant-booking.new.saveDetails": "Next: Location",
  "EditListingWizard.biketribe-instant-booking.new.saveLocation": "Next: Pricing",
  "EditListingWizard.biketribe-instant-booking.new.savePhotos": "Publish listing",
  "EditListingWizard.biketribe-instant-booking.new.savePricing": "Next: Availability"
}
You can now see the correct marketplace text strings instead of the keys.
Add error handling on user deletion
Because the Template offers support for users to delete their accounts, you will also need to ensure that the newly created transaction process is properly checked at the time of deletion for states that contain Stripe-related payment processing. This is handled in delete-account.js .
+ stripeRelatedStatesForBiketribeInstantBookings = [
+     stripeRelatedStatesForBiketribeInstantBookings = [
+       'state/pending-payment',
+       'state/booked',
+       'state/delivered',
+     ];
+ ];

+ const ongoingBiketribeInstantBookingsWithIncompletePaymentProcessing = () =>
+     sdk.transactions.query({
+       processNames: 'negotiated-booking',
+       states: stripeRelatedStatesForBiketribeInstantBookings.join(','),
+     });

 Promise.all([
    /* ... */
+     ongoingBiketribeInstantBookingsWithIncompletePaymentProcessing(),
  ])
  /* ... */
};
This handles throwing an error if the user attempts to delete their account while any of their involved transactions have ongoing Stripe payment processing. This also ensures that no expensive, unnecessary user deletion API calls are made, and that the user is prompted to contact the marketplace rather than receiving an unclear or confusing error.
Summary
We created a new process based on an existing example process, and removed unnecessary transitions from the new process. We then pushed our changes to the Sharetribe backend using Sharetribe CLI.
In addition, we modified our client app to work with the new process by updating
- listing configuration,
- transaction process graph file,
- state data helper files, and
- marketplace text strings.
Finally, we added error handling to reduce API calls and clearly communicate the issue to the user.
The next tutorial guide will focus on modifying transaction process email notifications.