Last updated
Add listings with multiple seats
This guide describes how to handle multiple seats in listings and bookings
Table of Contents
- Update EditListingAvailabilityPanel to add seats to listings
- Add seats handling to default availability plan
- Add seats handling to EditListingAvailabilityExceptionForm
- Update listing booking flow to allow bookings with seats
- Show seats input in order form
- Calculate price with seats
- Allow bookings with multiple seats
- Recap
On our imaginary bike rental marketplace, some providers may have several similar bikes to rent. Instead of needing to create separate listings for each similar bike, we can add “seats” to a single listing. This makes it possible for customers to book several similar bikes in one go for the same time period.
In this guide, you will
- Update edit listing availability panel to create listings with
multiple seats
- Add seats handling to default availability form
- Add seats handling to availability exceptions
- Book listings with multiple seats
- Update booking panel for seat selection
- Show input
- Determine correct number of seat options to show
- Update booking breakdown to show seat line items correctly
- Add seats handling to line item calculation
- Update booking panel for seat selection
Information
This guide deals mainly with adding seats for daily bookings. Where the hourly booking implementation differs, you will find collapsible sections describing how and where to make the relevant changes.
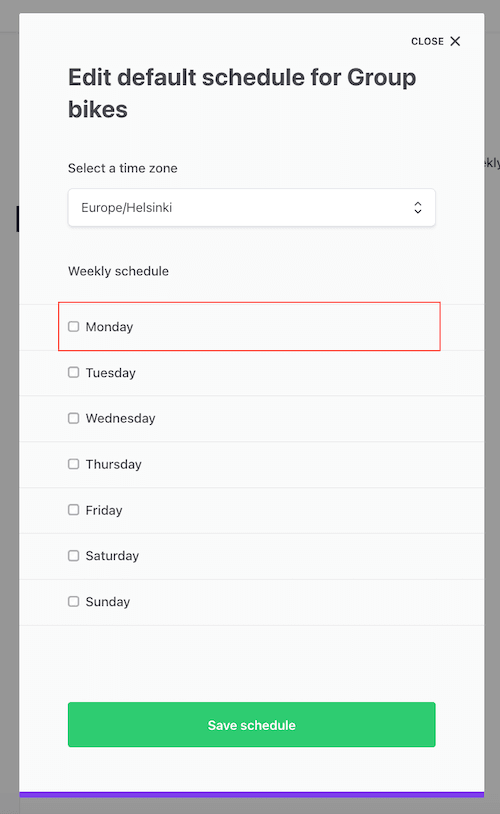
Update EditListingAvailabilityPanel to add seats to listings
Seats are a feature of a bookable listing’s availability plan. By default, all listings are created with availability plans featuring one seat.
To enable booking listings with multiple seats, we need to add the ability to create listings whose availability plan contains more than one seat. We will make these changes in EditListingAvailabilityPanel:
- For enabling seats in the default plan, we will update AvailabilityPlanEntries.js, which is a subcomponent used in EditListingAvailabilityPlanForm.js
- For managing seats in availability exceptions, we will update EditListingAvailabilityExceptionForm.js
- For saving both those changes, we will update in EditListingAvailabilityPanel.js
- For showing those changes, we will update in WeeklyCalendar.js
└── src
    └── containers
        └── EditListingPage
            └── EditListingWizard
                └── EditListingAvailabilityPanel
                    ├── EditListingAvailabilityExceptionForm
                    │ 	└── EditListingAvailabilityExceptionForm.js
                    │ 	└── EditListingAvailabilityExceptionForm.module.css
                    ├── EditListingAvailabilityPlanForm
                    │ 	└── AvailabilityPlanEntries.js
                    ├── WeeklyCalendar
                    │ 	└── WeeklyCalendar.js
                    └── EditListingAvailabilityPanel.js
Add seats handling to default availability plan
AvailabilityPlanEntries is a component that, in the EditListingAvailabilityPlanForm, represents a single day’s availability.
└── src
    └── containers
        └── EditListingPage
            └── EditListingWizard
                └── EditListingAvailabilityPanel
                    └── EditListingAvailabilityPlanForm
                        └── AvailabilityPlanEntries.js
The AvailabilityPlanEntries component handles
- day and night availability (i.e. no time ranges)
- and hourly availability (which does have time ranges).
In this guide, we are using day-based listings.
Show seats input in AvailabilityPlanEntries
We will need to import FieldTextInput from src/components, so let's add it to the existing import statement.
import {
  InlineTextButton,
  IconClose,
  FieldSelect,
  FieldCheckbox,
  FieldTextInput, // add this row
} from '../../../../../components';
When the user selects a day as active on a full day listing, the time range component is hidden by default. Now that we want to allow modifying seats for each day, however, we can add a seats input to the hidden time range component.
Replace the existing TimeRangeHidden component with the following version:
const TimeRangeHidden = props => {
  const { name, value, onChange, intl } = props;
  return (
    <div>
      <div className={css.formRowHidden}>
        <FieldHidden name={`${name}.startTime`} />
        <FieldHidden name={`${name}.endTime`} />
      </div>
      <FieldTextInput
        name={`${name}.seats`}
        type="number"
        initialValue={value.seats}
        placeholder={intl.formatMessage({
          id: 'EditListingAvailabilityPlanForm.seatsPlaceholder',
        })}
        min="1"
        onChange={onChange}
      />
    </div>
  );
};
The input is numeric, and we define minimum seats as 1, because a day with 0 seats is by default not available.
Next, we want to define the initial seat count when the day is first selected. That happens in the FieldCheckbox element’s onChange function. By default, for full days, the form adds an entry to the results array with start and end times. Let’s expand that entry with seats, too.
In this section, replace the original formApi.mutators.push statement with this new one.
  <FieldCheckbox
    key={checkboxName}
    id={checkboxName}
    name="activePlanDays"
    useSuccessColor
    label={intl.formatMessage({
      id: `EditListingAvailabilityPlanForm.dayOfWeek.${dayOfWeek}`,
    })}
    value={dayOfWeek}
    onChange={e => {
      const isChecked = e.target.checked;

      // 'day' and 'night' units use full days
      if (useFullDays) {
        if (isChecked) {
          // /** Replace this: **/
          formApi.mutators.push(dayOfWeek, { startTime: '00:00', endTime: '24:00' });
          // /** with this: **/
          formApi.mutators.push(dayOfWeek, {
            startTime: '00:00',
            endTime: '24:00',
            seats: 1,
          });
        } else {
          formApi.mutators.remove(dayOfWeek, 0);
        }
Now, we still need to give the correct props to the new TimeRangeHidden element. In addition to name and key, we pass value and onChange props, as well as intl.
The value prop passed to TimeRangeHidden is the entry pushed to formApi.mutators in the checkbox onChange function, i.e.
{
  startTime: '00:00',
  endTime: '24:00',
  seats: 1,
}
In the onChange function, we determine how the current plan gets updated with the numeric input value.
Replace the existing usage of TimeRangeHidden with the following:
    /** Replace this **/
    <TimeRangeHidden name={name} key={name} />
    /** with this **/
    <TimeRangeHidden
      name={name}
      key={name}
      intl={intl}
      value={entries[0]}
      onChange={e => {
        const { value } = e.currentTarget;
        const { values } = formApi.getState();
        const currentPlan = values[dayOfWeek][0];
        formApi.mutators.update(dayOfWeek, 0, { ...currentPlan, seats: value });
      }}
    />
Add seats for hourly availability
If you want to add seats for hourly availability, you can do the following instead of modifying the TimeRangeHidden component:
- Add a numeric FieldTextInput to the TimeRangeSelects component:
<FieldTextInput
  id={`${name}.seats`}
  name={`${name}.seats`}
  className={css.fieldSelect}
  type="number"
  min="1"
/>- Initialise the time range with 1 seat when the daily checkbox is first checked:
    } else {
      const shouldAddEntry = isChecked && !hasEntries;
      if (shouldAddEntry) {
        // The 'hour' unit is not initialized with any value,
+       // except seats,
        // because user need to pick them themselves.
-       formApi.mutators.push(dayOfWeek, { startTime: null, endTime: null });
+       formApi.mutators.push(dayOfWeek, { startTime: null, endTime: null, seats: 1 });
      } else if (!isChecked) {
        // If day of week checkbox is unchecked,
        // we'll remove all the entries for that day.
        formApi.mutators.removeBatch(dayOfWeek, entries);
      }
}- Initialise the time range with 1 seat when adding a new time range within an existing day:
  {!useFullDays && fields.length > 0 ? (
    <InlineTextButton
      type="button"
      className={css.buttonAddNew}
-     onClick={() => fields.push({ startTime: null, endTime: null })}
+     onClick={() => fields.push({ startTime: null, endTime: null, seats: 1 })}
    >
      <FormattedMessage id="EditListingAvailabilityPlanForm.addAnother" />
    </InlineTextButton>
  ) : null}
At this point, we can add the marketplace texts necessary in this guide. You can add the marketplace texts through Sharetribe Console, or in src/translations/en.js, if you are not using Console-based marketplace texts.
...
"EditListingAvailabilityPlanForm.seatsPlaceholder": "Select seats...",
"EditListingAvailabilityPanel.WeeklyCalendar.available": "Available ({seats})",
"EditListingAvailabilityExceptionForm.seatsLabel": "Available seats",
"EditListingAvailabilityExceptionForm.seatsPlaceholder": "Select available seats...",
"BookingDatesForm.seatsTitle": "Choose number of seats",
"OrderBreakdown.baseUnitDaySeats": "{unitPrice} x {quantity, number} {quantity, plural, one {day} other {days}} x { seats, number } { seats, plural, one {seat} other {seats} } ",
"OrderBreakdown.baseUnitNightSeats": "{unitPrice} x {quantity, number} {quantity, plural, one {night} other {nights}} x { seats, number } { seats, plural, one {seat} other {seats}}",
"OrderBreakdown.baseUnitHourSeats": "{unitPrice} x {quantity, number} {quantity, plural, one {hour} other {hours}} x { seats, number } { seats, plural, one {seat} other {seats}}",
...
Now, we can add seats to selected days, indicating the number of bikes we have available.
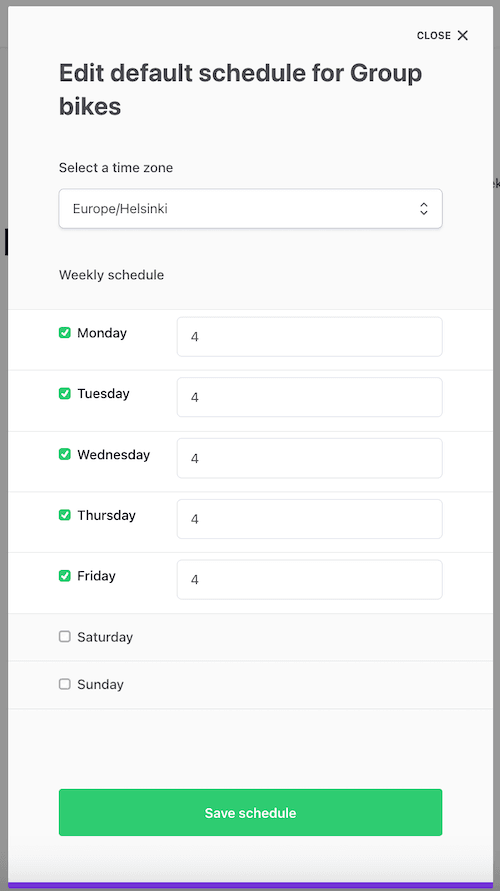
Save seats to default availability plan
When the provider clicks “Save schedule” on the default availability plan modal, EditListingAvailabilityPanel creates availability plan entries based on the submit values.
└── src
    └── containers
        └── EditListingPage
            └── EditListingWizard
                └── EditListingAvailabilityPanel
                    └── EditListingAvailabilityPanel.js
To do that, it uses a function called createEntriesFromSubmitValues.
// Create entries from submit values
const createEntriesFromSubmitValues = values =>
  WEEKDAYS.reduce((allEntries, dayOfWeek) => {
    const dayValues = values[dayOfWeek] || [];
    const dayEntries = dayValues.map(dayValue => {
      const { startTime, endTime } = dayValue;
      // Note: This template doesn't support seats yet.
      return startTime && endTime
        ? {
            dayOfWeek,
            seats: 1,
            startTime,
            endTime: endTime === '24:00' ? '00:00' : endTime,
          }
        : null;
    });

    return allEntries.concat(dayEntries.filter(e => !!e));
  }, []);
We want to modify this function to include the seats value coming from dayValue, instead of using the hard-coded value of 1 seat.
We also add a validation to the seats value – in case the user leaves the input empty, we pass 0 as seats for that day.
const createEntriesFromSubmitValues = values =>
WEEKDAYS.reduce((allEntries, dayOfWeek) => {
const dayValues = values[dayOfWeek] || [];
const dayEntries = dayValues.map(dayValue => {
- const { startTime, endTime } = dayValue;
+ const { startTime, endTime, seats } = dayValue;
+ const seatsValue = seats ? seats : 0;
// Note: This template doesn't support seats yet.
return startTime && endTime
? {
dayOfWeek,
- seats: 1,
+ seats: seatsValue,
startTime,
endTime: endTime === '24:00' ? '00:00' : endTime,
}
: null;
});
return allEntries.concat(dayEntries.filter(e => !!e));
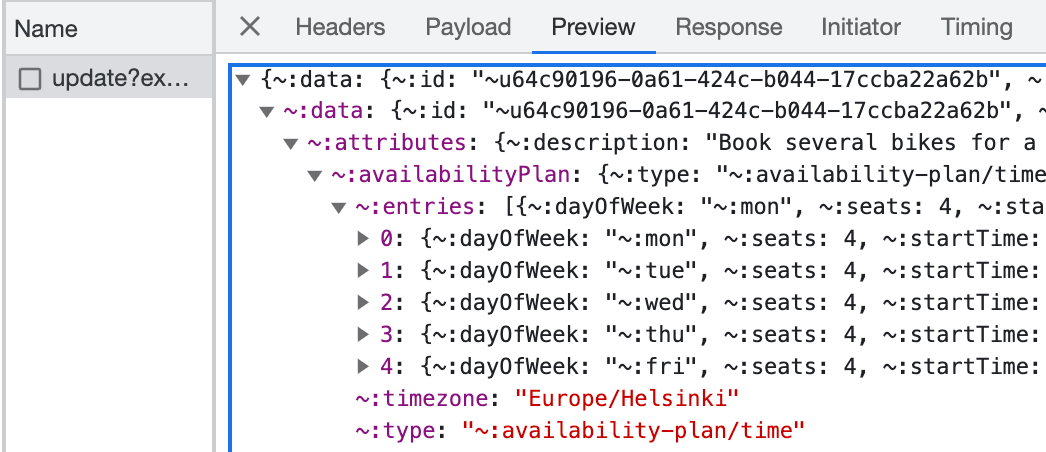
}, []);Now, the value of the seats input gets saved to the listing’s availability plan in the listing/update network call.
If you now refresh the page and re-open the modal, the seats values we just saved do not show up in the modal. We still need to update one function in EditListingAvailabilityPanel.js: createEntryDayGroups.
The createEntryDayGroups function takes the existing availability plan and maps the existing availability entries into initial values for the EditListingAvailabilityPlanForm. By default, it does not handle seats, so we will add seats handling.
// Create initial entry mapping for form's initial values
const createEntryDayGroups = (entries = {}) => {
  // Collect info about which days are active in the availability plan form:
  let activePlanDays = [];
  return entries.reduce((groupedEntries, entry) => {
-   const { startTime, endTime: endHour, dayOfWeek } = entry;
+   const { startTime, endTime: endHour, seats, dayOfWeek } = entry;
    const dayGroup = groupedEntries[dayOfWeek] || [];
    activePlanDays = activePlanDays.includes(dayOfWeek)
      ? activePlanDays
      : [...activePlanDays, dayOfWeek];
    return {
      ...groupedEntries,
      [dayOfWeek]: [
        ...dayGroup,
        {
          startTime,
          endTime: endHour === '00:00' ? '24:00' : endHour,
+         seats,
        },
      ],
      activePlanDays,
    };
  }, {});
};
Now the saved values also show up after refreshing the page.
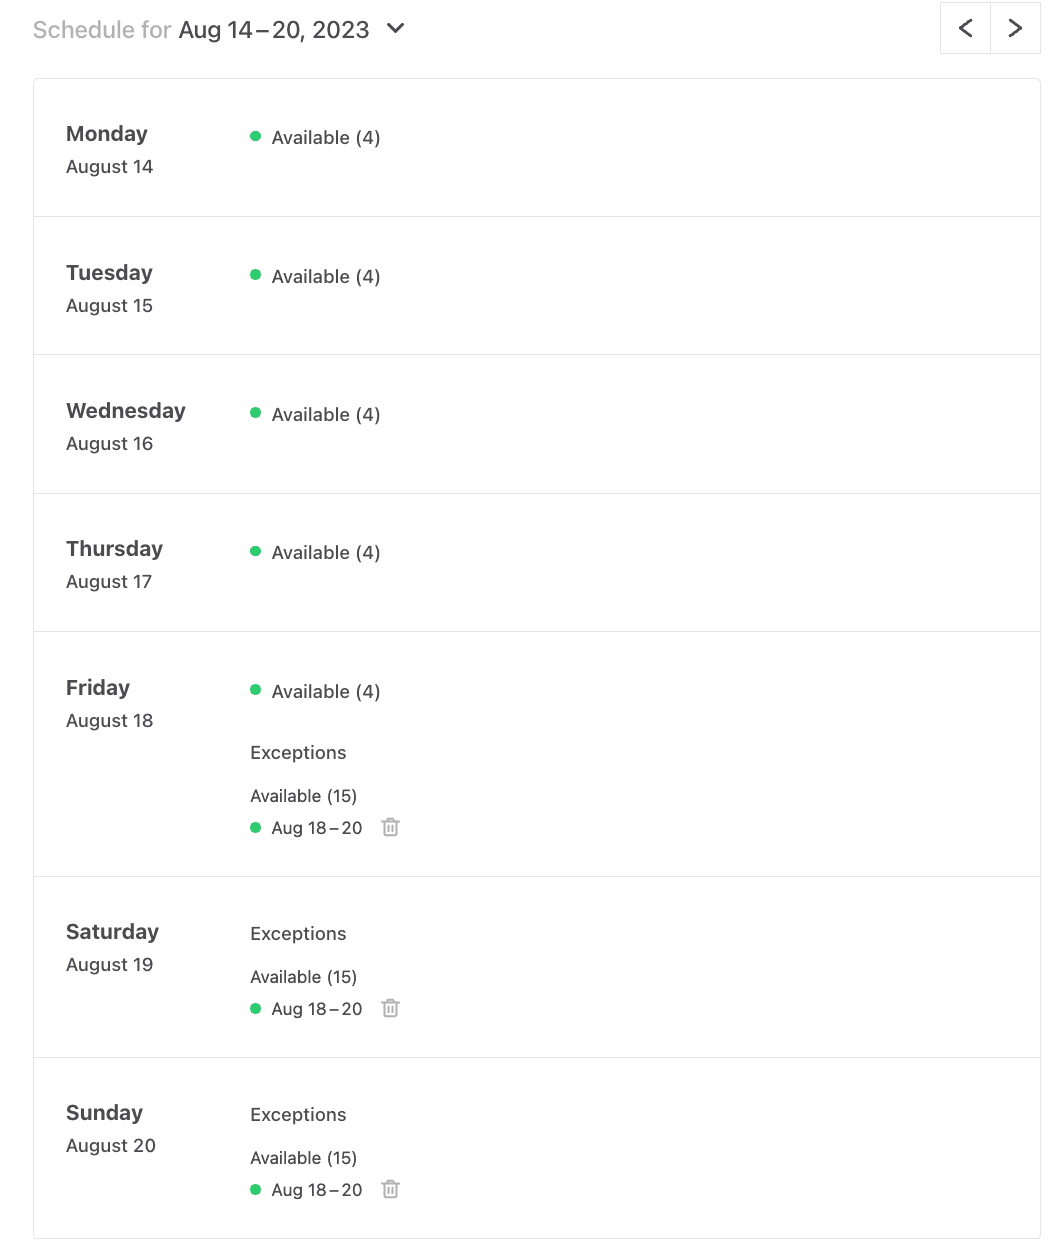
Show default seats in the weekly calendar
As the final step of adding seats to the default availability plan, let’s show the number of available seats in the weekly calendar.
└── src
    └── containers
        └── EditListingPage
            └── EditListingWizard
                └── EditListingAvailabilityPanel
                    └── WeeklyCalendar
                        └── WeeklyCalendar.js
We have already added a marketplace text string that takes a seats parameter. Now we will pass the seats value to the message.
Similarly to the inputs, the weekly calendar also has an element that renders a single availability plan entry, called PlanEntry. For full days, the component shows a formatted message depending on whether the entry has any seats.
// Component that renders an entry in the availability plan (weekly schedule)
const PlanEntry = ({ date, entry, useFullDays, isDaily, timeZone, intl, ...rest }) => {
  const isAvailable = entry.seats > 0;
  const availabilityInfo = isAvailable ? (
    <FormattedMessage id="EditListingAvailabilityPanel.WeeklyCalendar.available" />
  ) : (
    <FormattedMessage id="EditListingAvailabilityPanel.WeeklyCalendar.notAvailable" />
  );

  return (
    <div className={css.planEntry} {...rest}>
      <div
        className={classNames(css.availabilityDot, {
          [css.isAvailable]: entry.seats > 0,
        })}
      />
      {useFullDays ? (
        availabilityInfo
      ) : (
...
When the entry has seats, we want to pass the seat count to the FormattedMessage component to be displayed, and we can do it by passing a value prop.
  const isAvailable = entry.seats > 0;
  const availabilityInfo = isAvailable ? (
-   <FormattedMessage id="EditListingAvailabilityPanel.WeeklyCalendar.available" />
+   <FormattedMessage
+     id="EditListingAvailabilityPanel.WeeklyCalendar.available"
+     values={{ seats: entry.seats }}
+   />

  ) : (
    <FormattedMessage id="EditListingAvailabilityPanel.WeeklyCalendar.notAvailable" />
  );
Now, the weekly calendar shows the default seats available for each entry.

Show seats for hourly availability
If you are working with hourly bookings, you can do the following instead of modifying the availabilityInfo message:
- Pass the entry.seats value as a new prop from WeeklyCalendar.PlanEntry to TimeRange
  return (
    <div className={css.planEntry} {...rest}>
      <div
        className={classNames(css.availabilityDot, {
          [css.isAvailable]: entry.seats > 0,
        })}
      />
      {useFullDays ? (
        availabilityInfo
      ) : (
        <TimeRange
          className={css.timeRange}
          startDate={parseLocalizedTime(date, entry.startTime, timeZone)}
          endDate={getEndTimeAsDate(date, entry.endTime, isDaily, timeZone)}
+         seats={entry.seats}
          dateType={useFullDays ? DATE_TYPE_DATE : DATE_TYPE_TIME}
          timeZone={timeZone}
        />
      )}
    </div>
);- In TimeRange, get the seats value from props.
export const TimeRangeComponent = props => {
  const { rootClassName, className, startDate, endDate, seats, dateType, timeZone, intl } = props;
  const start = formatDateIntoPartials(startDate, intl, { timeZone });
...- Show the seats prop in the span elements with className={css.dateSection} in TimeRange, e.g.
...
  } else if (isSingleDay && dateType === DATE_TYPE_DATETIME) {
    return (
      <div className={classes}>
        <span className={css.dateSection}>{`${start.date}, ${start.time} - ${end.time}`} ({seats})</span>
      </div>
    );
  } else {
    return (
      <div className={classes}>
        <span className={css.dateSection}>{`${start.dateAndTime} - `}</span>
        <span className={css.dateSection}>{`${end.dateAndTime}`} ({seats})</span>
      </div>
    );
  }
Next, let’s enable seat handling in availability exceptions.
Add seats handling to EditListingAvailabilityExceptionForm
In addition to the default listing availability plan, we want to allow users to set seats for availability exceptions.
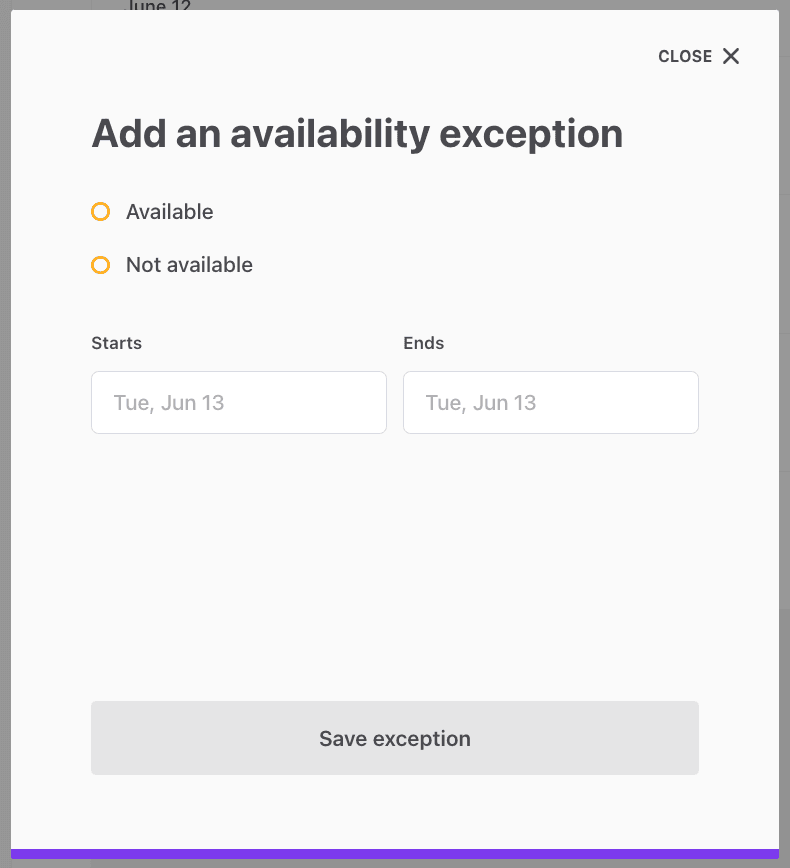
The default behavior of the availability exception form is that for non-available time slots, seats are set as 0, and for available time slots, seats are set as 1. We want to allow users to create exceptions with multiple seats.
Information
Creating exceptions with multiple seats is a great way to manage event-based marketplaces.
By removing all default plan entries, you can set the default plan to always be created with 0 seats. Providers can then add availability exceptions with a number of seats to open certain events to bookings.
This way, a service provider can use a single listing to organize multiple rounds of a workshop, or a concert venue can host a series of concerts, with a variable number of seats each time.
└── src
    └── containers
        └── EditListingPage
            └── EditListingWizard
                └── EditListingAvailabilityPanel
                    └── EditListingAvailabilityExceptionForm
                        └── EditListingAvailabilityExceptionForm.js
                        └── EditListingAvailabilityExceptionForm.module.css
First, we’ll again import the FieldTextInput component for seats.
import {
FieldTextInput, // add this row
Form,
H3,
PrimaryButton,
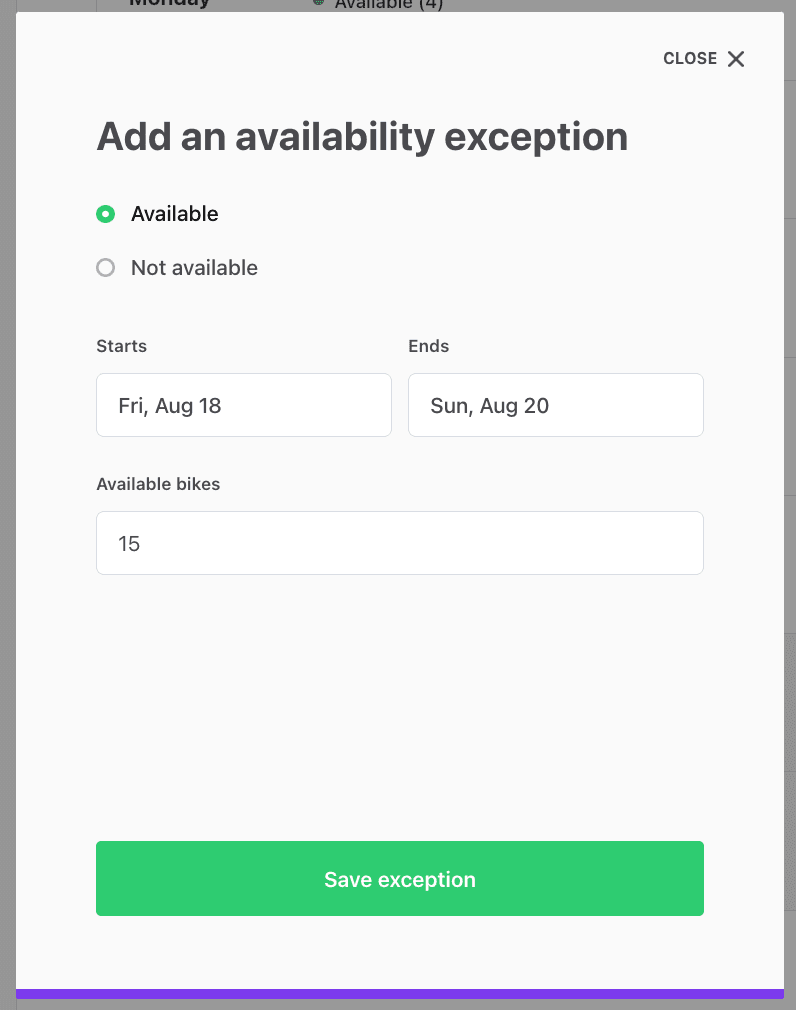
} from '../../../../../components';We only want to show the seat selection input if the provider has selected that the exception does have availability. We can check that value from formState in FinalForm’s render function, and then show an input component if the value is available.
const formState = formApi.getState();
const isAvailable = formState.values.availability === 'available';

const seatsSelectionMaybe = isAvailable ? (
  <FieldTextInput
    className={css.seats}
    id="seats"
    name="seats"
    type="number"
    min="1"
    label={intl.formatMessage({
      id: 'EditListingAvailabilityExceptionForm.seatsLabel',
    })}
    placeholder={intl.formatMessage({
      id: 'EditListingAvailabilityExceptionForm.seatsPlaceholder',
    })}
  />
) : null;
The component uses a CSS class to add a bit of margin, and we need to add the class to EditListingAvailabilityExceptionForm.module.css.
.seats {
  margin-top: 24px;
}
Then, we need to include the component in the form.
…
          timeZone={timeZone}
          values={values}
        />
      )}
+     {seatsSelectionMaybe}
    </div>
    <div className={css.submitButton}>
…
Now, we can see the seats input in the availability exception modal.
Now, let’s modify the EditListingAvailabilityPanel.js file again to save the seats we entered. The saving happens in the saveException function.
// Save exception click handler
const saveException = values => {
  const {
    availability,
    exceptionStartTime,
    exceptionEndTime,
    exceptionRange,
  } = values;

  // TODO: add proper seat handling
  const seats = availability === 'available' ? 1 : 0;

  // Exception date/time range is given through FieldDateRangeInput or
  // separate time fields.
  const range = useFullDays
    ? {
        start: exceptionRange?.startDate,
        end: exceptionRange?.endDate,
      }
    : {
        start: timestampToDate(exceptionStartTime),
        end: timestampToDate(exceptionEndTime),
      };

  const params = {
    listingId: listing.id,
    seats,
    ...range,
  };

  return onAddAvailabilityException(params)
    .then(() => {
      setIsEditExceptionsModalOpen(false);
    })
    .catch(e => {
      // Don't close modal if there was an error
    });
};
Here, we want to capture the value of seats from values. We will assign values.seats to the constant rawSeats, so we can keep the availability check when setting the value of seats in the function.
  // Save exception click handler
  const saveException = values => {
    const {
      availability,
      exceptionStartTime,
      exceptionEndTime,
      exceptionRange,
      seats: rawSeats,
    } = values;

    const seats = availability === 'available' ? rawSeats : 0;
...
Now, the seats get saved when we click “Save exception” in the modal.

Finally, we want to show the number of seats for exceptions as well. We will do that in the same WeeklyCalendar.js file that we modified for the default plan.
└── src
    └── containers
        └── EditListingPage
            └── EditListingWizard
                └── EditListingAvailabilityPanel
                    └── WeeklyCalendar
                        └── WeeklyCalendar.js
The component here we want to modify is AvailableExceptionsInfo. It uses the same marketplace text key EditListingAvailabilityPanel.WeeklyCalendar.available as the PlanEntry component.
// Component that renders all the ExceptionEntry components that allow availability (seats > 0)
const AvailableExceptionsInfo = ({
  availableExceptions,
  useFullDays,
  isDaily,
  timeZone,
  onDeleteAvailabilityException,
}) => {
  const hasAvailableExceptions = availableExceptions.length > 0;
  return hasAvailableExceptions ? (
    <>
      <Heading as="h6" rootClassName={css.exceptionsSubtitle}>
        <FormattedMessage id="EditListingAvailabilityPanel.WeeklyCalendar.available" />
      </Heading>
      {availableExceptions.map(exception => {
        return (
          <ExceptionEntry
            key={exception.id.uuid}
            exception={exception}
            timeZone={timeZone}
            useFullDays={useFullDays}
            isDaily={isDaily}
            onDeleteAvailabilityException={
              onDeleteAvailabilityException
            }
          />
        );
      })}
    </>
  ) : null;
};
Since we are modifying the daily bookings, each day can only have a single exception. Therefore, we can determine the number of seats based on the first item in the availableExceptions array. Then, we just need to pass the value of seats to FormattedMessage.
// Component that renders all the ExceptionEntry components that allow availability (seats > 0)
const AvailableExceptionsInfo = ({
  availableExceptions,
  useFullDays,
  isDaily,
  timeZone,
  onDeleteAvailabilityException,
}) => {
  const hasAvailableExceptions = availableExceptions.length > 0;
+ const seats = hasAvailableExceptions ? availableExceptions[0].attributes.seats : null;

  return hasAvailableExceptions ? (
    <>
      <Heading as="h6" rootClassName={css.exceptionsSubtitle}>
-       <FormattedMessage id="EditListingAvailabilityPanel.WeeklyCalendar.available" />
+       <FormattedMessage
+         id="EditListingAvailabilityPanel.WeeklyCalendar.available"
+         values={{ seats }}
        />
      </Heading>
Now, you can see the number of seats on each exception, as well.
Update listing booking flow to allow bookings with seats
We now have a listing with multiple seats available for booking! Next, we need to add the logic for customers to book more than one seat in that listing.
Show seats input in order form
First, let’s add the necessary seats inputs to the listing page booking form.
└── src
    └── components
        └── OrderPanel
            └── BookingDatesForm
                └── BookingDatesForm.js
First, we need to add a few helper functions to the BookingDatesForm. These functions help us determine the lowest number of seats available in the specified time range. For instance, if a customer wants to book Monday through Sunday, and Friday already has a booking, we can only allow the customer to book as many seats as are available for Friday.
Let's add the following import and two functions after the existing imports in BookingDatesForm.js:
import { generateMonths } from '../../../util/generators';

/**
 * Return an array of timeslots for the months between start date and end date
 * @param {*} monthlyTimeSlots
 * @param {*} startDate
 * @param {*} endDate
 * @param {*} timeZone
 * @returns
 */
const pickBookingMonthTimeSlots = (
  monthlyTimeSlots,
  startDate,
  endDate,
  timeZone
) => {
  // The generateMonths generator returns the first day of each month that is spanned
  // by the time range between start date and end date.
  const monthsInRange = generateMonths(startDate, endDate, timeZone);

  return monthsInRange.reduce((timeSlots, firstOfMonth) => {
    return [
      ...timeSlots,
      ...pickMonthlyTimeSlots(monthlyTimeSlots, firstOfMonth, timeZone),
    ];
  }, []);
};

// Get the time slot for a booking duration that has the least seats
const getMinSeatsTimeSlot = (
  monthlyTimeSlots,
  timeZone,
  startDate,
  endDate
) => {
  const timeSlots = pickBookingMonthTimeSlots(
    monthlyTimeSlots,
    startDate,
    endDate,
    timeZone
  );

  // Determine the timeslots that fall between start date and end date
  const bookingTimeslots = timeSlots.filter(ts => {
    const { start, end } = ts.attributes;
    return (
      // booking start date falls within time slot
      (start < startDate && end > startDate) ||
      // whole time slot is within booking period
      (start >= startDate && end <= endDate) ||
      // booking end date falls within time slot
      (start < endDate && end > endDate)
    );
  });

  // Return the timeslot with the least seats in the booking period
  return bookingTimeslots.reduce((minSeats, ts) => {
    if (!minSeats?.seats) {
      return ts.attributes;
    }

    return ts.attributes.seats < minSeats.seats
      ? ts.attributes
      : minSeats;
  }, {});
};
Next, we will modify the handleFormSpyChange function to include seats. You can replace the existing handleFormSpyChange function with the following code:
const handleFormSpyChange = (
  listingId,
  isOwnListing,
  fetchLineItemsInProgress,
  onFetchTransactionLineItems
) => formValues => {
  const { seats, bookingDates } = formValues.values;

  const { startDate, endDate } = bookingDates ? bookingDates : {};

  if (startDate && endDate && !fetchLineItemsInProgress) {
    onFetchTransactionLineItems({
      orderData: {
        bookingStart: startDate,
        bookingEnd: endDate,
        seats: parseInt(seats, 10),
      },
      listingId,
      isOwnListing,
    });
  }
};
We first get seats from the form values, and then include the value in orderData.
Then, we will add a function inside the form that retrieves the available seats. To do that, we will first need to get formApi from props:
      render={fieldRenderProps => {
        const {
          endDatePlaceholder,
          startDatePlaceholder,
          formId,
+         form: formApi,
          handleSubmit,
          intl,
          lineItemUnitType,
          values,
          monthlyTimeSlots,
          lineItems,
          fetchLineItemsError,
          onFetchTimeSlots,
        } = fieldRenderProps;
...
Next, add the function itself, before the return statement of the form:
const getSeatsArray = () => {
const formState = formApi.getState();
const { bookingDates } = formState.values;
if (!bookingDates) {
return null;
}
const minSeatsTimeSlot = getMinSeatsTimeSlot(
monthlyTimeSlots,
timeZone,
bookingDates.startDate,
bookingDates.endDate
);
// Return an array of the seat options a customer
// can pick for the time range
return Array(minSeatsTimeSlot.seats)
.fill()
.map((_, i) => i + 1);
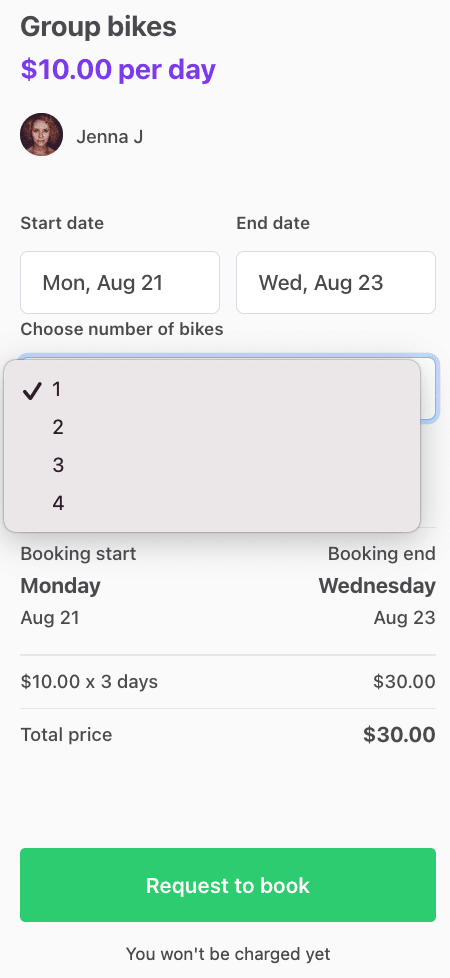
};Finally, pass props for seatsArray and seatsLabel to FieldDateRangeInput.
      <FieldDateRangeInput
        className={css.bookingDates}
...
        disabled={fetchLineItemsInProgress}
        onClose={event =>
          setCurrentMonth(getStartOf(event?.startDate ?? startOfToday, 'month', timeZone))
        }
+       seatsArray={getSeatsArray()}
+       seatsLabel={intl.formatMessage({ id: 'BookingDatesForm.seatsTitle' })}
      />
Now, we will add the corresponding handling to FieldDateRangeInput.
└── src
    └── components
      └── FieldDateRangeInput
      	  └── FieldDateRangeInput.js
First, add FieldSelect to the import from components folder:
import { FieldSelect, ValidationError } from '../../components';Next, add the seatsArray and seatsLabel props to the render function destructuring:
  render() {
    /* eslint-disable no-unused-vars */
    const {
      className,
	...
      onFocusedInputChange,
+     seatsArray,
+ 	  seatsLabel,
      ...rest
    } = this.props;
We only want to show the seats selection if the seatsArray has been calculated and it has more than one item. The template uses this same logic for products – quantity selection is only shown for items with 2 or more stock available. So, let’s add a conditional component for the input.
const seatsSelectionMaybe =
  seatsArray?.length > 1 ? (
    <FieldSelect name="seats" id="seats" label={seatsLabel}>
      {seatsArray.map(s => (
        <option value={s} key={s}>
          {s}
        </option>
      ))}
    </FieldSelect>
  ) : null;
Then, add the seat selector after the validation error in the returned component
    return (
      <div className={classes}>
        {label}
        <DateRangeInput {...inputProps} />
        <ValidationError className={errorClasses} fieldMeta={meta} />
+       {seatsSelectionMaybe}
      </div>
    );
Now, we can see the seat selector in the order panel when both start and end dates have been selected:
Add seat selection to hourly bookings
For hourly bookings, you will need to modify BookingTimeForm and FieldDateAndTimeInput instead of BookingDatesForm.
└── src
    └── components
        └── OrderPanel
            └── BookingTimeForm
                └── BookingTimeForm.js
      	        └── FieldDateAndTimeInput.js
The seatsArray variable can be calculated in the FieldDateAndTimeInput component using the existing selectedTimeSlot variable. In other words, no need to use the getMinSeatsTimeSlot helper described above.
const seatsArray =
  Array(selectedTimeSlot?.attributes.seats)
    .fill()
    .map((_, i) => i + 1) || null;

const seatsSelectionMaybe =
  seatsArray?.length > 1 ? (
    <FieldSelect name="seats" id="seats" label={seatsLabel}>
      {seatsArray.map(s => (
        <option value={s} key={s}>
          {s}
        </option>
      ))}
    </FieldSelect>
  ) : null;
Add seatsSelectionMaybe towards the very end of the returned form:
            </FieldSelect>
          </div>
        </div>
+       {seatsSelectionMaybe}
      </div>
In BookingTimeForm, you will need to modify handleOnChange to pass seats from formValues.values to orderData.
  handleOnChange(formValues) {
-   const { bookingStartTime, bookingEndTime } = formValues.values;
+   const { bookingStartTime, bookingEndTime, seats } = formValues.values;
    const startDate = bookingStartTime ? timestampToDate(bookingStartTime) : null;
    const endDate = bookingEndTime ? timestampToDate(bookingEndTime) : null;

    const listingId = this.props.listingId;
    const isOwnListing = this.props.isOwnListing;

    // We expect values bookingStartTime and bookingEndTime to be strings
    // which is the default case when the value has been selected through the form
    const isSameTime = bookingStartTime === bookingEndTime;

    if (bookingStartTime && bookingEndTime && !isSameTime && !this.props.fetchLineItemsInProgress) {
      this.props.onFetchTransactionLineItems({
-       orderData: { bookingStart: startDate, bookingEnd: endDate },
+       orderData: { bookingStart: startDate, bookingEnd: endDate, seats: parseInt(seats, 10) },
        listingId,
        isOwnListing,
      });
    }
  }
In addition, handle seatsLabel similarly to how it is handled above.
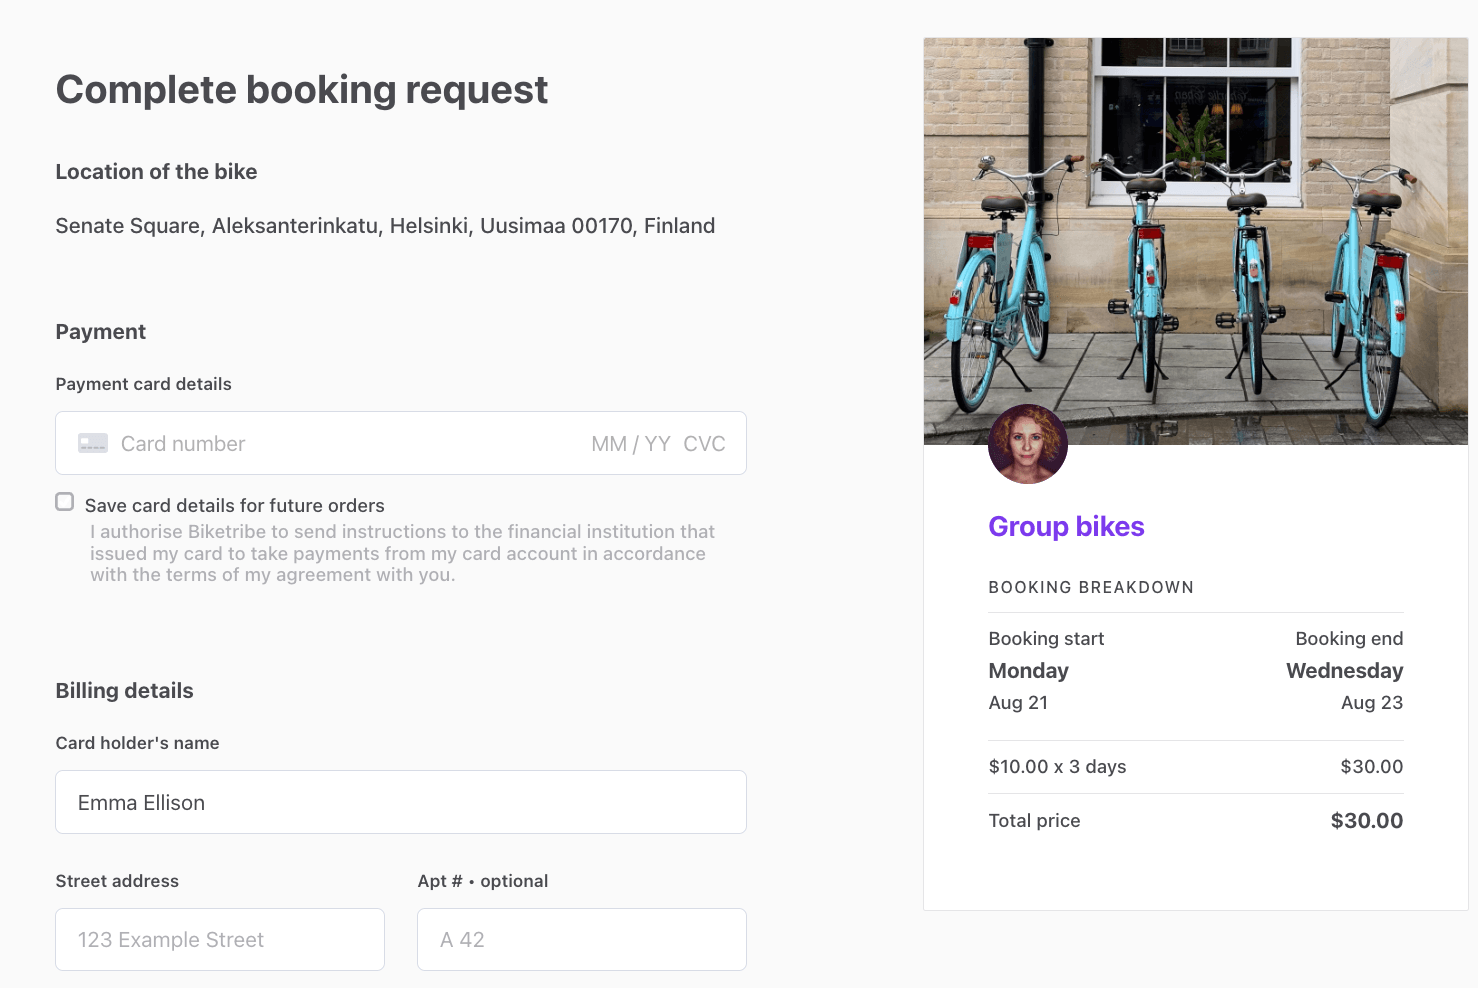
If you now select more than one bike for this rental, the price calculation will still only show the price for one bike. Since we are already passing the seats value to the onFetchTransactionLineItems function, our next step is to handle the correct number of seats in the line item calculation.
Calculate price with seats
To calculate the booking price with the correct number of seats, we need to modify the line item calculation in server/api-util/lineItems.js. We also need to modify LineItemBasePriceMaybe.js in the OrderBreakdown component to show the line items correctly.
We will start with handling the line item calculation server-side, in lineItems.js.
└── server
    └── api-util
        └── lineItems.js
The lineItems.js file already has several helper functions for calculating the quantity for different types or line items – days, nights, hours, and items.
In this guide, we are adding seats for daily bookings, which by default is managed with the helper function getDateRangeQuantityAndLineItems. However, we will keep using this function to handle the default case of a single seat per booking, so we don’t want to modify it. Instead, we will create a similar function for handling bookings with seats.
Add this new function below getDateRangeQuantityAndLineItems.
/**
 * Calculate units based on days or nights between given bookingDates. Returns units and seats.
 *
 * @param {*} orderData should contain booking dates and seats
 * @param {*} code should be either 'line-item/day' or 'line-item/night'
 */
const getDateRangeUnitsSeatsLineItems = (orderData, code) => {
  const { bookingStart, bookingEnd, seats } = orderData;

  const units =
    bookingStart && bookingEnd
      ? calculateQuantityFromDates(bookingStart, bookingEnd, code)
      : null;

  return { units, seats, extraLineItems: [] };
};
Line item calculation for hourly bookings
If you are working with hourly bookings, you will need to make a
parallel function for getHourQuantityAndLineItems instead, and add it
to unitType: hour handling.
/**
 * Get quantity for arbitrary units and seats for time-based bookings.
 *
 * @param {*} orderData should contain quantity
 */
const getHourUnitsSeatsAndLineItems = orderData => {
  const { bookingStart, bookingEnd, seats } = orderData || {};
  const units =
    bookingStart && bookingEnd
      ? calculateQuantityFromHours(bookingStart, bookingEnd)
      : null;

  return { units, seats, extraLineItems: [] };
};
We want to use this new function whenever orderData has seats defined. We do that when defining the quantityAndExtraLineItems constant, which is also where other similar helper functions are used.
  // Here "extra line-items" means line-items that are tied to unit type
  // E.g. by default, "shipping-fee" is tied to 'item' aka buying products.
  const quantityAndExtraLineItems =
    unitType === 'item'
      ? getItemQuantityAndLineItems(orderData, publicData, currency)
      : unitType === 'hour'
      ? getHourQuantityAndLineItems(orderData)
+     : ['day', 'night'].includes(unitType) && !!orderData.seats
+     ? getDateRangeUnitsSeatsLineItems(orderData, code)
      : ['day', 'night'].includes(unitType)
      ? getDateRangeQuantityAndLineItems(orderData, code)
: {};Information
In Sharetribe, line items need to have either
- a percentage,
- a quantity, or
- both units and seats.
For this reason, we use quantity to denote the number of days
when seats are not defined, and units to denote the number of days
when seats are defined.
Because we are now handling both quantity and units, we will include units in our error handling, and then determine which option to use in the line item.
- 	const { quantity, extraLineItems } = quantityAndExtraLineItems;
+   const { quantity, units, seats, extraLineItems } = quantityAndExtraLineItems;

  // Throw error if there is no quantity information given
- if (!quantity) {
+ if (!quantity && !(units && seats)) {
    const message = `Error: transition should contain quantity information:
-      stockReservationQuantity, quantity, or bookingStart & bookingEnd (if "line-item/day" or "line-item/night" is used)`;
+      stockReservationQuantity, quantity, units & seats, or bookingStart & bookingEnd (if "line-item/day" or "line-item/night" is used)`;
    const error = new Error(message);
    error.status = 400;
    error.statusText = message;
    error.data = {};
    throw error;
  }

+ // A booking line item can have either quantity, or units and seats. Add the
+ // correct values depending on whether units and seats exist.
+ const quantityOrSeats = !!units && !!seats ? { units, seats } : { quantity };
Finally, we replace quantity in the order line item with quantityOrSeats.
  const order = {
    code,
    unitPrice,
- 	quantity,
+   ...quantityOrSeats,
    includeFor: ['customer', 'provider'],
  };
Now we have a line item that may have either quantity or units. This means that we need to modify our line item display component in the template, since by default it only handles quantity in line items.
└── src
    └── components
        └── OrderBreakdown
            └── LineItemBasePriceMaybe.js
By default, LineItemBasePriceMaybe.js has a fairly simple quantity handling. We will add units handling to this same statement.
/** Replace this **/
const quantity = unitPurchase ? unitPurchase.quantity.toString() : null;
/** with this **/
const quantity = unitPurchase?.units
  ? unitPurchase.units.toString()
  : unitPurchase?.quantity
  ? unitPurchase.quantity.toString()
  : null;
We also want to show different messages whenever the order has seats defined. We will therefore set the FormattedMessage component into a variable, so we can conditionally use the version that is appropriate.
+ const message = unitPurchase?.seats > 1
+ ? (<FormattedMessage id={`${translationKey}Seats`} values={{ unitPrice, quantity, seats: unitPurchase.seats }} />)
+ : (<FormattedMessage id={translationKey} values={{ unitPrice, quantity }} />)
return quantity && total ? (
<div className={css.lineItem}>
<span className={css.itemLabel}>
- <FormattedMessage id={translationKey} values={{ unitPrice, quantity }} />
+ {message}
</span>
<span className={css.itemValue}>{total}</span>
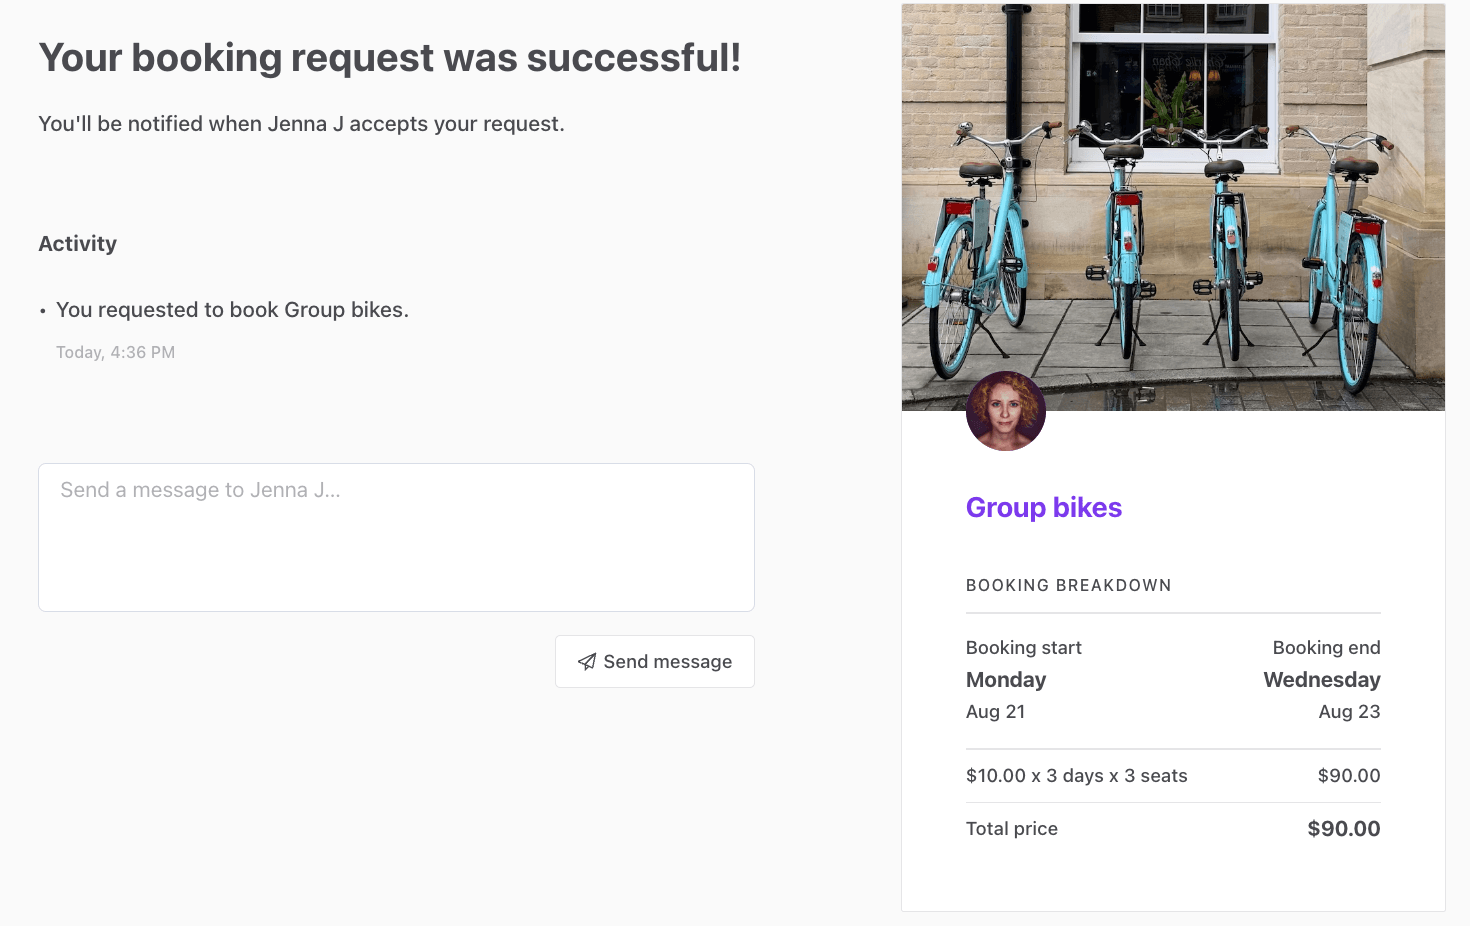
</div>Now, when we select seats for our booking, we can see the selected seats both calculated and displayed correctly in the breakdown.

Allow bookings with multiple seats
Finally, we want to include the seats value in the actual booking as well. Now, if we click on “Request to book”, the CheckoutPage does not yet recognise any seats for the booking.
For this, we need to make changes to ListingPage and CheckoutPage. We will start with modifying the ListingPage.shared.js file to pass the seats value to CheckoutPage.
└── src
    └── containers
        └── ListingPage.shared.js
Since the template has two listing page components, the functions used in both components are in ListingPage.shared.js. One of those shared functions is handleSubmit, which passes the order information to CheckoutPage. This is the function we will modify.
In this function (and indeed, in this section) we will add seats handling that parallels the default quantity handling for purchase items. Both seats and quantity may or may not be present in the values coming in from the order panel.
First, let’s parse the raw seats value from the values parameter:
  const {
    bookingDates,
    bookingStartTime,
    bookingEndTime,
    bookingStartDate, // not relevant (omit)
    bookingEndDate, // not relevant (omit)
    quantity: quantityRaw,
+   seats: seatsRaw,
    deliveryMethod,
    ...otherOrderData
  } = values;
Then, we will check whether the value of seats is a number, and include it in the orderData attribute of initialValues sent to CheckoutPage.
  const quantity = Number.parseInt(quantityRaw, 10);
  const quantityMaybe = Number.isInteger(quantity) ? { quantity } : {};
+ const seats = Number.parseInt(seatsRaw, 10);
+ const seatsMaybe = Number.isInteger(seats) ? { seats } : {};
  const deliveryMethodMaybe = deliveryMethod ? { deliveryMethod } : {};

  const initialValues = {
    listing,
    orderData: {
      ...bookingMaybe,
      ...quantityMaybe,
+     ...seatsMaybe,
      ...deliveryMethodMaybe,
      ...otherOrderData,
    },
    confirmPaymentError: null,
  };
The next step is to pass seats from orderData to Redux actions on the CheckoutPage. Since we are dealing with payments, we will make the changes in the CheckoutPageWithPayment.js component.
└── src
    └── containers
        └── CheckoutPage
            └── CheckoutPageWithPayment.js
In this component, the data we passed as orderData is available under pageData.
CheckoutPageWithPayment makes two Redux calls using order parameters parsed from pageData:
- fetching speculated transaction immediately when the customer lands on the page, and
- initiating order when the customer has filled out the necessary information
In both of those contexts, the order parameters are created using the getOrderParams function, so that is where we will add seats handling. Similarly to ListingPage.shared.js, we will handle seats the same way we already handle quantity.
const getOrderParams = (pageData, shippingDetails, optionalPaymentParams, config) => {
  const quantity = pageData.orderData?.quantity;
  const quantityMaybe = quantity ? { quantity } : {};
+ const seats = pageData.orderData?.seats;
+ const seatsMaybe = seats ? { seats } : {};

  const deliveryMethod = pageData.orderData?.deliveryMethod;
  const deliveryMethodMaybe = deliveryMethod ? { deliveryMethod } : {};

...

  // These are the order parameters for the first payment-related transition
  // which is either initiate-transition or initiate-transition-after-enquiry
  const orderParams = {
    listingId: pageData?.listing?.id,
    ...deliveryMethodMaybe,
    ...quantityMaybe,
+   ...seatsMaybe,
    ...bookingDatesMaybe(pageData.orderData?.bookingDates),
    ...protectedDataMaybe,
    ...optionalPaymentParams,
  };
  return orderParams;
};
When we pass seats as a part of orderParams to the Redux actions, the default handling passes them onwards to the line item calculation we modified earlier.
Now, you can make a booking with multiple seats!
Recap
In this guide, you made the following changes:
- Allow adding seats to a listing
- Update default availability plan handling in EditListingAvailabilityPanel.js and AvailabilityPlanEntries.js
- Update availability exception handling in EditListingAvailabilityExceptionForm.js
- Update seats display in WeeklyCalendar.js
- Show seats selection in the order panel
- Add seats handling to FieldDateRangeInput.js
- Add logic to determine minimum seats per a time range in BookingDatesForm.js
- Calculate line items with seats
- Add units and seats handling to lineItems.js
- Add units and seats handling to LineItemBasePriceMaybe.js
- Allow bookings with multiple seats
- Add seats handling to ListingPage.shared.js, CheckoutPage.js and CheckoutPage.duck.js