Enable OpenID Connect login
OpenID Connect
OpenID Connect is a specification built on OAuth2 that describes how a user authenticated at an identity provider can be authorized to resources in another service. This how-to guide assumes that you already have an OpenID Connect solution available and intend to use that as a login option in your Sharetribe marketplace.
Identity provider requirements
Discovery document and JSON Web keys
All identity providers should provide an
OpenID Connect discovery document .
The document has to define a jwks_uri attribute which denotes the
location of public signing keys used by the identity provider. The
signing keys should be served in the jwks_uri location in
JSON Web Key Set format .
Signing algorithms
Sharetribe only supports ID tokens signed with asymmetric RS256 signing algorithm. The identity provider should provide public signing keys as mentioned above.
Rotating signing keys
Sharetribe relies heavily on the kid attribute of a JSON Web Key when
caching signing keys. We advise that every OpenID Connect identity
provider includes the kid attribute in signing keys and in ID token
header. Especially, when signing keys are rotated, it is critical to
have the kid attribute in JWKs and a corresponding kid header in the
ID token.
Configure an identity provider client in Console
To take an OpenID Connect identity provider into use with Sharetribe, you will need to configure a new identity provider and an accompanying identity provider client in Sharetribe Console.
Add a new IdP Client
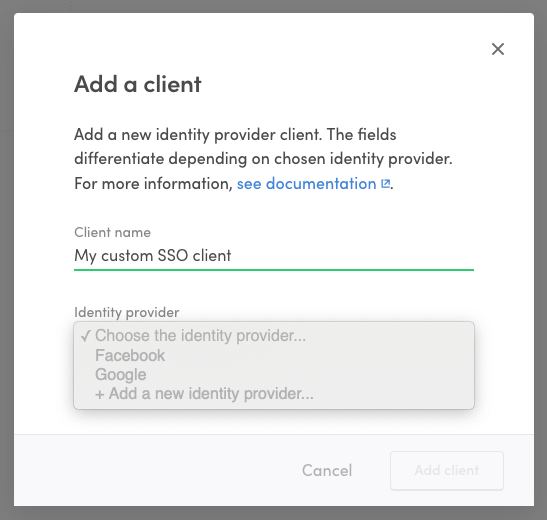
Go to the Social logins & SSO page in Console and click ”+ Add new” to add a new identity provider client. Fill in a name for the client.
Add a new provider
In the identity provider dropdown, select ”+ Add a new identity provider…”
Fill in information
Fill in information regarding your OpenID Connect identity provider. This is the service that your users authenticate to in order to log into Sharetribe.
- Identity provider name: A descriptive name for the identity provider that helps you to distinguish it from other providers.
- Identity provider ID: IdP ID that is passed as a parameter to Sharetribe API when authenticating using this client/IdP. It is generated based on the provider name
- Identity provider URL: In OpenID Connect terms this is the issuer location of the identity provider. It is used to resolve ID token signing keys used by the identity provider. See below Discovery document and JSON Web keys for more details.
Add Client ID
Fill in the Client ID. This is the identifier of your Sharetribe marketplace at you identity provider. It will be the audience of the ID token returned from the identity provider.
List additional clients
If you have multiple clients configured at your identity provider to be
used to log into your Sharetribe marketplace, list the additional client
IDs as trusted client IDs. The idea is, that every client ID that is
included as an audience (aud claim) in an ID token returned from your
identity provider should be included as the client ID or trusted client
ID in the client.
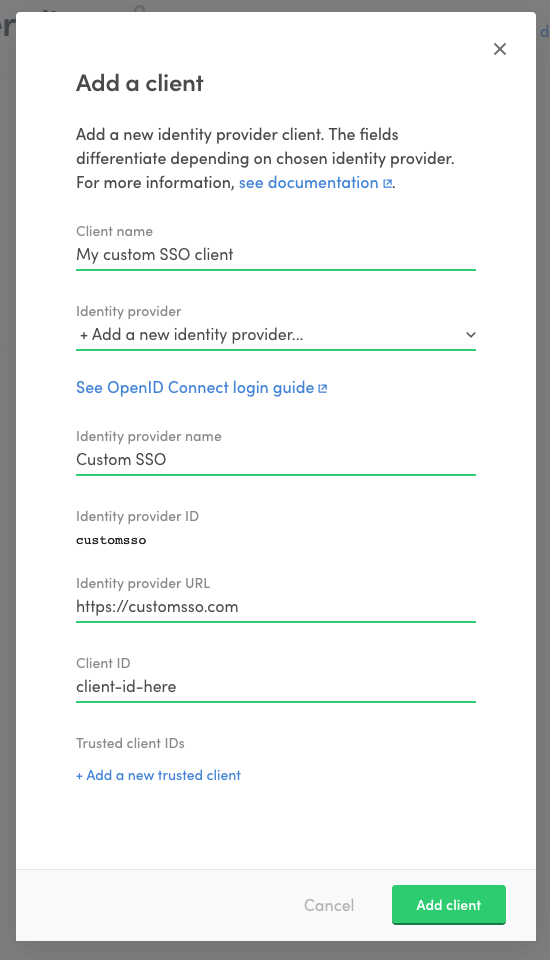
Add client
Click “Add client” to create the client and identity provider.
Now that you have created the identity provider, you can use it if your login flow requires using another client or if you wish to remove the client you added and create a new one. Just select the identity provider from the dropdown when creating a new client.
Add OpenID Connect login flow to Sharetribe Web Template
OpenID Connect login flow can be added to Sharetribe Web Template in multiple ways. One good starting point is to take a look at OpenID Connect implementations in the Passport.js strategies . We also recommend using the default facebook.js and google.js files as a basis for your modifications.
On a high level, you can follow these steps to get started with your integration.
Create auth file
Replicate either facebook.js or google.js and rename it for your identity provider.
Update passport strategy
Replace the passport module with one for your provider. Update the strategy options accordingly.
Configure credentials
Add your provider and Sharetribe SSO client credentials to .env.
Update
your new file
and
createWithIdp.js .
Also update the
identity provider selection logic .
Define a callback
Import your new file in server/apiRouter.js and define callback endpoints . Add the callback URL to your provider’s settings.
Add login buttons
Add buttons for your service in the AuthenticationPage SocialLoginButtons component .
Implement verify callback
Update the
verifyCallback function
to parse provider response parameters, extract the ID token, and pass it
to done. This ensures tokens flow correctly to Sharetribe’s
/auth/auth_with_idp
and
current_user/create_with_idp
endpoints.
Identity provider specific information
Apple Sign-in
Apple Sign-in has several features that resemble the OpenID Connect specification. However, it is not explicitly stated to be OpenID Connect compliant. To the knowledge of our team, the Apple Sign-in token should be compliant with the Sharetribe back-end at the time of this writing (2024-05), but you will need to conduct your own testing to verify this.
Apple Sign-in also requires developers to set up a private email relay service for Apple users who do not want to share their email address with the service. If you do integrate Apple Sign-in, it is important that you provide Sharetribe with a valid email address even if the user requests to keep their own address private. At the moment, the Sharetribe managed Sendgrid setup cannot handle private relay addresses, so at the very least you will need to use your own Sendgrid account.
Auth0
Auth0 requires identity provider URL with a trailing slash, but Sharetribe Console does not currently allow adding trailing slashes. If you are adding an Auth0 integration, add the URL without the trailing slash, and reach out to Sharetribe Support so we can manually fix the formatting.
Sign In with LinkedIn was updated to support Open ID Connect in August 2023. The corresponding Passport strategy has been updated to version 3.0.0 support Open ID Connect in the Github repository . However, at the time of this writing, only version 2.0.0 seems to be available through npm and yarn package managers. This means that to use version 3.0.0 in your integration, you will need to install the package directly from the Github repository:
## yarn add <git remote url>#<branch/commit/tag>
yarn add https://github.com/auth0/passport-linkedin-oauth2#v3.0.0