Last updated
Implement user deletion
This article guides you in implementing a feature where a user can delete their own account through the Sharetribe Web Template Account settings section.
Table of Contents
Sharetribe Marketplace API has an endpoint for deleting a user's account. After the user has been deleted, any transactions where they are a participant cannot transition forward, and no payouts will be made to the user – even if the payouts have already been scheduled.
This how-to article guides you in implementing an account deleting feature in the Sharetribe Web Template "Account settings" section. When the signed-in user navigates to the account deletion page, they need to enter their password to confirm that they do in fact want to delete their account. An endpoint in the template application's server then gets called, and that endpoint checks whether the user has incomplete transactions.
Depending on the result, the endpoint then either returns the count of
incomplete transactions, or deletes the user's account through the
current_user/delete endpoint. If the user cannot be deleted, the page
shows the count of unfinished transactions, and if the user is deleted,
they are immediately logged out.
This how-to guide is based on the Sharetribe Web Template and the
default-booking process. As you implement the guide, you will need to
review the transaction processes used on your marketplace to see which
transitions count as non-final transitions, i.e. ones where you do not
want to allow the user to delete their profile.
In addition to incomplete transactions, your marketplace transaction
processes may have payout considerations. If your transaction process
uses the default Stripe integration including payouts, it may take up to
7 days from stripe-confirm-payment-intent action until the payout is
processed by Stripe, even if stripe-create-payout is called and the
payout has been scheduled.
In other words, if your transaction processes create a provider payout close to the payment intent being confirmed, you may want to prevent users from deleting their profile before 7 days have passed from payment intent being confirmed. Alternatively, you can of course handle payouts manually for deleted users, if the transactions have otherwise been completed.
Add UI components
Add "Delete account" tab to Account settings
First, add a new tab to the Account settings section of the template.
└── src
    └── components
        └── LayoutComposer
            └── LayoutSideNavigation
                └──LayoutWrapperAccountSettingsSideNav.js
          ...
The new page will appear as the final tab in Account Settings side navigation.
      linkProps: {
        name: 'PaymentMethodsPage',
      },
    },
    {
      text: <FormattedMessage id="LayoutWrapperAccountSettingsSideNav.deleteAccountTabTitle" />,
      selected: currentPage === 'DeleteAccountPage',
      id: 'DeleteAccountPageTab',
      linkProps: {
        name: 'DeleteAccountPage',
      },
    },
  ];
Next, add the actual DeleteAccountPage component. You can use the example files directly, or modify them for your use case.
└── src
    └── containers
         └── DeleteAccountPage
              └── DeleteAccountPage.js
              └── DeleteAccountPage.duck.js
└── DeleteAccountPage.module.cssOnce the DeleteAccountPage component and corresponding Redux store DeleteAccountPage.duck.js exist in the project, import the Redux file reducer to a combined reducer.
└── src
    └── containers
         └── reducers.js
For more info on the Redux structure, you can read about the Ducks modular Redux proposal, which is the proposal of Redux usage followed in the Sharetribe Web Template.
  import ContactDetailsPage from './ContactDetailsPage/ContactDetailsPage.duck';
  import DeleteAccountPage from './DeleteAccountPage/DeleteAccountPage.duck';
  import EditListingPage from './EditListingPage/EditListingPage.duck';
  ...

  export {
    CheckoutPage,
    ContactDetailsPage,
    DeleteAccountPage,
    EditListingPage,
Since DeleteAccountPage has a new route, add the component to the application's route configuration.
└── src
    └── routing
        └── routeConfiguration.js
const ContactDetailsPage = loadable(() =>
import(
/* webpackChunkName: "ContactDetailsPage" */ '../containers/ContactDetailsPage/ContactDetailsPage'
)
);
const DeleteAccountPage = loadable(() =>
import(
/* webpackChunkName: "DeleteAccountPage" */ '../containers/DeleteAccountPage/DeleteAccountPage'
)
);
const EditListingPage = loadable(() =>
import(
/* webpackChunkName: "EditListingPage" */ '../containers/EditListingPage/EditListingPage'
)
);The "Account settings" side navigation tabs are defined in routeConfiguration.js as well, so add DeleteAccountPage in the tab array.
export const ACCOUNT_SETTINGS_PAGES = [
  'ContactDetailsPage',
  'PasswordChangePage',
  'StripePayoutPage',
  'PaymentMethodsPage',
  'DeleteAccountPage',
];
Then, add the delete profile route to the array returned by the route configuration function:
    {
      path: '/account/delete-profile',
      name: 'DeleteAccountPage',
      auth: true,
      authPage: 'LoginPage',
      component: DeleteAccountPage,
    },
Finally, add the necessary marketplace text rows into either src/translations/en.json or the Sharetribe Console Marketplace texts editor.
└── src
    └── translations
         └── en.json
Feel free to modify the texts to suit your marketplace.
"DeleteAccountPage.details": "This action is permanent and cannot be undone! After deleting your account, you will be logged out immediately and will not be able to access your listings or transactions anymore.",
"DeleteAccountPage.heading": "Delete your account",
"DeleteAccountPage.title": "Delete your account",
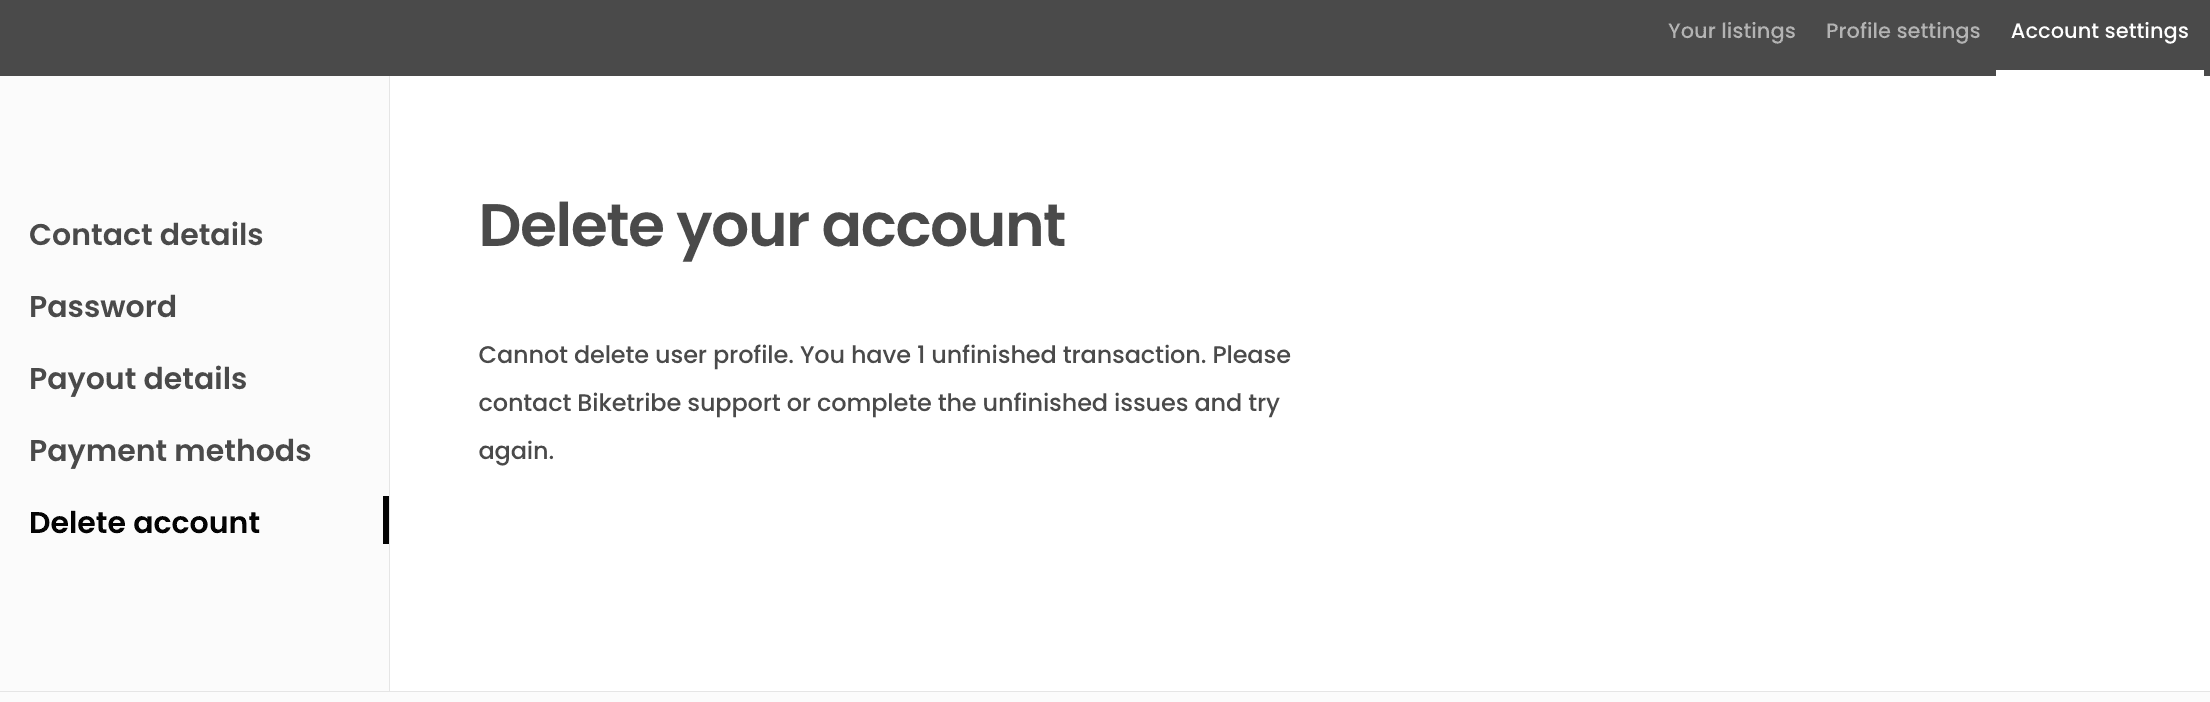
"DeleteAccountPage.error": "Cannot delete user profile. You have {errorCause} Please contact Biketribe support or complete the unfinished issues and try again.",
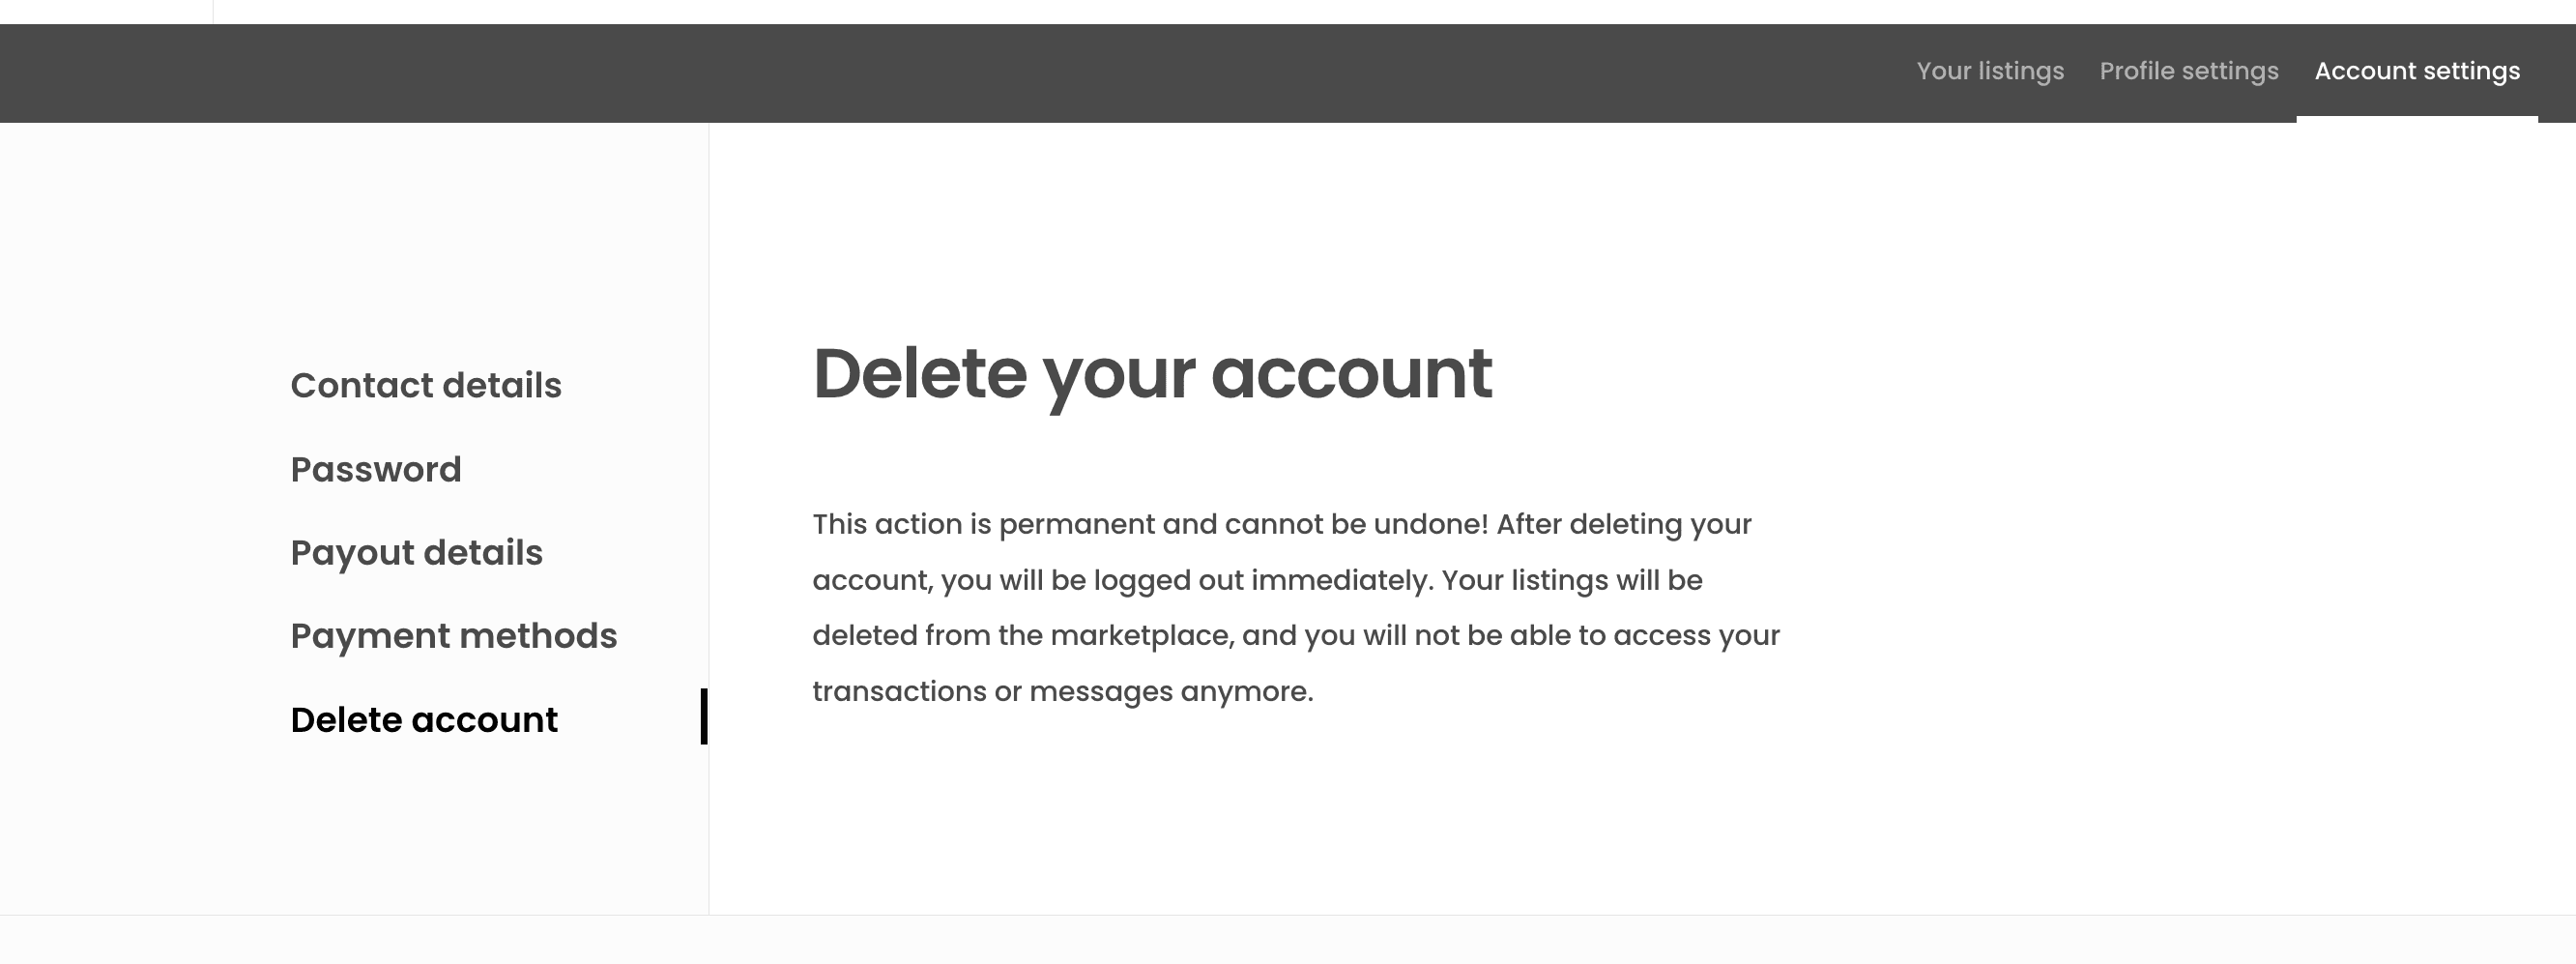
"LayoutWrapperAccountSettingsSideNav.deleteAccountTabTitle": "Delete account",If you now navigate to Account Settings, you can see the "Delete account" tab on the left side navigation. If you click the tab, you can see the info text.
Next, we'll implement the form component for deleting the user account.
Add DeleteAccountForm
Next, we want to add the form that actually handles the user deletion experience.
└── src
    └── containers
         └── DeleteAccountPage
             └── DeleteAccountForm
                   └── DeleteAccountForm.js
└── DeleteAccountForm.module.cssYou can either use the files directly, or use them as a template for modification. You can, for instance, add a feedback field if you need the user to submit some information before they can delete their account.
Now that the DeleteAccountForm component exists, implement it into the DeleteAccountPage template you downloaded earlier.
└── src
    └── containers
         └── DeleteAccountPage
              └── DeleteAccountPage.js
Set DeleteAccountPage to only show the form for authenticated users. First, create the form component depending on whether current user exists.
import DeleteAccountForm from './DeleteAccountForm/DeleteAccountForm';// Show form for a valid current user
const showDeleteAccountForm = currentUser && currentUser.id;
const deleteAccountForm = showDeleteAccountForm ? (
<DeleteAccountForm
className={css.form}
deleteAccountError={deleteAccountError}
currentUser={currentUser}
onSubmit={handleDeleteAccount}
onChange={onChange}
onResetPassword={onResetPassword}
resetPasswordInProgress={resetPasswordInProgress}
resetPasswordError={resetPasswordError}
inProgress={deleteAccountInProgress}
ready={accountDeleted}
/>
) : null;Then, add the form component as a child to the Page component.
  return (
    <Page title={title} scrollingDisabled={scrollingDisabled}>
...
            {pageDetails}
+           {deleteAccountForm}
          </div>
...
    </Page>
  );
You still need to add some marketplace texts related to the form.
└── src
    └── translations
         └── en.json
The DeleteAccountForm template file has validations for password length and requirements, so those validation error messages require marketplace text strings. The file also has the capability to send a password reset link to the user if they have forgotten their password.
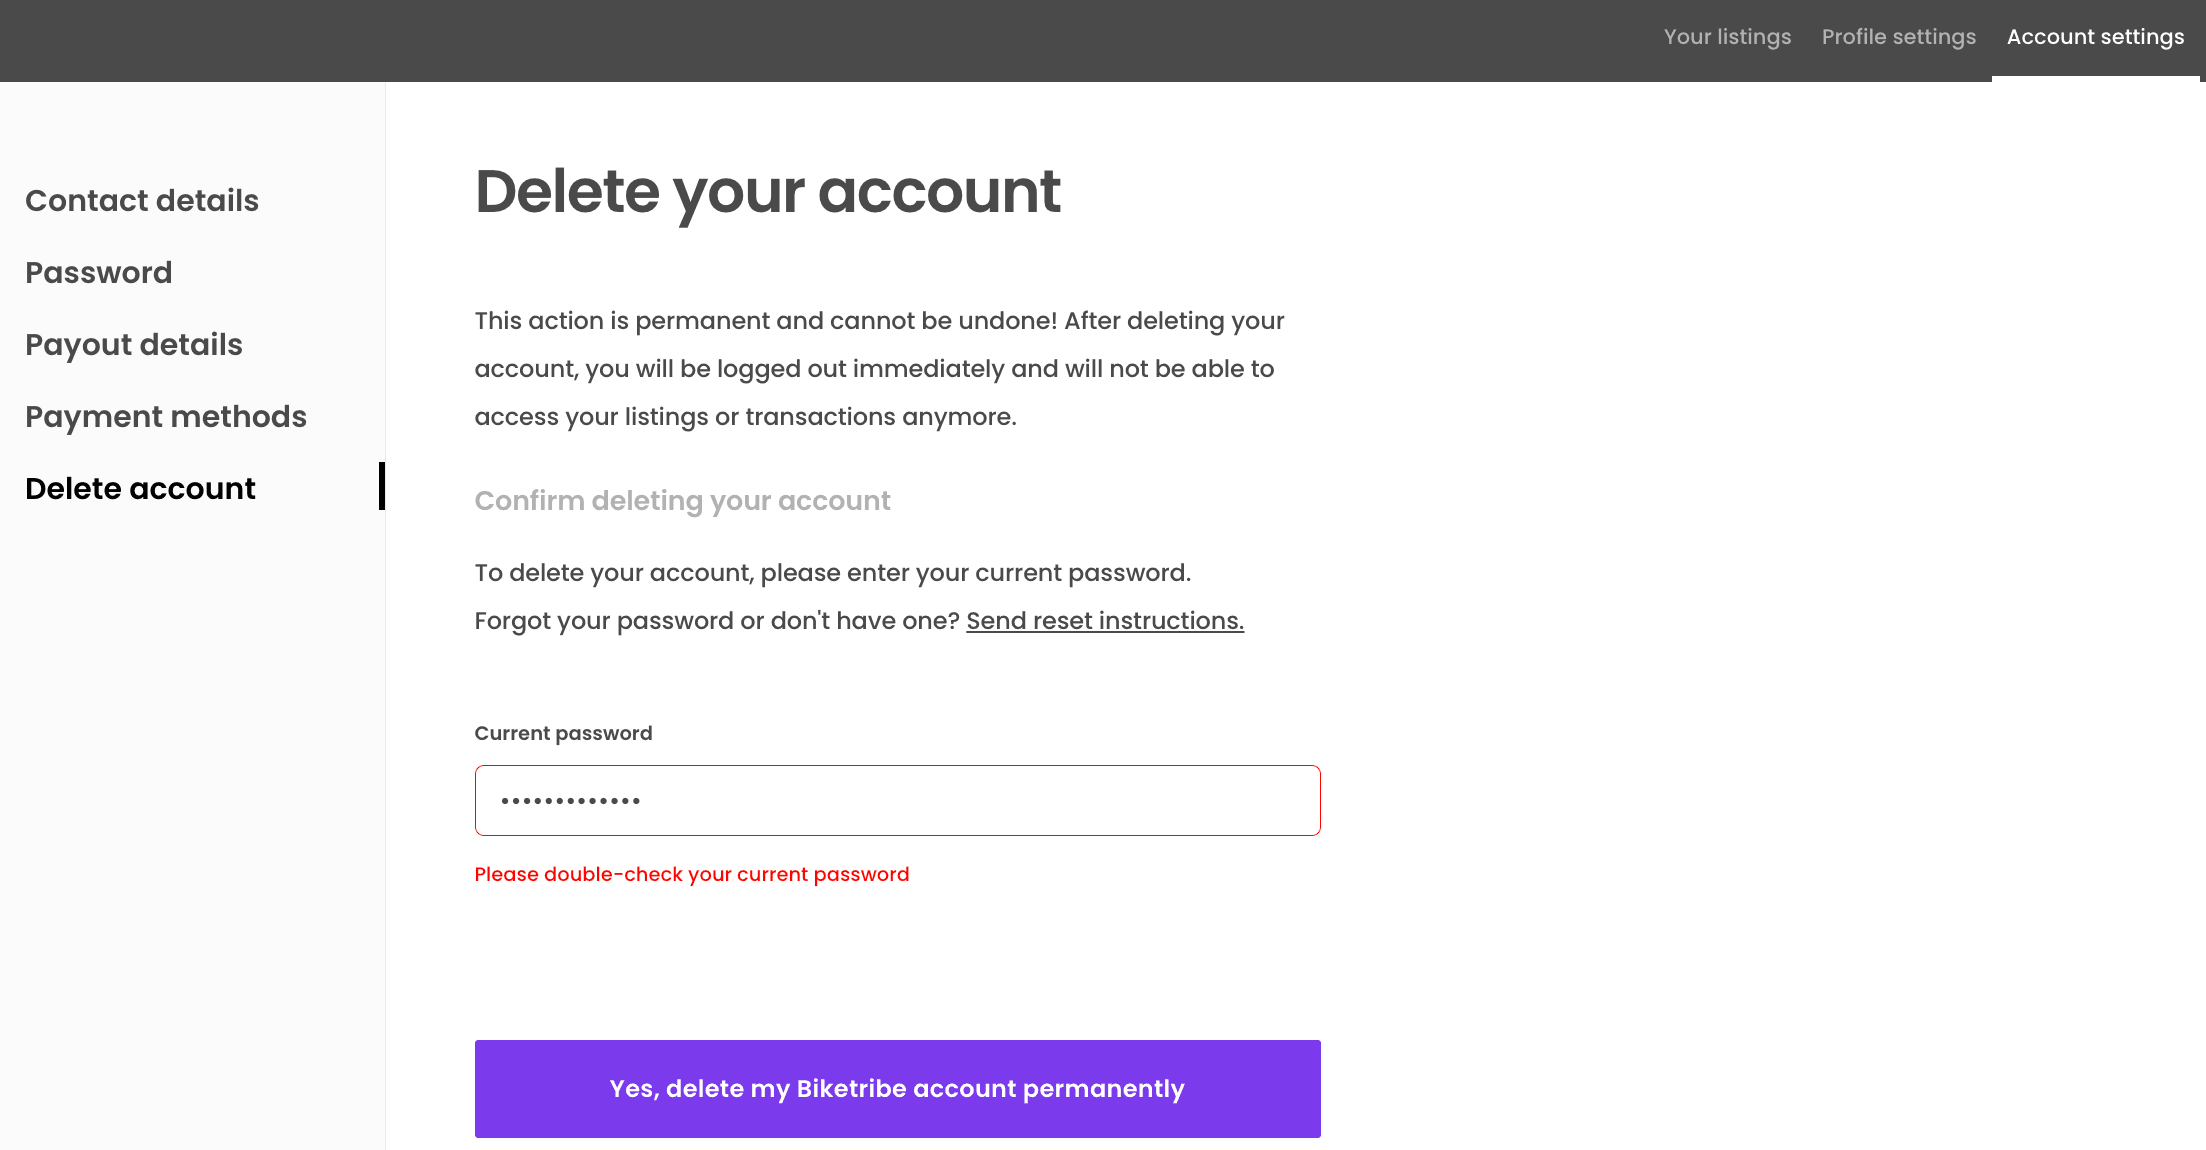
"DeleteAccountForm.confirmChangesInfo": "To delete your account, please enter your current password.",
"DeleteAccountForm.confirmChangesTitle": "Confirm deleting your account",
"DeleteAccountForm.conflictingData": "Unable to delete user profile. You have {errorCause}",
"DeleteAccountForm.genericFailure": "Whoops, something went wrong. Please refresh the page and try again.",
"DeleteAccountForm.passwordFailed": "Please double-check your current password",
"DeleteAccountForm.passwordLabel": "Current password",
"DeleteAccountForm.passwordPlaceholder": "Enter your current password…",
"DeleteAccountForm.passwordRequired": "Current password is required",
"DeleteAccountForm.passwordTooLong": "The password should be at most {maxLength} characters",
"DeleteAccountForm.passwordTooShort": "The password should be at least {minLength} characters",
"DeleteAccountForm.resetPasswordInfo": "Forgot your password or don't have one? {resetPasswordLink}",
"DeleteAccountForm.resetPasswordLinkSent": "The instructions for resetting your password have been sent to {email}.",
"DeleteAccountForm.resetPasswordLinkText": "Send reset instructions.",
"DeleteAccountForm.resendPasswordLinkText": "Resend instructions.",
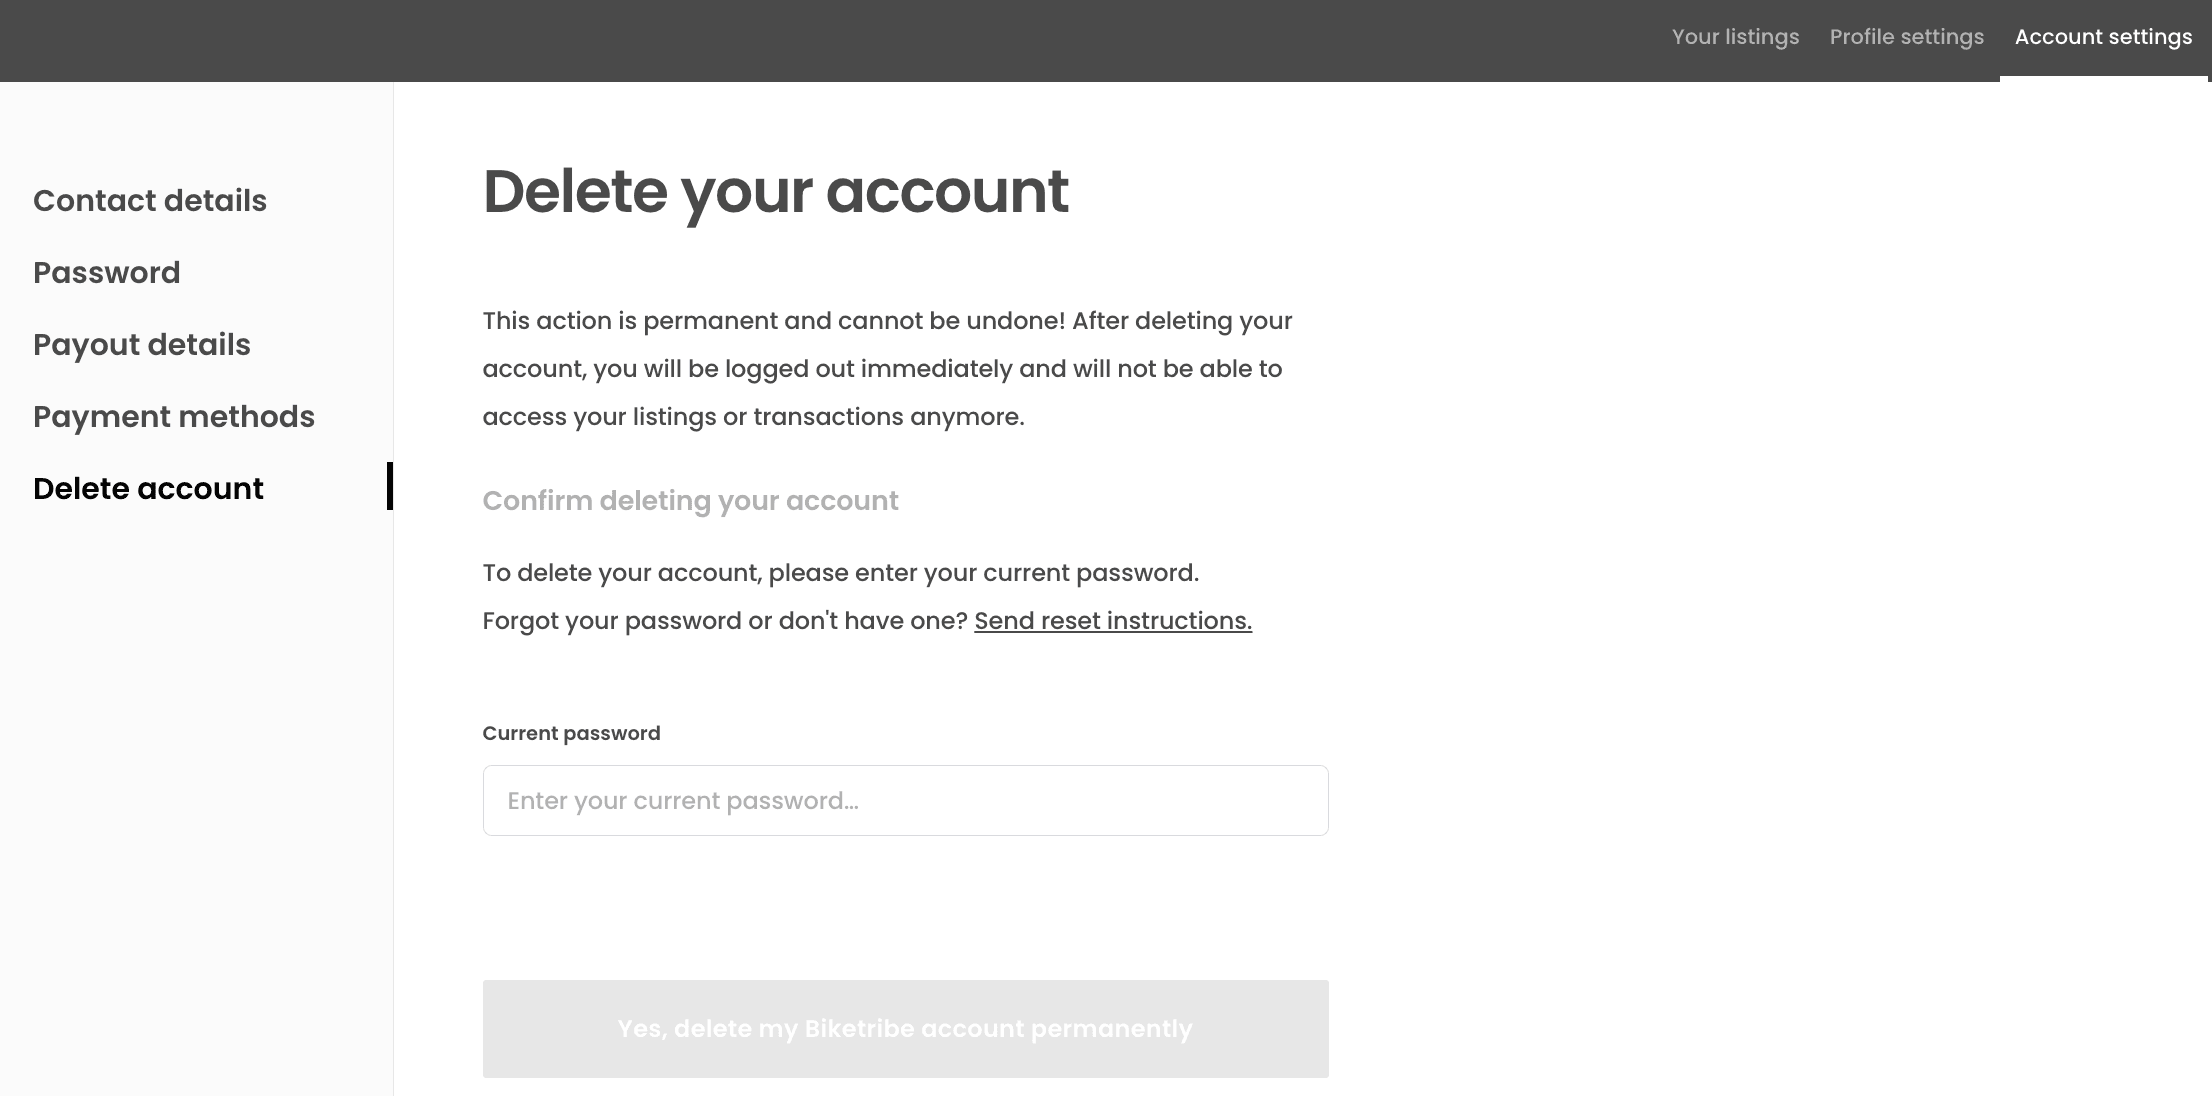
"DeleteAccountForm.saveChanges": "Yes, delete my Biketribe account permanently",You can now see the input for the user's current password, as well as the button for deleting the account. on the page.
└── src
    └── containers
         └── DeleteAccountPage
              └── DeleteAccountPage.js
- import React, { useEffect } from 'react';
+ import React, { useEffect, useState } from 'react';
...
- import { isScrollingDisabled } from '../../ducks/ui.duck';
+ import { isScrollingDisabled, manageDisableScrolling } from '../../ducks/ui.duck';
...
UserNav,
+ Button,
+ Modal
} from '../../components';
...
onLogout,
+ onManageDisableScrolling,
onSubmitDeleteAccount,...
} = props;
+ const [modalIsOpen, toggleModalOpen] = useState(false);
+
+ const handleModalOpen = () => {
+ toggleModalOpen(true);
+ }
+
+ const handleModalClose = () => {
+ toggleModalOpen(false);
+ }
const handleDeleteAccount = (values) => {
+ handleModalClose()
return onSubmitDeleteAccount(values).then(() => {
onLogout();
})
}
...
+ const incompleteTransactions = deleteAccountError?.status === 409;Replace {deleteAccountForm} with the following:
            <Button
              onClick={handleModalOpen}
              disabled={incompleteTransactions}
            >
              Delete my account
            </Button>
            <Modal
              id="DeleteAccountPage.deleteAccountModal"
              isOpen={modalIsOpen}
              onManageDisableScrolling={onManageDisableScrolling}
              onClose={handleModalClose}
            >
              {deleteAccountForm}
            </Modal>
Then, add onManageDisableScrolling to DeleteAccountPageComponent.propTypes:
DeleteAccountPageComponent.propTypes = {
  deleteAccountError: propTypes.error,
  deleteAccountInProgress: bool.isRequired,
  currentUser: propTypes.currentUser,
  onChange: func.isRequired,
  onManageDisableScrolling: func.isRequired,
  onSubmitDeleteAccount: func.isRequired,
  accountDeleted: bool.isRequired,
  scrollingDisabled: bool.isRequired,
  resetPasswordInProgress: bool,
  resetPasswordError: propTypes.error,

  // from injectIntl
  intl: intlShape.isRequired,
};
Also add onManageDisableScrolling to mapDispatchToProps:
const mapDispatchToProps = dispatch => ({
onChange: () => dispatch(deleteAccountClear()),
onLogout: () => dispatch(logout()),
onManageDisableScrolling: () => dispatch(manageDisableScrolling()),
onSubmitDeleteAccount: values => dispatch(deleteAccount(values)),
onResetPassword: values => dispatch(resetPassword(values)),
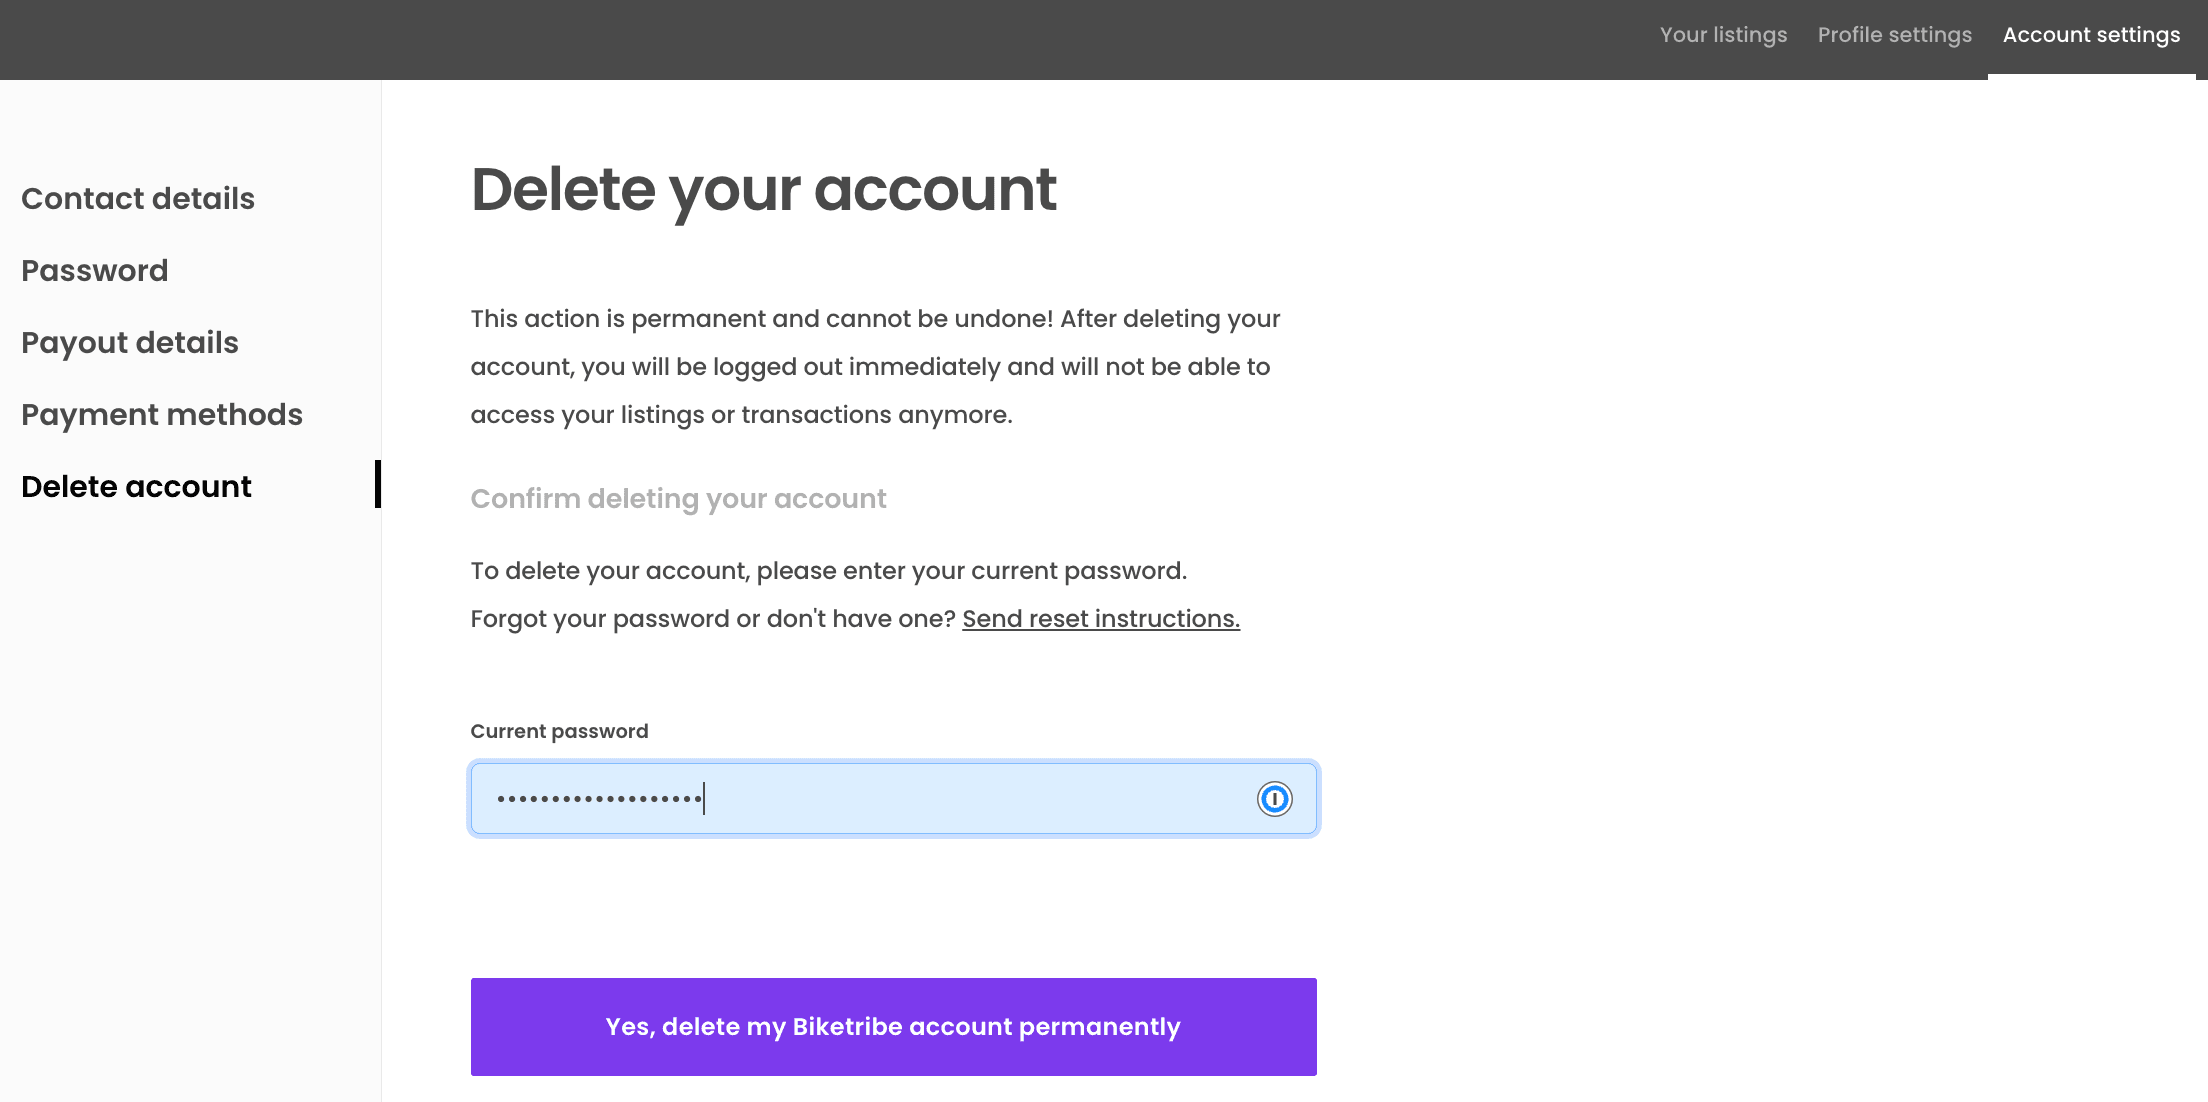
});If you now enter the password for the account you used to log in, the button activates when the input length is long enough to be a valid password.
However, if you click the button now, you will get an error from
DeleteAccountPage.duck.js stating that deleteUserAccount is not
defined. We will add the endpoint to the Redux action next.
Add logic to call the Sharetribe API endpoint
The next step is to add the logic that calls the server endpoint, which then calls the Marketplace API endpoint if the user can be deleted.
Update SDK
First of all, to get access to the new endpoint, you will need to update the SDK package.
yarn upgrade sharetribe-sdkAfter updating the SDK, you can start adding the endpoint and logic.
Add endpoint to client side
When you click the button to delete the user account,
DeleteAccountPage.js dispatches a
thunk called
deleteAccount, which in turn calls endpoint deleteUserAccount.
First, create the endpoint in the client-side API file.
└── src
    └── util
        └── api.js
          ...
// Check if user can be deleted and then delete the user. Endpoint logic
// must be modified to accommodate the transaction processes used in
// the marketplace.
export const deleteUserAccount = body => {
return post('/api/delete-account', body);
};Then, import the endpoint in DeleteAccountPage.duck.js.
import { deleteUserAccount } from '../../util/api';Now, clicking the delete button should show a 404 error in the dev tools console, since the endpoint does not yet exist on the server side. You will also see a generic error ("Whoops, something went wrong. Please refresh the page and try again.") above the delete button.
Finally, in the server endpoint, you need to check whether the user has any transactions that have not finished and would thus prevent deleting their account.
Add endpoint logic
First, set up the endpoint logic. You can use the delete-account.js
file below as your starting point. However, you will need to modify the
logic to correspond to your own transaction processes. For convenience,
we've commented out the code that calls the SDK, so you can test the
actual flow of the user interface first, before accidentally deleting
any of your test users.
Save the file in the server/api folder.
└── server
    └── api
        └── delete-account.js
...Each transaction process has its own logic and flow. Determine the points at which you want to prevent the user from deleting their own profile.
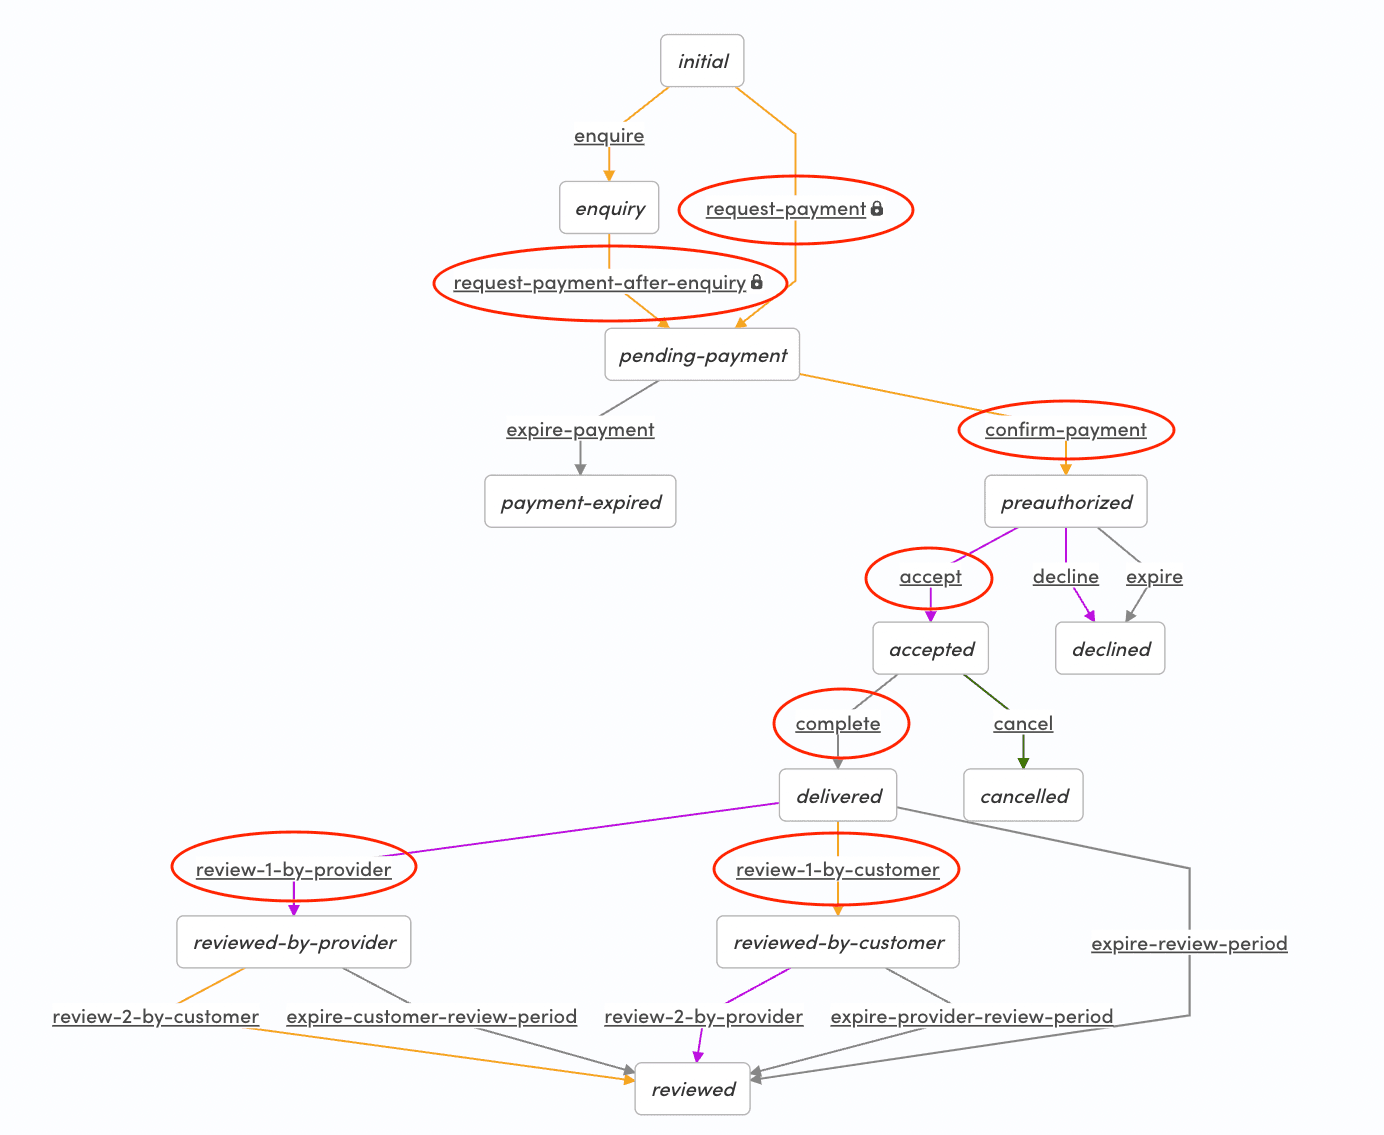
// The list of non-final transitions depends on the transaction processes
// being used on the marketplace. This list contains the non-final transitions
// of an unmodified default-booking process i.e. the transitions where we do not want to
// allow the user to delete their account.
const nonFinalTransitions = [
  'transition/request-payment',
  'transition/request-payment-after-inquiry',
  'transition/confirm-payment',
  'transition/accept',
  'transition/complete',
  'transition/review-1-by-customer',
  'transition/review-1-by-provider',
]; sdk.transactions.query({
only: "sale"
})
.then(resp => {
// In the default-booking and default-purchase processes, payouts are created on "transition/complete". We want to
// determine the transactions where this transition has been created less than 7 days ago.
const pendingPayouts = resp.data.data.filter(tx =>{
// For the transactions where the user is the provider, check the transitions
// to determine whether "transition/complete" was created less than 7 days ago.
return tx.attributes.transitions.some(tr => {
const today = new Date();
const sevenDaysFromCreated = new Date(tr.createdAt);
sevenDaysFromCreated.setDate(sevenDaysFromCreated.getDate() 7);
return tr.transition == 'transition/complete' && today < sevenDaysFromCreated;
});
})Finally, add the endpoint to apiRouter in the server.
└── server
    └── apiRouter.js
  ...
const transitionPrivileged = require('./api/transition-privileged');
+ const deleteAccount = require('./api/delete-account');
...
router.post('/transition-privileged', transitionPrivileged);
+ router.post('/delete-account', deleteAccount);If you want to hide the password field and delete button when the user
has unfinished transactions, you can check the status of
deleteAccountError on DeleteAccountPage.js and only show the fields
when the user has not already received a 409 Conflict error.
In that case, replace the existing const showDeleteAccountForm definition with the one below:
// Show form for a valid current user
const showDeleteAccountForm =
  currentUser && currentUser.id && deleteAccountError?.status !== 409;
Test functionality
You can now test the functionality! When you enter your password and click the delete button, depending on the user's transaction history you will either see an error message on the page or be logged out.
The Marketplace API endpoint also validates the user's password. If the password they entered is not their valid current password, the endpoint returns 403 Forbidden, and the page shows a validation error message under the password input.
Once you are happy with the user flow without the deletion SDK call, you
can uncomment the code in delete-account.js that calls the SDK
endpoint. After that, you can confirm the deletion of the user in your
Sharetribe Console.
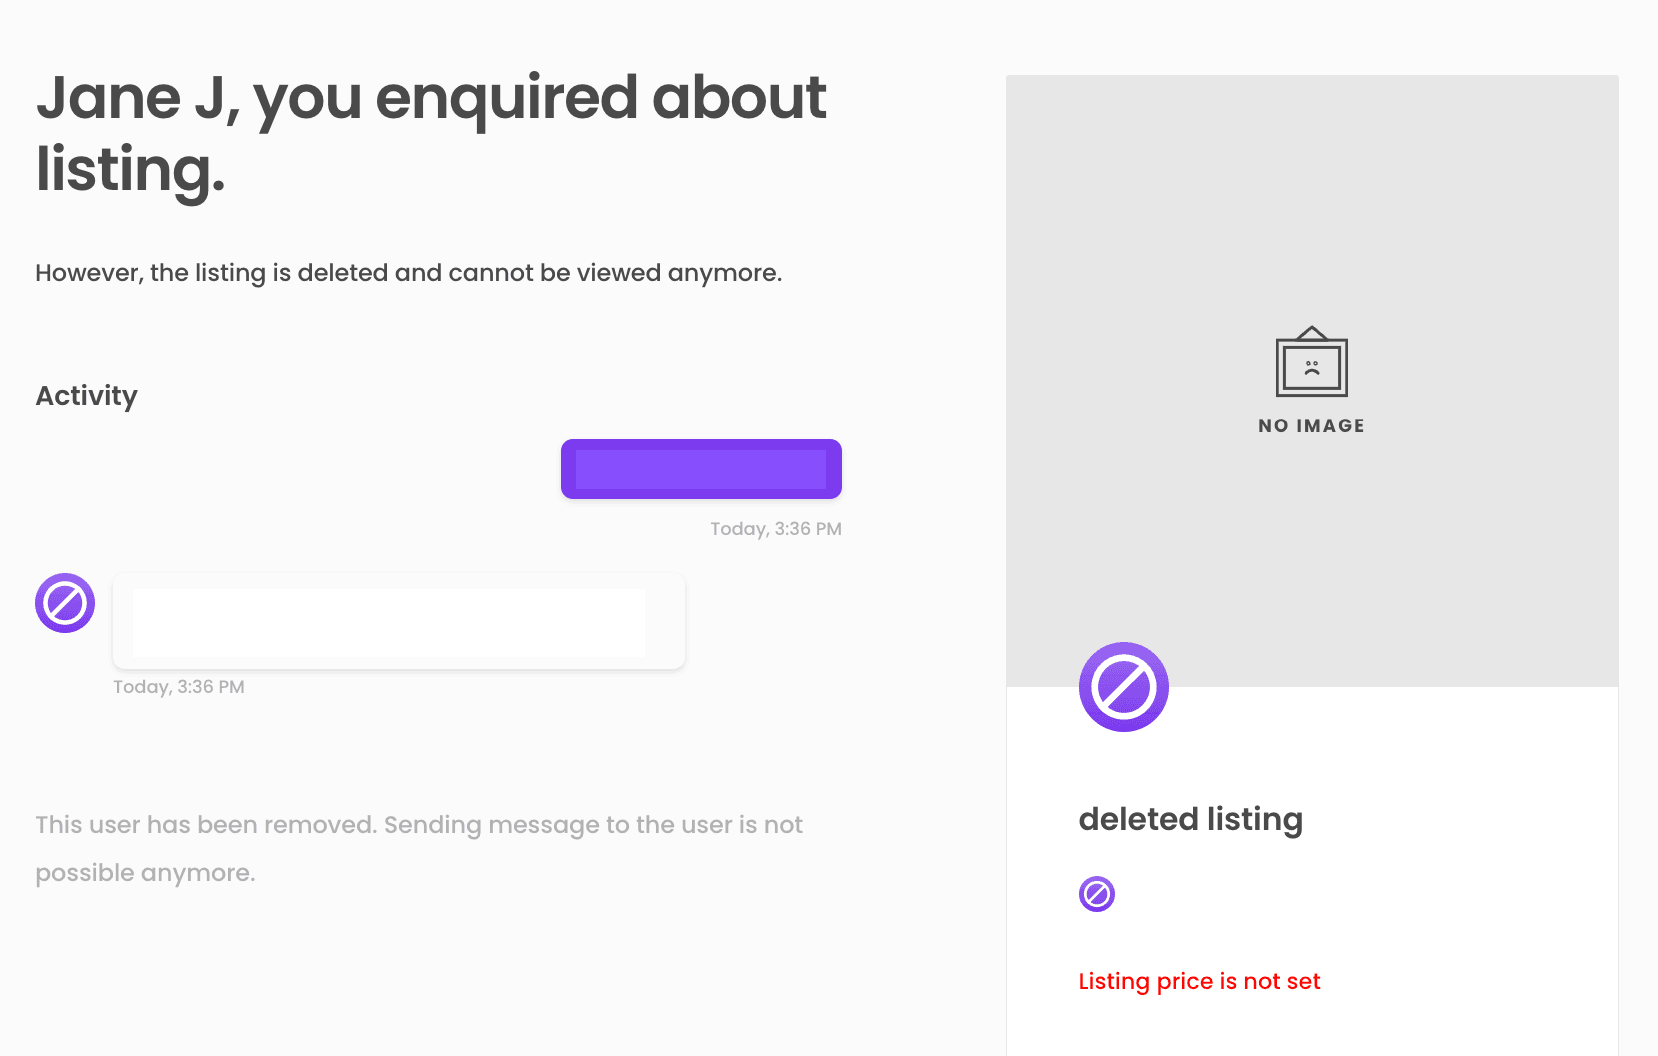
Once a user has been deleted, their listings are also removed. However, their transactions and messages will still show up in the inbox of the transaction's other party.
And that's it! Depending on your marketplace needs, you can build further steps into the process before you allow the user to delete their own account.