Last updated
How to integrate a 3rd-party payment gateway with your marketplace
This guide describes, on a high-level, how to integrate any 3rd-party payment gateway with your Sharetribe-powered marketplace.
Table of Contents
- Prerequisites
- Marketplace payment flow
- Step 1: Provider onboarding
- Step 2: Customer checkout
- Step 3: Provider accept
- Step 4: Customer refund
- Step 5: Provider payout
- Can I just accept all payments to my own bank account and pay my providers manually?
- Before you start the integration
- White-label or hosted onboarding and payments
- White-label onboarding and payments
- Hosted onboarding and payments
- Hosted onboarding and white-label payments
- Do you need to be PCI DSS compliant to integrate with a 3rd-party payment gateway?
- PCI DSS compliance levels
- Self-Assessment Questionnaire (SAQ)
- When and where do I submit the Self-Assessment Questionnaire?
- Conclusion about marketplace PCI DSS compliance
- Communication between the marketplace app and payment gateway
- API calls
- Redirect URLs and Return URLs
- Webhooks
- Integrating your Sharetribe marketplace with a 3rd-party payment gateway
- Using privileged transitions
- Using Events
- Integrating payment steps with your marketplace
- Step 1: Provider onboarding
- Step 2: Customer checkout
- Step 3: Provider accept
- Step 4: Customer refund
- Step 5: Provider payout
- Summary
- Further reading
Sharetribe provides out-of-the-box integration with Stripe. To reach markets not supported by Stripe, relying on another payment gateway can be crucial. This guide describes on a high-level, without going into the details of specific payment gateways, how to integrate any 3rd-party payment gateway (such as PayPal Commerce Platform, MANGOPAY, or Adyen for Platforms) with Sharetribe.
Prerequisites
Before reading this guide, you should be familiar with the following Sharetribe features:
Marketplace payment flow
In this section we illustrate a marketplace payment flow in high-level and briefly discuss each stage. Later in this article, we'll go through how to integrate each state with your Sharetribe-powered marketplace.
In a nutshell, a payment flow in a marketplace contains five significant steps. The following diagram illustrates a timeline of these steps:

Step 1: Provider onboarding
In this step, the provider connects their Sharetribe account with the payment gateway. This is the step when they provide the bank details where the money from the customers will be transferred to. In addition, in this step, they provide the necessary information and documents for the identity verification and Know Your Customer (KYC) requirements.
Step 2: Customer checkout
Customer checkout happens when the customer initiates a transaction. At this stage, they also provide the payment information, such as their credit card number. Also, the payment will be made at this point. The payment gateway will preauthorize the money, i.e. reserve the money on customer's credit card.
Step 3: Provider accept
After the customer has checked out, the provider has ability to either accept or reject the request. If the request is accepted, the payment will be captured, and the reserved money will be transferred from customer's credit card to the payment gateway.
Provider accept is a step that you can combine with the customer checkout. The flow where provider accept happens instantly after customer checkout is called "instant booking" flow.
Step 4: Customer refund
Typically, the marketplace payment flow contains a delayed payment period. This is the time between the money is captured from customer's credit card and transferred to the provider's bank account. The payout in marketplaces usually happen after the provider has successfully provided the agreed service.
Customer refund usually happens during the delayed payment period. There are many reasons why a refund may be necessary, for example, the provider or customer may not be able to make it or the provided service was not what was agreed.
Step 5: Provider payout
If everything in the transaction went right and the customer received the agreed service, the money from the payment gateway will be eventually paid out to the provider.
Can I just accept all payments to my own bank account and pay my providers manually?
You might be wondering if it would be easier for you to just accept the entire payment to your own bank account, and handle refunds to customers payouts to providers separately, outside the main platform functionality.
In terms of development work required to build the integration, this is indeed a lot easier. Any online payment service provider in the world supports such a simple checkout flow.
However, this can lead to a myriad of issues in terms of regulation, accounting, and liability. You could be considered as holding other people's money, which is a heavily regulated area. In many countries, you need to acquire an expensive license for this purpose, and holding money without such a license is considered a crime. You might also be considered to be responsible for providing the goods or services your providers are selling, which is not always desirable. Finally, handling the payouts to the providers correctly can be quite a lot of manual, error-prone labor. You also still need to ensure the Know Your Customer process has been done correctly for them.
Because of these challenges, we recommend you to only consider building a flow where the entire payment goes to your account only if you're absolutely sure that you're aware of all the consequences, and have gotten your approach greenlighted by your accountant and a lawyer familiar with the matter.
From now on, this article focuses on integrating with a marketplace-specific payment solution, which handles the issues described above for you. Learn more about choosing the right payment service provider.
Before you start the integration
Before you start coding the integration, we strongly advise you to contact the payment provider's customer support team.
Keep in mind that while many payment providers give you access to their sandbox environment, access to the live environment usually needs contacting customer support and possibly signing a contract with them.
Contact the support and make sure that:
- They are available in the country where you operate your business
- They support a marketplace-specific payment flow, handling Know Your Customer process for your providers and splitting payments
- They can process the currencies of your marketplace
- They can do payouts to your providers' country/countries
- You are eligible to get access to the live environment
- You know the process of how to get access to the live environment
- You are familiar with the fees involved.
White-label or hosted onboarding and payments
Before integrating a 3rd-party payment gateway with Sharetribe, a few words on the different onboarding and payment experiences the payment gateways offer. The different experiences have implications for the integration, branding, and also the level of PCI-compliance required.
There are two main types of onboarding and payment experiences the payment gateways offer: white-label and hosted. However, most providers offer a mix of both.
White-label onboarding and payments
Payment gateways such as MANGOPAY and Adyen offer a so-called white-label experience. This experience is closest to the default Stripe Connect integration in Sharetribe.
A white-label experience means that you build the payment flow inside your marketplace application. This way, you have control over the user-interface and branding. The downside is that the integration requires more coding to build, most likely requires more maintenance, too. The regulations concerning online payments may change, which means you'll need to update your integration accordingly.
When using white-label experience, you may also need to do some work regarding PCI-compliance, but more on that later.
Hosted onboarding and payments
Some payment gateways, such as PayPal, offer a hosted experience. In this case, the seller onboarding and customer payments happen by redirecting your user to the payment provider's website. After the customer completes the payment, the payment gateway redirects them to your application to the return URL you provided. This is also the case with seller onboarding: they'll interact with the branded user interface of the payment gateway.
With this model, you have limited control over the user-interface on the payment provider's website. However, there is also less coding required from you: The payment provider has already implemented the required forms and hosts them for you. In the case of a well-known payment gateway, their branded payment experience can also increase the perceived security of the payment experience.
In case of regulatory changes, the payment provider updates their user-interface to comply with the new regulation. Most likely, you also don't need to do any work regarding PCI-compliance when using a hosted experience.
Hosted onboarding and white-label payments
White-label payment gateways usually offer an option to use hosted pages in some stages of the payment flow. We offer this approach by default with the Stripe integration in Sharetribe, where we use hosted pages for provider onboarding and a white-label experience for customer checkout.
Using hosted pages for some parts of the payment flow and white-label experience for other parts provides a good balance between the work required from you and the ability to customize the user experience. For example, we've chosen to use Stripe-hosted pages for Sharetribe's provider onboarding because in this step, compliance with the Know Your Customer (KYC) guidelines is critical and may include uploading identity documents or utility bills. Implementing all that in a white-label fashion would require an undesirable amount of work.
Do you need to be PCI DSS compliant to integrate with a 3rd-party payment gateway?
PCI DSS stands for Payment Card Industry Data Security Standards. It is a set of security standards to ensure that companies that accept credit card payments process, store, and transfer the credit card information securely.
Since you are operating a marketplace business that accepts payment by credit card, you have to be PCI DSS compliant. However, there are different levels to PCI DSS compliance. You can reduce your required level of compliance significantly by using a payment gateway that offers tools like hosted pages and components or client-side encryption of the credit card information.
All of the payment gateways listed in this article (Adyen, PayPal, MANGOPAY, and Stripe) offer such tools.
PCI DSS compliance levels
There are four PCI DSS compliance levels, where Level 1 is the strictest.
Level 4 is for small-to-medium-sized businesses that process less than 20,000 transactions per year. Most early-stage marketplace entrepreneurs start at this level.
The only requirement for becoming Level 4 PCI DSS compliant is to perform a Self-Assessment Questionnaire (SAQ).
Self-Assessment Questionnaire (SAQ)
The PCI Security Standards Council offers several SAQ questionnaire documents. The one you should choose depends on your payment integration.
If you outsource credit card information processing to a PCI-compliant 3rd-party payment gateway, the required questionnaire is Self-Assessment Questionnaire A (SAQ A). The SAQ A is relatively short (24 yes/no questions).
Some payment gateways prefill the questionnaire for you. This is, for example, what Stripe does.
When and where do I submit the Self-Assessment Questionnaire?
Most likely, your payment gateway will contact you and ask you to upload the Self-Assessment Questionnaire and additional documents, if necessary.
Example: Stripe
- If you use Stripe Checkout/Elements, Mobile SDK, or Connect, Stripe pre-fills the SAQ A for you.
- Stripe monitors your transaction volume and notifies if a growing transaction volume will require a change in how you validate compliance.
Example: Adyen
- If you use Pay by Link (hosted experience), Adyen doesn't require you to submit SAQ A.
- If you use Drop-in or Components (white-label), Adyen requires you to assess your compliance with SAQ A and submit the filled questionnaire.
Conclusion about marketplace PCI DSS compliance
On some level, you need to be PCI DSS compliant.
However, if you are on Level 4, depending on the type of your payment integration, becoming PCI DSS compliant requires little to no work from you.
Communication between the marketplace app and payment gateway
Before integrating a 3rd-party payment gateway into your marketplace, it's good to be aware of the different methods apps can use to communicate with a payment gateway.
The most common communication methods are:
- API calls
- Redirect URLs and Return URLs
- Webhooks.
The communication method to use depends on the onboarding and payment experience, and the payment flow stage. For example, Redirect URLs are only used for hosted onboarding and payment pages. API calls instead are heavily used for white-label onboarding and payments, but they are also needed even when using hosted payments to request the hosted page URL where the user should be redirected.
Next, we'll go through all the different communication methods.
API calls
The marketplace can communicate with the payment gateway by calling their API. The marketplace needs to do this for example to request URL for the hosted page or make a payment in a white-label fashion. Even when using hosted experience payments, you still need to make API calls to the payment gateway for some payment actions, such as capturing the payment or refunding a payment.
To call the API, the payment gateways require you to use a secret key which you should never expose to the public. Thus, the API calls to the payment gateway need to happen from your marketplace backend, never from the user's browser.
Redirect URLs and Return URLs
When using hosted pages (i.e. your onboarding or payment experience is fully hosted or combines hosted and white-label stages), your app communicates with the payment gateway through data added in the URL.
Before redirecting your user to the hosted page, your marketplace makes an API call to the payment gateway to request the URL to the hosted page. At this point, your marketplace provides the payment gateway two different return URLs: one for when a payment is completed by the user, and one for failed or canceled payment. After receiving the hosted page URL from the payment gateway, you redirect the user to that URL.
When the user returns from the hosted page, the payment gateway redirects them to one of the return URLs depending on the payment status.
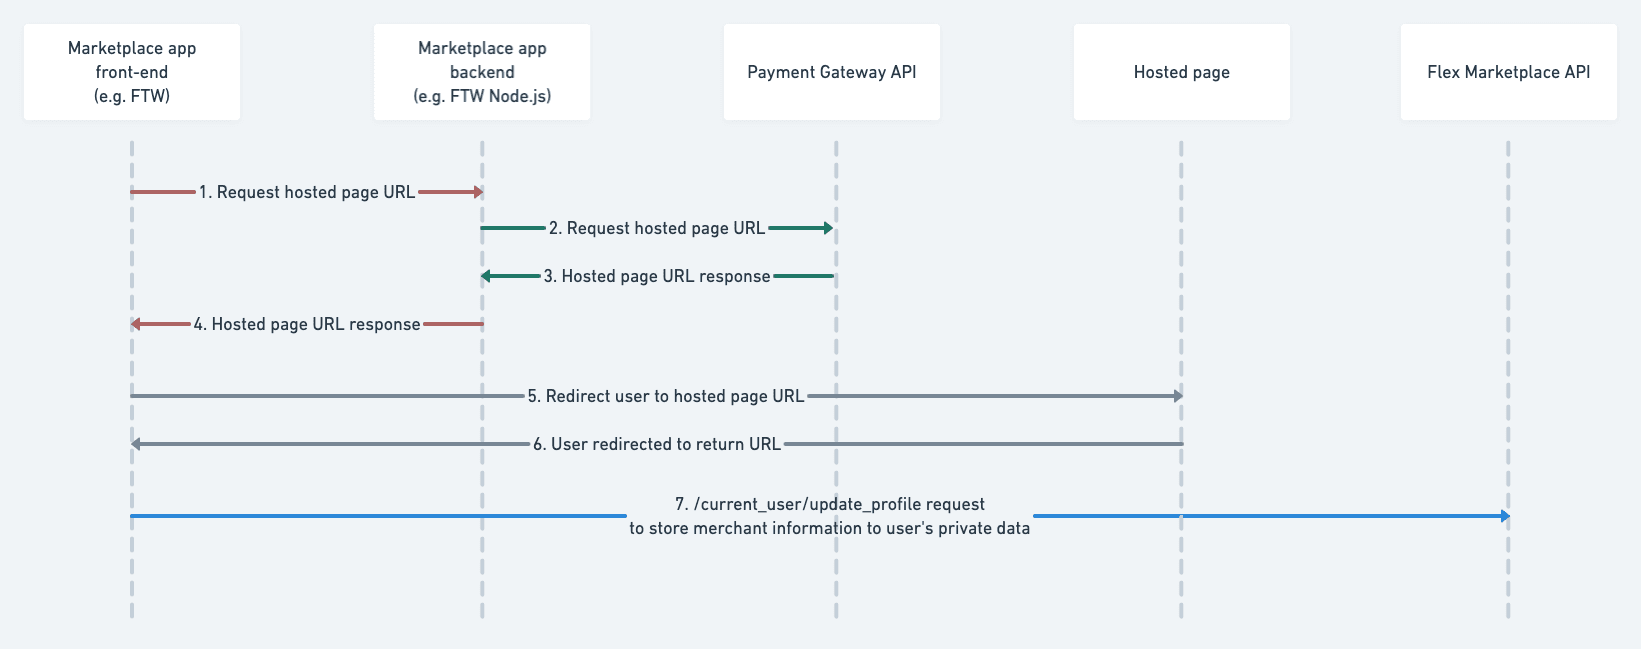
The payment gateway appends data about the onboarding or payment result to the return URL query parameters. When it redirects the user to your application, you can read this data from the URL and store it for later use. You can use the Marketplace API's update current user endpoint to store seller's onboarding status to current user's private data or the Integration API to store payment status to transaction's metadata.
Example: PayPal redirect after seller onboarding
After successful seller onboarding, PayPal redirects the seller to the return URL and loads the URL with the following query parameters:
merchantIdmerchantIdInPayPalpermissionsGrantedaccountStatusconsentStatusproductIntentIdisEmailConfirmedreturnMessageriskStatus
The marketplace should store at least the merchantId to current user's
private data. Later on, when a customer makes a payment to the seller,
the merchantId is needed in order to pay for the correct seller.
Webhooks
Payment gateways send webhook notifications that you can listen to.
You may want to listen to these notifications in a case where customer onboarding on a hosted page contains multiple steps or when a particular payment action such as payout is happening without user involvement, and you want to know the status of that action.
Example: PayPal onboarding
PayPal seller onboarding is complete when the following requirements are met:
- Seller creates a PayPal account.
- Seller grants you permission for the features you set.
- Seller confirms the email address of the account.
The marketplace can track the onboarding status by listening to the webhook notifications. When the marketplace knows the onboarding status, it can be used to provide the seller a useful message in the marketplace user-interface, should as "PayPal account created, but the email address is not yet confirmed. Please confirm the email address in order to complete the onboarding".
Backend endpoint to listen to webhook notifications
To listen to webhooks, you'll need to implement a new endpoint to your backend and configure the payment gateway to send the notifications to that URL. The endpoint should read the notifications and decide what to do with them and where to store the information. If a notification is, for example, about the user's onboarding status, you can use the Integration API to store the information in the user's private data. On the other hand, if the notification is about a payment related to a transaction, you may want to store the information in the transaction's metadata or transition the transaction.
If you use a Sharetribe Web Template, you can add a new endpoint by adding it to the API router.
We recommend securing the endpoint with Basic Authentication if the payment gateway supports that.
Integrating your Sharetribe marketplace with a 3rd-party payment gateway
There are two main options for integrating Sharetribe with a 3rd-party payment gateway:
For some payment flow stages you can use either method to build the integration, but for some stages using exactly one of the two is required. In the next chapter, we'll give our recommendations on which option to use in each step. First, a quick introduction to how each method works in practice.
Using privileged transitions
To use privileged transitions, you need to make a new endpoint to your backend server. Your marketplace front-end should call this new backend endpoint and not the Sharetribe API directly.
If you use Sharetribe Web Template, you can add a new endpoint by adding it to the API router.
The new server endpoint should call the payment gateway API to do the payment action and the Sharetribe Marketplace API to transition the transaction.
The following diagram shows the call sequence between the marketplace and the APIs. First, a user makes a transaction request using the marketplace front end, after which the backend calls the Sharetribe Marketplace API to initiate the transaction. Next, the marketplace backend calls the payment gateway's API, and finally the Sharetribe Marketplace API is called again after the payment action is completed.
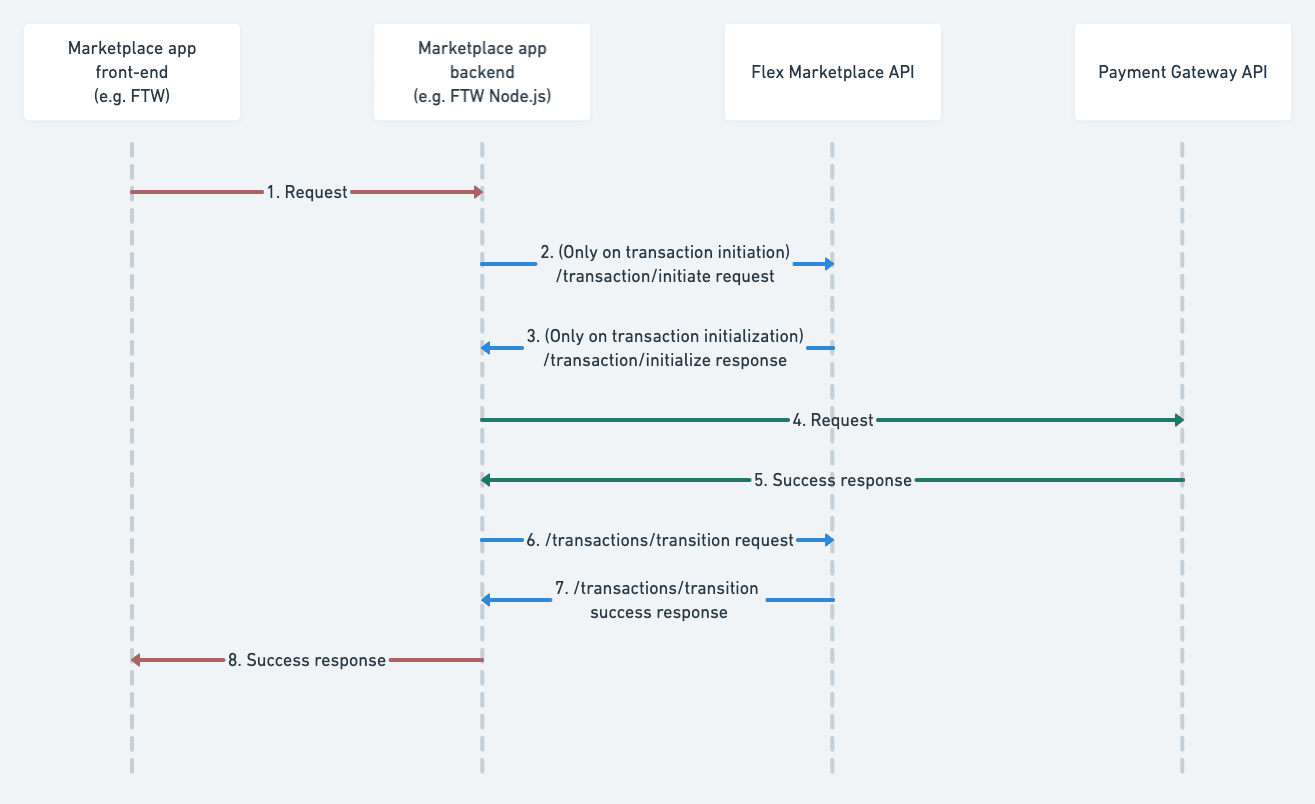
Error handling in this model is simple. Because all the calls to the Sharetribe Marketplace API and the payment gateway's API are triggered by the request of the end-user, your marketplace front-end can immediately return a failure response and show an error message to the user when things go wrong.
Using Events
You can also use Events for your payment gateway integration.
In this model, the transaction transition is done as usual. Your backend polls the events and reacts to transaction transition events by calling the payment gateway API.

Error handling in this model needs more attention than in the privileged transition model. If the payment action fails, the transaction is in a state where the transaction and payment are out of sync.
Example: Let's imagine the customer made a transition "cancel," which moved the transaction to the "canceled" state, but the "refund" payment action failed. If you don't handle this error state, the customer gets charged without receiving the service.
There are a couple of ways you can set up Events to handle the error case:
- Retry the payment action immediately, in case of a network error or error 5xx from the payment gateway.
- Send a notification to the marketplace operator. The operator can then manually resolve the issue (e.g., by manually refunding from the payment gateway's dashboard)
- Transition the transaction to an error state, e.g., "canceled-but-refund-failed." The operator then needs to manually resolve the issue with a refund.
- Write the error in the transaction's metadata and show it to the user. The user can then contact the operator to resolve the situation.
Integrating payment steps with your marketplace
In the beginning of this document we illustrated a high-level picture of the different payment steps in a marketplace payment flow. In this chapter we'll go through each step and how to integrate them with your marketplace.
Step 1: Provider onboarding
The provider onboarding step usually needs to happen before the customer starts the transaction. Onboarding can occur during or right after listing creation.
If you choose white-label onboarding, you need to build the necessary forms in your marketplace to ask for the required customer details. Also, to comply with the Know Your Customer (KYC) requirements, the customer may need to upload certain documents such as an identity document or a utility bill to prove their identity.
If you're using a payment gateway that provides hosted onboarding, you need to redirect the user to the onboarding page hosted by the payment provider. When the user returns from the hosted page, you receive information about the newly created merchant account (e.g., a merchant ID) in the return URL. You should store this information in the user's private data. You can use the Marketplace API's update current user endpoint for this.
Recommendation: Use hosted pages for onboarding if they are available. Building the necessary forms, including the file upload forms, can be avoided using hosted pages. Besides, the KYC requirements tend to change over time. By using hosted pages, you avoid the need to change your application when the requirements change. The payment provider will keep the hosted pages up to date with the regulatory requirements.
Step 2: Customer checkout
Customer checkout happens during transaction initialization, and it's an essential part of your marketplace payment flow. It's also the step that requires the most integration work.
Before you start implementation, consider what payment methods you are about to integrate and where your customers are located. Does the payment method have separate authorization and capture actions, or are the funds immediately captured during the payment? Are your customers located in countries that require 3D Security?
In this step, your marketplace collects the customer's credit card information. Keep in mind that you should never pass unencrypted credit card information via your server. Use either the JavaScript library/elements provided by the payment gateway, client-side encryption, or hosted pages when collecting credit card information.
Recommendation: Use privileged transitions for this step.
Recommendation: Initiate the Sharetribe transition before payment.
If using 3D Security is required, the checkout process may contain multiple steps where the customer may have to leave your marketplace app and go to their bank's website to confirm the payment. This process may take some time for the user to complete. Because of that, we recommend that you initiate the Sharetribe transition first, before initiating the payment. During the initialization of the transaction, you can already make a booking and ensure availability. It would be a bad experience for the user to pay first but then realize that the transaction initialization failed because someone else managed to book the selected timeslot a moment before they did.
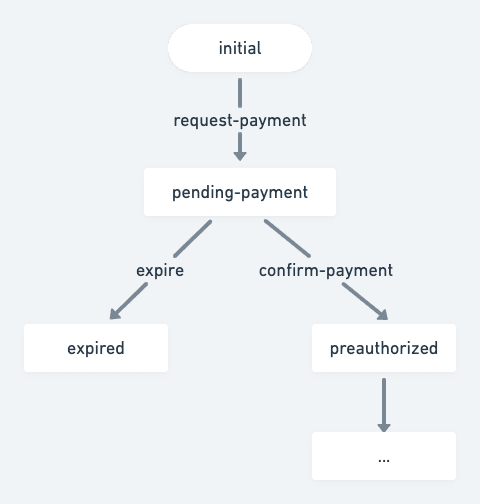
The transaction should be in a "pending-payment" state at this point. After the payment is successfully made, transition the transaction forward to a "paid" state. The "pending-payment" state should have an automatic expiration, e.g., after 15 minutes. The user may not finalize the payment, and thus we need to expire the transaction.
The transaction process should look something like this:
The steps to implement this stage are:
- Add (or modify existing) server endpoint for initiating a transaction.
- Initiate the transaction.
- Make the payment after the transaction is initiated.
- Ensure that the payment went through.
- Transition the transaction forward.
Step 3: Provider accept
Depending on the payment method, the payment may happen in one or two steps. The two steps are:
- Authorization (payment gateway reserves the money from the buyer's credit card)
- Capture (payment gateway transfers the money from the buyer)
Credit card payments use these two steps, whereas some payment methods like giropay or iDEAL have only one step where the payment is authorized and captured in one go.
If you're using a payment method where authorization and capturing happens in one step, you should skip the provider accept stage, and implement a so-called "instant booking" flow. In this flow, the provider is expected to be able to provide the service to the customer, thus, no separate accept stage is needed. For this to happen, the providers must keep their availability calendar up-to-date.
Even if you're using payment method with separate authorization and capture steps, it's worth considering whether you could streamline the transaction process by implementing an instant book flow.
In case you decide to have the provider accept state to your transaction process, you should do the payment authorization on customer checkout and capture the payment on provider accept. After the money is captured, you most likely need to pay the payment gateway's processing fees, even if the provider ends up declining the customer's request.
If the provider declines the request, or if it expires due to a lack of answer from the provider, the payment should be voided.
Recommendation: Use events for this step. Poll the transaction/transition events and react on accept/decline/expire transitions. Call the payment gateway API to either capture or void the payment.
Step 4: Customer refund
In most marketplaces, it makes sense to have a delayed payment period. During this period, the customer has paid, but the money is not yet paid out to the provider. The provider is expected to provide the service first, and payout happens after the service was successfully provided.
Customer refund usually happens during this period.
Recommendation: Use events for this step. Poll the transaction/transition events and react on transitions where a refund is needed by calling the payment gateway API.
Step 5: Provider payout
At some point, it's time to release the money to the provider and do the payout.
Depending on the provider's bank, there's usually a delay between when the payout is issued and when the money reaches the provider's bank account. The delay is on a scale of days, but not weeks.
Recommendation: Use events for this step. Poll the transaction/transition events and react on transitions where the payout is needed by calling the payment gateway API.
Summary
In this document, we first illustrated on a high-level a typical marketplace payment flow. After that, we went through the different payment gateway integration experiences, white-label and hosted, and their implications to the integration, branding, and PCI DSS compliance requirements. We then discussed PCI DSS compliance in more detail.
We discussed the integration and what are the options to communicate with payment gateways. After that, we laid out the two different options to hook your payment integration code with Sharetribe: privileged transitions and events. Finally, we went through each stage of the marketplace payment flow and gave recommendations on how to integrate a 3rd-party payment gateway to each step.