Last updated
Enable OpenID Connect login
In this guide we'll take at how to use an OpenID Connect login solution with a Flex marketplace.
Table of Contents
OpenID Connect
OpenID Connect is a specification built on OAuth2 that describes how a user authenticated at an identity provider can be authorized to resources in another service. This how-to guide assumes that you already have an OpenID Connect solution available and intend to use that as a login option in your Flex marketplace.
Information
Apple Sign-in has several features that resemble the OpenID Connect specification. However, the Apple Sign-in implementation has some differences to the Open ID Connect spec that render it not fully compliant.
One feature that our Flex developers have discovered is that the email_verified claim is returned as string from Apple, whereas the Open ID Connect spec determines that it needs to be boolean. This means that simply integrating Apple Sign-in as an Open ID Connect IdP in Flex is not possible. Instead, you will need to use the OIDC proxy approach to integrate Apple Sign-in into your marketplace.
Identity provider requirements
Discovery document and JSON Web keys
All identity providers should provide an
OpenID Connect discovery document.
The document has to define a jwks_uri attribute which denotes the
location of public signing keys used by the identity provider. The
signing keys should be served in the jwks_uri location in
JSON Web Key Set format.
Signing algorithms
Flex only supports ID tokens signed with asymmetric RS256 signing algorithm. The identity provider should provide public signing keys as mentioned above.
Rotating signing keys
Flex relies heavily on the kid attribute of a JSON Web Key when
caching signing keys. We advise that every OpenID Connect identity
provider includes the kid attribute in signing keys and in ID token
header. Especially, when signing keys are rotated, it is critical to
have the kid attribute in JWKs and a corresponding kid header in the
ID token.
Configure an identity provider client in Console
To take an OpenID Connect identity provider into use with Flex, you will need to configure a new identity provider and an accompanying identity provider client in Flex Console.
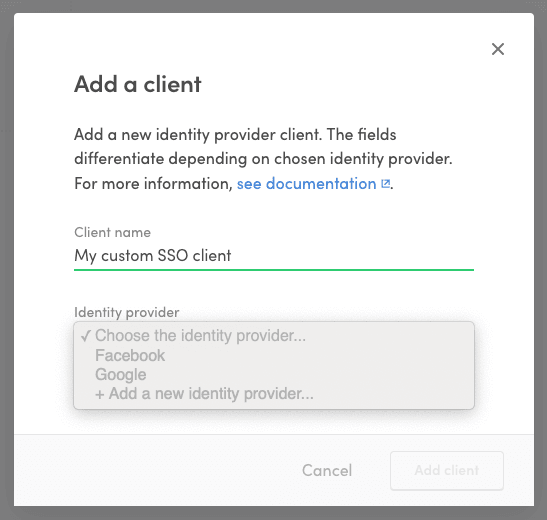
- Go to the Social logins & SSO page in Console and click "+ Add new" to add a new identity provider client.
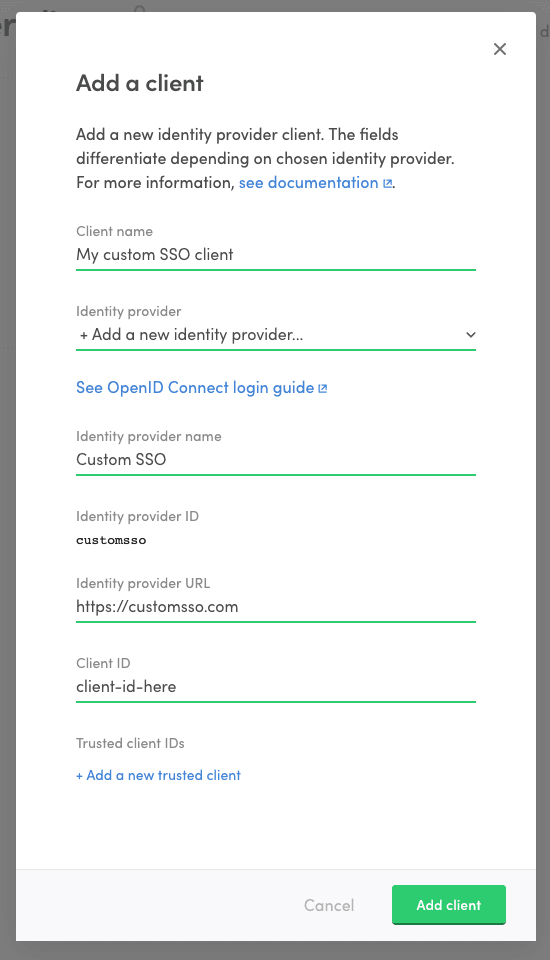
- Fill in a name for the client.
- In the identity provider dropdown, select "+ Add a new identity provider..."
- Fill in information regarding your OpenID Connect identity provider.
This is the service that your users authenticate to in order to log
into flex.
- Identity provider name: A descriptive name for the identity provider that helps you to distinguish it from other providers.
- Identity provider ID: IdP ID that is passed as a parameter to Flex API when authenticating using this client/IdP. It is generated based on the provider name
- Identity provider URL: In OpenID Connect terms this is the issuer location of the identity provider. It is used to resolve ID token signing keys used by the identity provider. See below Discovery document and JSON Web keys for more details.
Information
- Fill in the Client ID. This is the identifier of your Flex marketplace at you identity provider. It will be the audience of the ID token returned from the identity provider.
- If you have multiple clients configured at your identity provider to
be used to log into your Flex marketplace, list the additional client
IDs as trusted client IDs. The idea is, that every client ID that is
included as an audience (
audclaim) in an ID token returned from your identity provider should be included as the client ID or trusted client ID in the client.
- Click "Add client" to create the client and identity provider.
Now that you have created the identity provider, you can use it if your login flow requires using another client or if you wish to remove the client you added and create a new one. Just select the identity provider from the dropdown when creating a new client.
Add OpenID Connect login flow to FTW
OpenID Connect login flow can be added to FTW in multiple ways. One good
starting point is to take a look at OpenID Connect implementations in
the Passport.js strategies. Keep in mind
that you should get a hold of the ID token that is returned from the
identity provider so that you can pass it along to Flex's
/auth/auth_with_idp
and
current_user/create_with_idp
endpoints.

