Last updated
Enable Facebook login
In this how-to guide we'll take a look at the process of setting up Facebook login for your marketplace. It will allow your users to sign and log in by using their Facebook accounts.
Table of Contents
Note, that Facebook login requires ftw-daily version 6.4.0 or ftw-hourly version 8.4.0.
Has your marketplace UI application diverged from ftw-daily or ftw-hourly so much that pulling upstream updates to enable Facebook login is not a feasible option? In that case, take a look at the following change set in ftw-daily for reference on how to implement Facebook login in the front end: Facebook login in Github.
Enabling Facebook login consists of three main steps:
- Create a Facebook app Facebook app is what connects your marketplace to Facebook and let's Facebook know that users from your marketplace are allowed to authenticate themselves using the Facebook login.
- Create an identity provider client in Flex Console Identity provider (IdP) client is what let's Flex know that the users of your marketplace are allowed to use the Facebook app you created to log into your marketplace.
- Configure FTW A few attributes from the Facebook app will need to be configured to FTW so that FTW can perform the login flow via Facebook.
Configure a Facebook app
First thing to do is to create a Facebook app for your marketplace. Create a Facebook app by following these steps:
- Go to https://developers.facebook.com/.
- Log in. In case you do not have a Facebook account you will need to sign up.
- Click on the "My Apps" dropdown in the top right corner of the header.
- Click "Create App". A popup asking "How are you using your app?" should appear.
- Choose the last option: "For Everything Else".
- Type your App Display Name. For example: "My Marketplace".
- Enter the contact email of your choice.
- Click "Create App ID". You may have to answer a security check.
- Don't select a Product or Recommended Product but instead in the left hand menu, click "Settings" then "Basic".
- In "App Domains", add all the domains from which you want the Facebook login to work, i.e. all your marketplace domains. Add the domains without any subdomain, for example www, so if your marketplace runs in https://www.example.com, add example.com.
- Scroll all the way to the bottom and click "+ Add Platform".
- Select "Website".
- In "Site URL", add your full marketplace's URL with https and possibly www or the subdomain, for example: https://www.example.com. Note that the Site URL needs to have the same domain that you added to App Domains, or one of them if you added many.
- You might also need to add your privacy policy URL (in some cases
this is not needed). If so, please add it by typing the URL to your
privacy policy into the "Privacy Policy URL" field. In FTW the
policy is by default located in the
/privacy-policypath, so the URL could then be https://www.example.com/privacy-policy. - Click "Save Changes" at the bottom right.
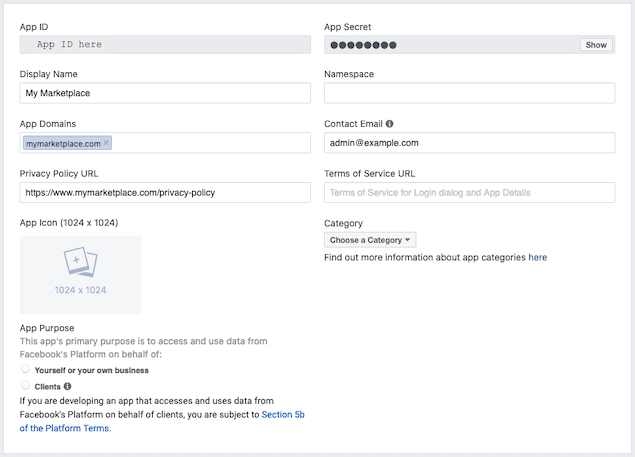
Now your app basic setting should look like this:
- In the left hand menu, click "PRODUCTS +".
- Look up "Facebook Login" form the products list and click "Set up".
- Select "Web" (www) in the list of options.
- Verify that your "Site URL" is correct and click "Save" then "Continue".
- You can leave the 2nd step after setting the site URL as it is and in the left hand menu, click "Facebook Login" then "Settings".
- Under "Client OAuth Settings" check that the following settings are
correct:
- Client OAuth Login: Yes
- Web OAuth Login: Yes
- Force Web OAuth Reauthentication: No
- Use Strict Mode for Redirect URIs: Yes
- Enforce HTTPS: Yes
- Embedded Browser OAuth Login: No
- Login from devices: No
- In the "Valid OAuth redirect URIs" field add your marketplace
address followed by
/api/auth/facebook/callback, for example: https://www.example.com/api/auth/facebook/callback. This endpoint can be different if you have modified the/apiendpoints in FTW.
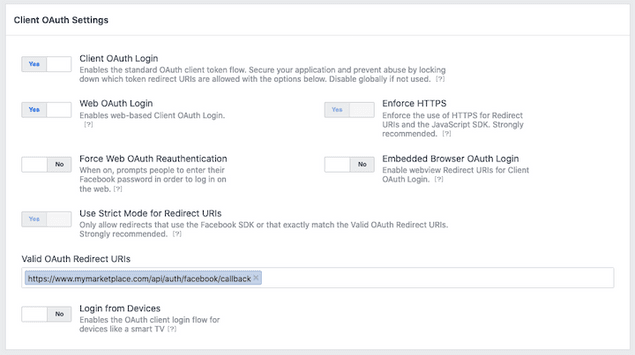
Your Facebook login settings should now look like this:
- Click "Save Changes".
- Your Facebook app is now ready for development. Note that while the app is in development mode only you and other app admins can use it to log in. When you are ready to take the app live, turn the top switch from "In development" to "Live" in the top bar. Confirm the choice when asked. You may have to select a category and/or answer a security check. Your app doesn't require an approval from Facebook so you don't have to go through the submission process. In the left hand menu, click "Dashboard". Your app should be public and a green dot should be displayed.
Your Facebook app is now created and configured. The next step is to set up an identity provider client in Flex Console.
Configure an identity provider client in Console
Now that your Facebook app is all set up, a corresponding identity provider client will need to be configured for your marketplace. This will tell Flex that your users will be allowed to log into your marketplace using the Facebook app you just created. The information stored in an IdP client is used to verify a token obtained from Facebook when a user logs in.
An identity provider client can be configure with the following steps:
- Go to Social logins & SSO in Console.
- Under Identity provider clients click "+ Add new".
- Set "Client name". This can be anything you choose, for example, "Facebook login". In case you need to create multiple Facebook apps, this will help you make a distinction between the corresponding IdP clients.
- Set the Client ID. This value is the App ID from your Facebook app. You can see the value under Settings > Basic in the Facebook app view.
- Set the Client secret. This value is the App secret in your Facebook app. You can see the value under Settings > Basic in the Facebook app view. You will need to authenticate to reveal the secret value.
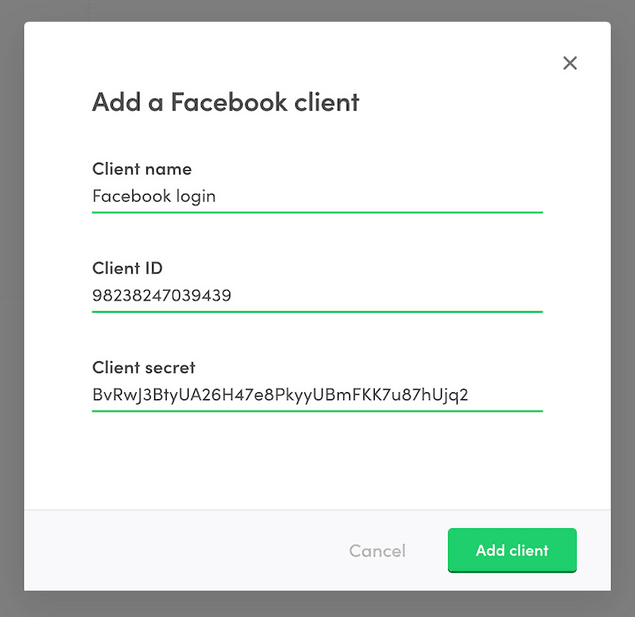
The IdP client config should now look something like this:
- Click "Add client" and your identity provider client is ready.
Configure FTW
Last step to enabling Facebook login is to configure FTW with the values that you used to add an identity provider client in Console. Add the following environment variables to FTW:
REACT_APP_FACEBOOK_APP_IDThe App ID of your Facebook app. Corresponds to client ID of the identity provider in Console.FACEBOOK_APP_SECRETThe App Secret of your Facebook app. Corresponds to client secret of the identity provider in Console.
For more information on FTW environment variables, see the FTW Environment configuration variables article.
That is it. Setting these environment variables will make FTW render the Facebook login button in signup and login forms.


