Change transaction process in Sharetribe Web Template
Sharetribe Web Template defines four transaction processes by default:
- daily, nightly, hourly, and fixed bookings use the default-booking process,
- product sales use the default-purchase process
- price negotiations use the default-negotiation process, and
- inquiries use the default-inquiry process.
The template is created to support states and transitions defined in those processes.
How the transaction process works underneath the Marketplace API depends on how your process is customised in our backend. To customise the transaction process in the backend, you should use Sharetribe CLI. See the Getting started with Sharetribe CLI tutorial to get familiar with the tool.
If you have changed the transaction process in your marketplace, or added a new one to use in parallel with the existing ones, you should check if your client app needs to be updated to match this different transaction process. You can read more about how these processes work from a background info article about the transaction process.
The following guide will help you to customise the process flow in the template to match the process in our backend.
This guide assumes that you have already followed these instructions to add a new process:
Add a listing type that uses the transaction process
The
src/config/configListing.js
file lists the listing types actively used by the template, as well as
the transaction processes related to those types. You need to add a
listing type configuration for a new transaction process into the
listingTypes array to use it in the template.
If you have not added any listing types in code before, the entries in the listing type array are all commented out by default. They serve as examples of what the listing type configuration looks like.
To add a new listing type, you can either replace or comment out any previously active process definitions (if you only want to use the new process) or leave them as they are (if you want to allow using multiple processes in the same application).
export const listingTypes = [
{
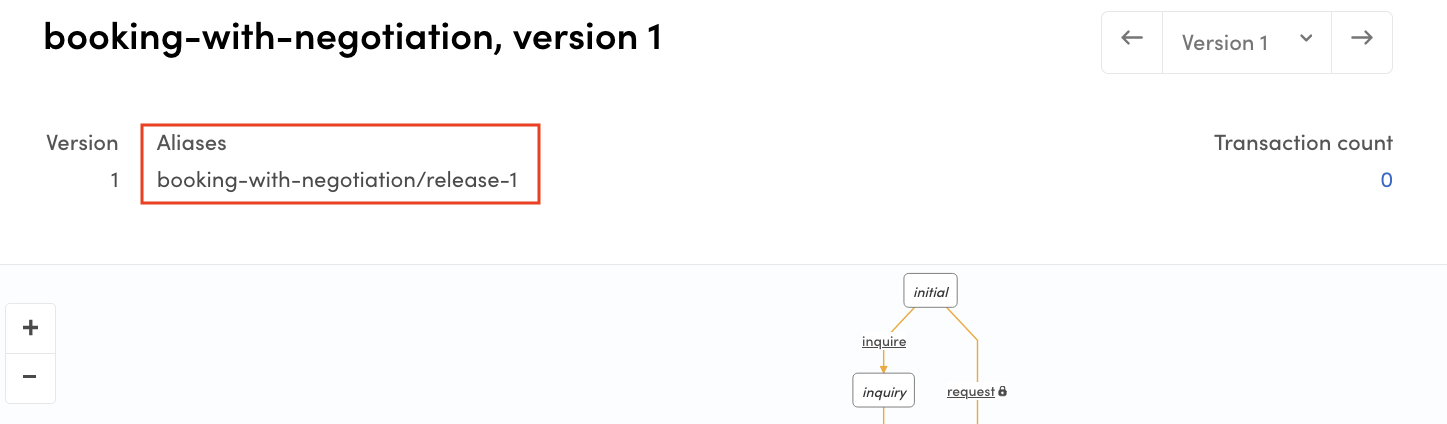
listingType: 'booking-with-negotiation',
label: 'Booking with negotiation',
transactionType: {
process: 'booking-with-negotiation',
alias: 'booking-with-negotiation/release-1',
unitType: 'night',
},
},
// {
// listingType: 'daily-booking',
// label: 'Daily booking',
// transactionType: {
// process: 'default-booking',
// alias: 'default-booking/release-1',
// unitType: 'day',
// },
// availabilityType: 'oneSeat',
// defaultListingFields: {
// location: true,
// payoutDetails: true,
// },
// },
/* ... */
];Settings configured in local configurations files are overridden by any fetched via the Asset Delivery API.
When you first add a new listing type in the configListing.js file, you need to follow the steps in this article to modify the way your template merges local and hosted configurations.
The alias variable should point to the correct alias. You need to
check in Console which process and process version your client app
should support. All available transaction process aliases can be found
in the
Build section
in Console.
The unitType specifies what kind of units the web app is dealing with
when handling the listing type. The Sharetribe Web Template recognises
and handles these unit types by default:
- day, night, hour, and fixed for the default-booking process
- item for the default-purchase process
- inquiry for the default-inquiry process
- request and offer for the default-negotiation process.
The Sharetribe engine can handle other unit types besides the default ones. If you use a unit type outside the defaults, you need to add custom handling for it in e.g. line item calculation, order handling, and email templates.
Update the relevant files in src/transactions folder
Supported transaction processes are also defined in the files found in
src/transactions folder. In all cases, you will need to update the
transaction.js file to include your new process definition.
- transaction.js
// Then names of supported processes
export const PURCHASE_PROCESS_NAME = 'default-purchase';
export const BOOKING_PROCESS_NAME = 'default-booking';
export const INQUIRY_PROCESS_NAME = 'default-inquiry';
export const NEGOTIATION_PROCESS_NAME = 'default-negotiation';
// Add new processes with a descriptive name
export const NEGOTIATED_BOOKING_PROCESS_NAME =
  'booking-with-negotiation';
In addition to updating the process name to your transaction.js file,
you will need to make sure the application has an accurate
representation of the different transitions and states in your new
transaction process. The transitions and states for the existing
processes are defined in the transactionProcess....js files in the
same src/transactions folder.
If you are replacing one of the default processes (for instance the default booking process with a new booking process with different transitions and states), you can modify the existing transactionProcessBooking.js file to correspond to the new process.
If you are creating a parallel new process and want to allow listing
authors to choose between two processes for their listings, you will
need to create a new transaction process file and import it in
transaction.js.
Determine which process files to work with
The best way to know which transactionProcess...js file to use as the
basis of your new one is to compare the transaction process graphs of
the two processes in the Console > Build > Advanced > Transaction
process visualiser view.
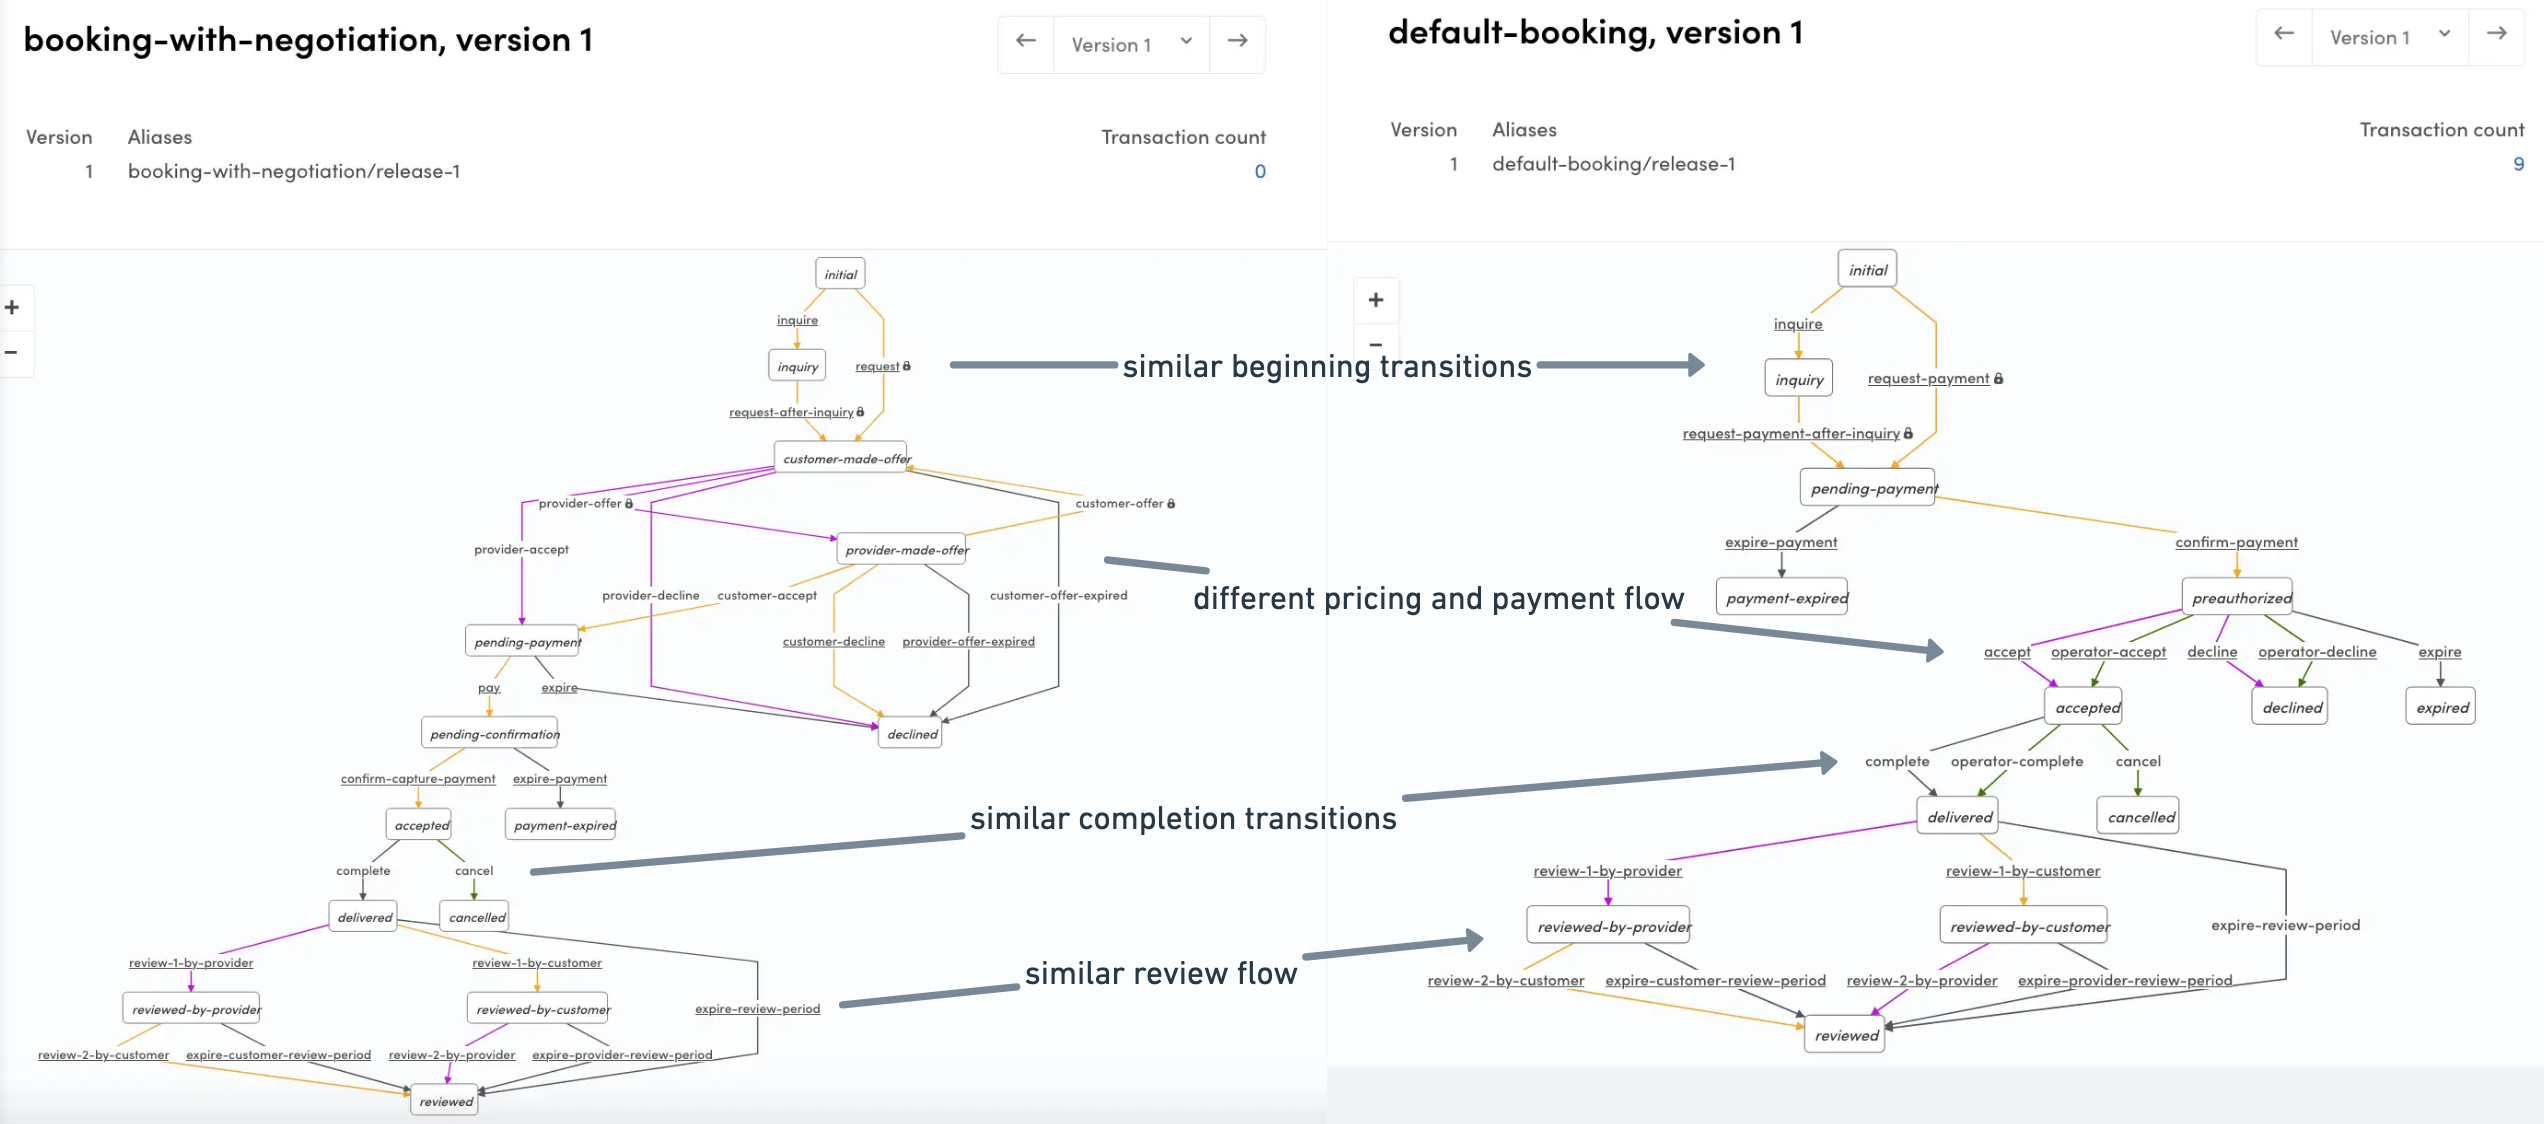
If two processes have mostly identical states and transitions with only one or two exceptions, you can use the existing files of that process as the basis for your new one with very little modification. The more differences there are between two processes, the more you need to customize the files. We recommend that you use the files of the existing process that is closest to your new process.
For example, the image below shows a comparison between Sharetribe
example negotiated booking process and the default-booking process. You
can see that the main difference between the two flows is the pricing
and payment flow – in the default, the customer first pays and then the
provider either accepts or declines, whereas in the negotiated booking
flow, the parties first need to accept the suggested price and payment
happens after that. This means that the files related to the
default-booking process are a good starting point for implementing
this guide for that specific process.
The more your new process differs from existing processes, the more custom changes you will need to make to the presentational components and containers. You might have use cases in your transaction process that are not currently covered by the existing components and containers.
The following instructions specify the steps for modifying the existing
transactionProcessBooking.js file. If you do create a new one, we
recommend you replicate the existing default process file and make the
necessary changes instead of creating one from scratch.
Update transitions and states
If the new transaction process has different transitions and states, you should add (or remove) those. Transition names need to exactly match the transitions used in Marketplace API, since transitions are part of queried transaction entities.
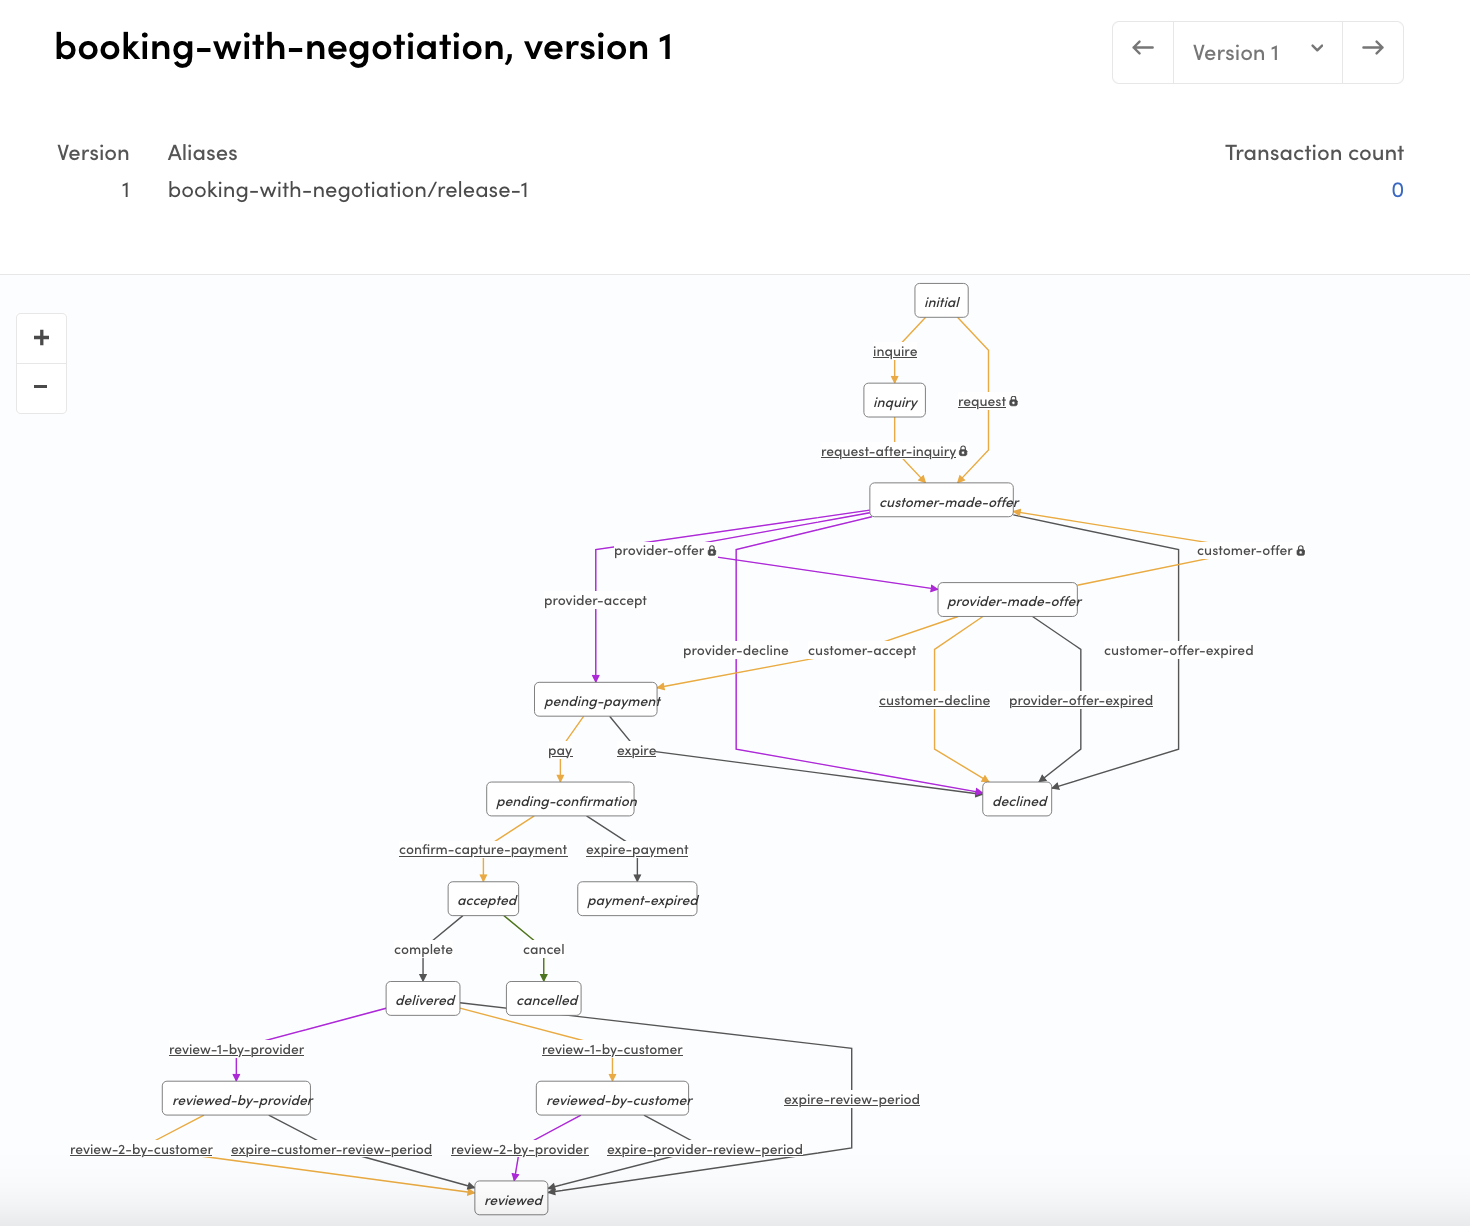
You can find the names of your transaction process transitions and states by viewing your process in Console > Build > Advanced > Transaction process visualiser.
export const transitions = {
  // When a customer makes a booking to a listing, a transaction is
  // created with the initial request-payment transition.
  // At this transition a PaymentIntent is created by Marketplace API.
  // After this transition, the actual payment must be made on client-side directly to Stripe.
- REQUEST_PAYMENT: 'transition/request-payment',
+ REQUEST: 'transition/request',

  // A customer can also initiate a transaction with an inquiry, and
  // then transition that with a request.
  INQUIRE: 'transition/inquire',
- REQUEST_PAYMENT_AFTER_INQUIRY: 'transition/request-payment-after-inquiry',
+ REQUEST_AFTER_INQUIRY: 'transition/request-after-inquiry',

+ PROVIDER_OFFER: 'transition/provider-offer',
  /* ... */
  EXPIRE_CUSTOMER_REVIEW_PERIOD: 'transition/expire-customer-review-period',
  EXPIRE_PROVIDER_REVIEW_PERIOD: 'transition/expire-provider-review-period',
  EXPIRE_REVIEW_PERIOD: 'transition/expire-review-period',
}

export const states = {
  INITIAL: 'initial',
  INQUIRY: 'inquiry',
+ CUSTOMER_MADE_OFFER: 'customer-made-offer',
+ PROVIDER_MADE_OFFER: 'provider-made-offer',
  PENDING_PAYMENT: 'pending-payment',
  PAYMENT_EXPIRED: 'payment-expired',
- PREAUTHORIZED: 'preauthorized',
  DECLINED: 'declined',
  ACCEPTED: 'accepted',
  EXPIRED: 'expired',
  CANCELED: 'canceled',
  DELIVERED: 'delivered',
  REVIEWED: 'reviewed',
  REVIEWED_BY_CUSTOMER: 'reviewed-by-customer',
  REVIEWED_BY_PROVIDER: 'reviewed-by-provider',
};
Add or update state graph to match the new transaction process
State graph description makes it easier to understand how the transaction process works - but even more importantly, it makes it easier to create utility functions which tell you if a transaction has reached a specific state. The description format follows Xstate , which is a Finite State Machine (FSM) library. However, the library is not used since transitions in the actual state machine are handled by Marketplace API.
export const graph = {
  // id is defined only to support Xstate format.
  // However if you have multiple transaction processes defined,
  // it is best to keep them in sync with transaction process aliases.
- id: 'default-booking/release-1',
+ id: 'booking-with-negotiation/release-1',

  // This 'initial' state is a starting point for new transaction
  initial: states.INITIAL,

  // States
  states: {
    [states.INITIAL]: {
      on: {
        [transitions.INQUIRE]: states.INQUIRY,
-       [transitions.REQUEST_PAYMENT]: states.PENDING_PAYMENT,
+       [transitions.REQUEST]: states.CUSTOMER_MADE_OFFER,
      },
    },
    [states.INQUIRY]: {
      on: {
-       [transitions.REQUEST_PAYMENT_AFTER_INQUIRY]: states.PENDING_PAYMENT,
+       [transitions.REQUEST_AFTER_INQUIRY]: states.CUSTOMER_MADE_OFFER,
      },
    },
    // etc.
  },
};
When adding a new state, it needs to be added to the states property
of graph. Transitions from one state to another are defined in the
on property of a state. So, you need to add outbound transitions there
and inbound transitions to the on property of the previous state(s).
Update graph helper functions to match the new process
Since the states and transitions in your state graph description have changed, you will need to review all the helper functions in your transaction process file and adjust them accordingly.
For example, if you have different privileged transitions in your process than the ones in the default process, you will need to update the helper function to feature the correct transitions. You can identify privileged transitions in the transaction process graph by the lock icon next to the transition name.
export const isPrivileged = (transition) => {
  return [
-   transitions.REQUEST_PAYMENT,
-   transitions.REQUEST_PAYMENT_AFTER_INQUIRY,
+   transitions.CUSTOMER_OFFER,
+   transitions.PROVIDER_OFFER,
  ].includes(transition);
};
Update state data for Inbox Page and Transaction Page
In addition to the transaction process file, there are two other places where transaction process state data is handled: InboxPage and TransactionPage. Both of those containers have files you will need to review.
- InboxPage.stateData.js
- InboxPage.stateDataBooking.js
- InboxPage.stateDataInquiry.js
- InboxPage.stateDataNegotiation.js
- InboxPage.stateDataPurchase.js
- TransactionPage.stateData.js
- TransactionPage.stateDataBooking.js
- TransactionPage.stateDataInquiry.js
- TransactionPage.stateDataNegotiation.js
- TransactionPage.stateDataPurchase.js
Similarly to the src/transactions folder, you can either
- modify the existing state data file whose states and transitions most closely match your new process,
- or you can replicate the existing file into a new one and modify the new file
In both InboxPage and TransactionPage contexts, the ...stateData.js
file compiles necessary transaction state information being used on the
page.
For instance, TransactionPage has an action button, and depending on
the transaction state and the user’s role in the transaction, the button
may be used to accept or decline the transaction, or mark it as
delivered or received. This logic is determined in the process specific
TransactionPage.stateData....js. files. The following example is from
TransactionPage.stateDataPurchase.js :
// ConditionalResolver is basically a case structure
// that takes the process state and transaction role as parameters
return new ConditionalResolver([processState, transactionRole])
  .cond([states.INQUIRY, CUSTOMER], () => {
    const transitionNames = Array.isArray(nextTransitions)
      ? nextTransitions.map((t) => t.attributes.name)
      : [];
    const requestAfterInquiry =
      transitions.REQUEST_PAYMENT_AFTER_INQUIRY;
    const hasCorrectNextTransition = transitionNames.includes(
      requestAfterInquiry
    );
    const showOrderPanel =
      !isProviderBanned && hasCorrectNextTransition;
    return { processName, processState, showOrderPanel };
  })
  .cond([states.INQUIRY, PROVIDER], () => {
    return { processName, processState, showDetailCardHeadings: true };
  })
  .cond([states.PURCHASED, CUSTOMER], () => {
    // In the default purchase process, after the item has been purchased the customer
    // sees an action button to transition the transaction with 'mark-received-from-purchased'
    return {
      processName,
      processState,
      showDetailCardHeadings: true,
      showActionButtons: true,
      showExtraInfo: true,
      primaryButtonProps: actionButtonProps(
        transitions.MARK_RECEIVED_FROM_PURCHASED,
        CUSTOMER
      ),
    };
  })
  .cond([states.PURCHASED, PROVIDER], () => {
    // In the same state, the provider sees an action button to transition the transaction
    // with 'mark-delivered'. The component on the transaction page is the same, but the props are
    // resolved in this ...stateData... -file.
    const actionButtonTranslationId = isShippable
      ? `TransactionPage.${processName}.${PROVIDER}.transition-mark-delivered.actionButtonShipped`
      : `TransactionPage.${processName}.${PROVIDER}.transition-mark-delivered.actionButton`;

    return {
      processName,
      processState,
      showDetailCardHeadings: true,
      showActionButtons: true,
      primaryButtonProps: actionButtonProps(
        transitions.MARK_DELIVERED,
        PROVIDER,
        {
          actionButtonTranslationId,
        }
      ),
    };
  });
/*...*/
The main ...stateData.js file imports functions from these process
specific files, such as ...stateDataBooking.js and
...stateDataPurchase.js, to retrieve the state data corresponding to
the correct process.
export const getStateData = (params) => {
  /* ... */
  if (processName === PURCHASE_PROCESS_NAME) {
    return getStateDataForPurchaseProcess(params, processInfo());
  } else if (processName === BOOKING_PROCESS_NAME) {
    return getStateDataForBookingProcess(params, processInfo());
  } else if (processName === INQUIRY_PROCESS_NAME) {
    return getStateDataForInquiryProcess(params, processInfo());
  } else if (processName === NEGOTIATION_PROCESS_NAME) {
    return getStateDataForNegotiationProcess(params, processInfo());
  } else {
    return {};
  }
};
If you have added a new process name constant besides the defaults
listed in the above example, you will need to import it in the two
...stateData.js files, as well as import the functions they need to
use for retrieving state data, so that your Inbox Page and Transaction
Page work correctly.
The process specific ...stateData files (e.g. ...stateDataBooking.js
and ...stateDataPurchase.js) export a getStateDataFor... function,
which conditionally resolves the necessary props based on the
transaction state and the user role. You will need to check which
changes to make in the ConditionalResolver, for example if there are
new states that require specific props to be returned to the page based
on the state.
Depending on what props your user interface changes require, you may need to also pass custom props that are not used in the default processes.
export const getStateDataForNegotiatedBookingProcess = (txInfo, processInfo) => {
  const { transaction, transactionRole, nextTransitions } = txInfo;
  const isProviderBanned = transaction?.provider?.attributes?.banned;
  const isCustomerBanned = transaction?.provider?.attributes?.banned;
  const _ = CONDITIONAL_RESOLVER_WILDCARD;

  const {
    processName,
    processState,
    states,
    transitions,
    isCustomer,
    actionButtonProps,
    leaveReviewProps,
  } = processInfo;

  return new ConditionalResolver([processState, transactionRole])
    .cond([states.INQUIRY, CUSTOMER], () => {
      const transitionNames = Array.isArray(nextTransitions)
        ? nextTransitions.map(t => t.attributes.name)
        : [];
      const requestAfterInquiry = transitions.REQUEST_AFTER_INQUIRY;
      const hasCorrectNextTransition = transitionNames.includes(requestAfterInquiry);
      const showOrderPanel = !isProviderBanned && hasCorrectNextTransition;
      return { processName, processState, showOrderPanel };
    })
    .cond([states.INQUIRY, PROVIDER], () => {
      return { processName, processState, showDetailCardHeadings: true };
    })
    .cond([states.CUSTOMER_MADE_OFFER, CUSTOMER], () => {
      return { processName, processState, showDetailCardHeadings: true, showExtraInfo: true };
    })
    .cond([states.CUSTOMER_MADE_OFFER, PROVIDER], () => {
      const primary = isCustomerBanned ? null : actionButtonProps(transitions.PROVIDER_ACCEPT, PROVIDER);
      const secondary = isCustomerBanned ? null : actionButtonProps(transitions.PROVIDER_DECLINE, PROVIDER);
      const tertiary = isCustomerBanned ? null : actionButtonProps(transitions.PROVIDER_OFFER, PROVIDER),
      return {
        processName,
        processState,
        showDetailCardHeadings: true,
        showActionButtons: true,
        primaryButtonProps: primary,
        secondaryButtonProps: secondary,
        tertiaryButtonProps: tertiary
      };
    })
    /* ... */
If you have created a new stateData file (e.g.
TransactionPage.stateDataNegotiatedBooking.js), you will need to
export a uniquely named getStateDataFor… function from that file and
then use it in the ...stateData.js file.
export const getStateData = params => {
  /* ... */
  if (processName === PURCHASE_PROCESS_NAME) {
    return getStateDataForPurchaseProcess(params, processInfo());
  } else if (processName === BOOKING_PROCESS_NAME) {
    return getStateDataForBookingProcess(params, processInfo());
  } else if (processName === INQUIRY_PROCESS_NAME) {
    return getStateDataForInquiryProcess(params, processInfo());
  } else if (processName === NEGOTIATION_PROCESS_NAME) {
    return getStateDataForNegotiationProcess(params, processInfo());
+ } else if (processName === NEGOTIATED_BOOKING_PROCESS_NAME) {
+   return getStateDataForNegotiatedBookingProcess(params, processInfo());
  } else {
    return {};
  }
}
Update listing creation tabs
In the EditListingWizard component, listing editing tabs are defined by transaction process.
- EditListingWizard.js
Add the tabs you want to use for listings using this process.
const tabsForListingType = (processName, listingTypeConfig) => {
  /* ... */
  const tabs = {
    ['default-booking']: [DETAILS, ...locationMaybe, PRICING, AVAILABILITY, ...styleOrPhotosTab],
+   ['booking-with-negotiation']: [DETAILS, ...locationMaybe, PRICING, AVAILABILITY, ...styleOrPhotosTab],
    ['default-purchase']: [DETAILS, PRICING_AND_STOCK, ...deliveryMaybe, ...styleOrPhotosTab],
    ['default-negotiation']: [DETAILS, ...locationMaybe, ...pricingMaybe, ...styleOrPhotosTab],
    ['default-inquiry']: [DETAILS, ...locationMaybe, ...pricingMaybe, ...styleOrPhotosTab],
  };

  return tabs[processName] || tabs['default-inquiry'];
};
Add marketplace text strings
A lot of marketplace text strings in Sharetribe Web Template are transaction process and state specific.
/* ... */
  "InboxPage.default-booking.accepted.status": "Accepted",
  "InboxPage.default-booking.canceled.status": "Canceled",
  "InboxPage.default-booking.declined.status": "Declined",
  "InboxPage.default-booking.delivered.status": "Delivered",
/* ... */
This means that when you create a new transaction process, you will also need to add marketplace texts for the relevant keys and states in the new process. You can add the process specific keys either into the bundled marketplace text files in the template or through the Sharetribe Console > Build > Content > Marketplace texts section .
After making the necessary changes in these contexts, your new transaction process should work as expected in the Template! Be sure to test all the steps in your transaction process carefully to make sure that all cases show up as you would expect.
Add error handling on user deletion
Because the Template offers support for users to delete their accounts, you will also need to ensure that newly created transaction processes (or modified ones) are properly checked at the time of deletion for states that contain Stripe-related payment processing. This is handled in delete-account.js .
If you have modified an existing transaction process, ensure that all states containing Stripe-related actions have been included in the appropriate array. See the default booking configuration for example:
const stripeRelatedStatesForBookings = [
  'state/pending-payment',
  'state/preauthorized',
  'state/accepted',
  'state/delivered',
];
Alternatively, if you have added an entirely new transaction process then you will need to create a new array and add it to the queue to be checked before submitting the user deletion request.
+ stripeRelatedStatesForNegotiatedBookings = [
+   // ...add the relevant states
+ ];

+ const ongoingNegotiatedBookingsWithIncompletePaymentProcessing = () =>
+     sdk.transactions.query({
+       processNames: 'booking-with-negotiation',
+       states: stripeRelatedStatesForNegotiatedBookings.join(','),
+     });

 Promise.all([
    /* ... */
+     ongoingNegotiatedBookingsWithIncompletePaymentProcessing(),
  ])
  /* ... */
};
This handles throwing an error if the user attempts to delete their account while any of their involved transactions have ongoing Stripe payment processing. This also ensures that no expensive, unnecessary user deletion API calls are made, and that the user is prompted to contact the marketplace rather than receiving an unclear or confusing error.
Summary
Adding a new transaction process always requires changes in your client application. This article offers a starting point to adding your new process to the transaction process configuration and state handling.
If your new process is very similar to one of the existing default processes, you may be able to implement by making the default changes to configuration and state handling. However, if your process is complex or it differs significantly from any of the existing processes, you will also need to carefully test the user experience and likely add new logic for the containers and components as well.