Getting started with Sharetribe Web Template
The Sharetribe Web Template is a marketplace web application built on top of the Marketplace API. While you can create a marketplace purely using just the API, it requires a significant amount of effort (both money and time) and we recommend using the template as a starting point for customizations.
The Sharetribe Web Template is built with React , Redux , and CSS Modules . It also contains a small Node.js server, which provides server-side rendering (SSR) for the deployed site.
The purpose of this guide is to clone and configure the Sharetribe Web Template to your local development environment - and then get it up and running. This guide also helps you to create accounts to Stripe and Mapbox. Those services are needed to run the Sharetribe Web Template app.
We recommend that you take the steps for this guide in your Sharetribe Console dev environment. Read more about Sharetribe environments.
Setup a development environment
Prerequisities
To get Sharetribe Web Template up and running, you will need to download and install some basic development tooling:
Install the Sharetribe Web Template App locally
-
Open Terminal
-
Clone the Sharetribe Web Template repository:
git clone https://github.com/sharetribe/web-template.git- Go to the cloned directory:
cd web-template/Check how the directory structure should look like
After these steps you should have a directory structure that looks like this for Sharetribe Web Template:
   ├── ext
   │   └── transaction-processes
   ├── node_modules
   │   └── // dependencies
   ├── public
   │   ├── static
   │   ├── index.html
   │   ├── robots.txt
   │   └── 500.html
   ├── scripts
   │   ├── audit.js
   │   ├── config.js
   │   └── translations.js
   ├── server
   │   ├── api
   │   ├── api-util
   │   ├── apiRouter.js
   │   ├── apiServer.js
   │   ├── auth.js
   │   ├── csp.js
   │   ├── dataLoader.js
   │   ├── env.js
   │   ├── importer.js
   │   ├── index.js
   │   ├── log.js
   │   ├── renderer.js
   │   ├── sitemap.js
   │   └── wellKnownRouter.js
   ├── src
   │   ├── analytics
   │   ├── app.js
   │   ├── app.node.test.js
   │   ├── app.test.js
   │   ├── assets
   │   ├── components
   │   ├── config
   │   ├── containers
   │   ├── context
   │   ├── ducks
   │   ├── examples.js
   │   ├── index.js
   │   ├── reducers.js
   │   ├── routing
   │   ├── store.js
   │   ├── styles
   │   ├── transactions
   │   ├── translations
   │   └── util
   ├── CHANGELOG.md
   ├── LICENSE
   ├── README.md
   ├── package.json
   └── yarn.lock
- Install dependency libraries:
yarn installCheck that you have the correct transaction processes in your environment
If you have created your marketplace environment prior to the 25th of April 2023, and you are using the Sharetribe Web Template, it is good to note that there are two new transaction processes the template uses, and those processes may not be in your Sharetribe marketplace by default. You can find the transaction processes in /ext/transaction-processes/ in the repository.
To use the template, you will need to have the transaction processes in your Sharetribe environment. Follow these steps to create both processes in your environment through Sharetribe CLI.
Mandatory Integrations
The Sharetribe Web Template has 3 mandatory integrations that you need to configure before the app is fully functional:
- Stripe
- a map provider for location services
- Sharetribe Marketplace API
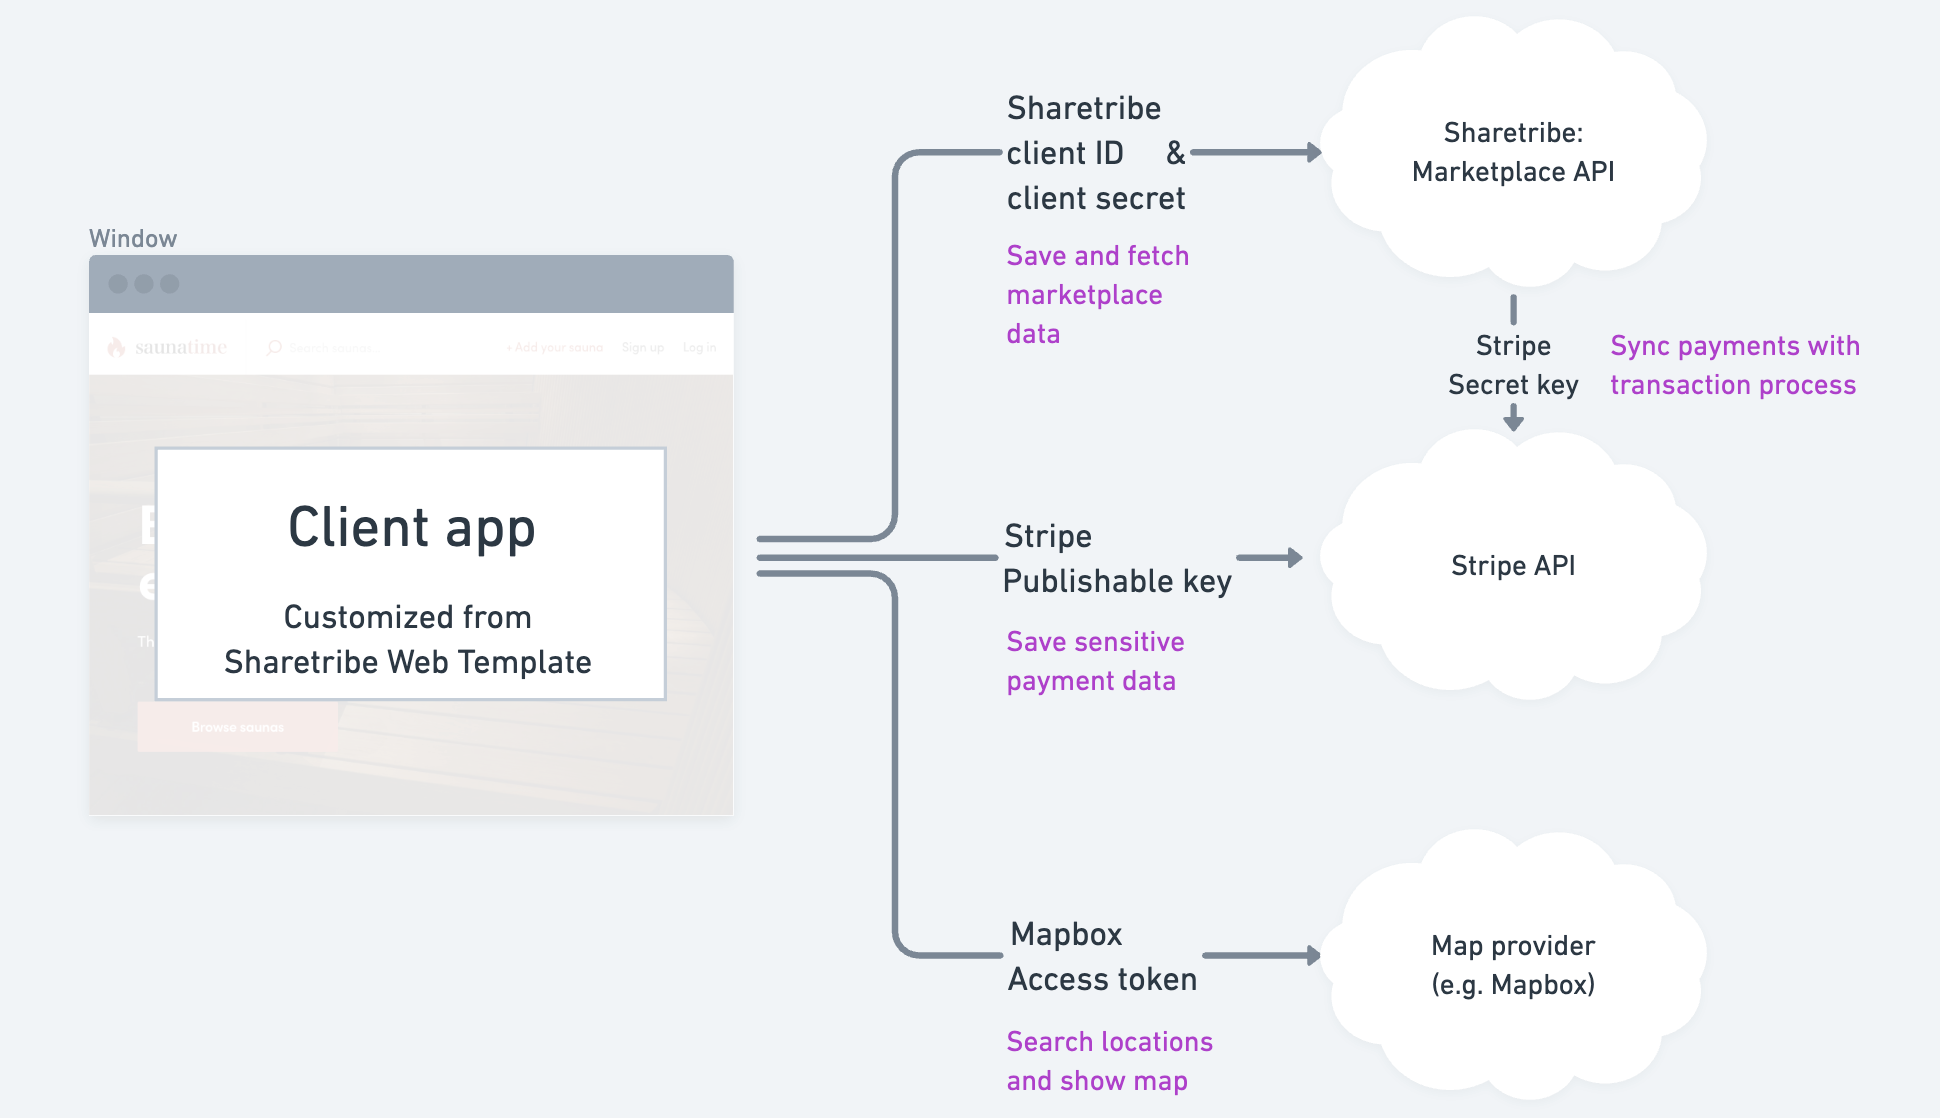
One of the integrations is configured in Console, and two are configured with environment variables. So the Sharetribe Web Template needs these three environment variables to make mandatory integrations work:
Stripe
The Sharetribe Web Template uses Stripe as a payment processor, and Sharetribe Web Template saves sensitive payment information directly to Stripe.
First, follow these instructions to get your Stripe keys. Add your Sandbox secret key to Console, and make a note of your Sandbox publishable key. We will set that publishable key as the value of REACT_APP_STRIPE_PUBLISHABLE_KEY later in this guide.
A map provider
You can use either Mapbox or Google Maps to provide location search (geocoding) and maps for the web app. You can configure your map provider in Console by following these instructions:
You can make map access tokens in your web applications more secure by adding URL restrictions. When you add a URL restriction to a token, that token will only work for requests that originate from the URLs you specify. See the Mapbox documentation for domain restrictions:
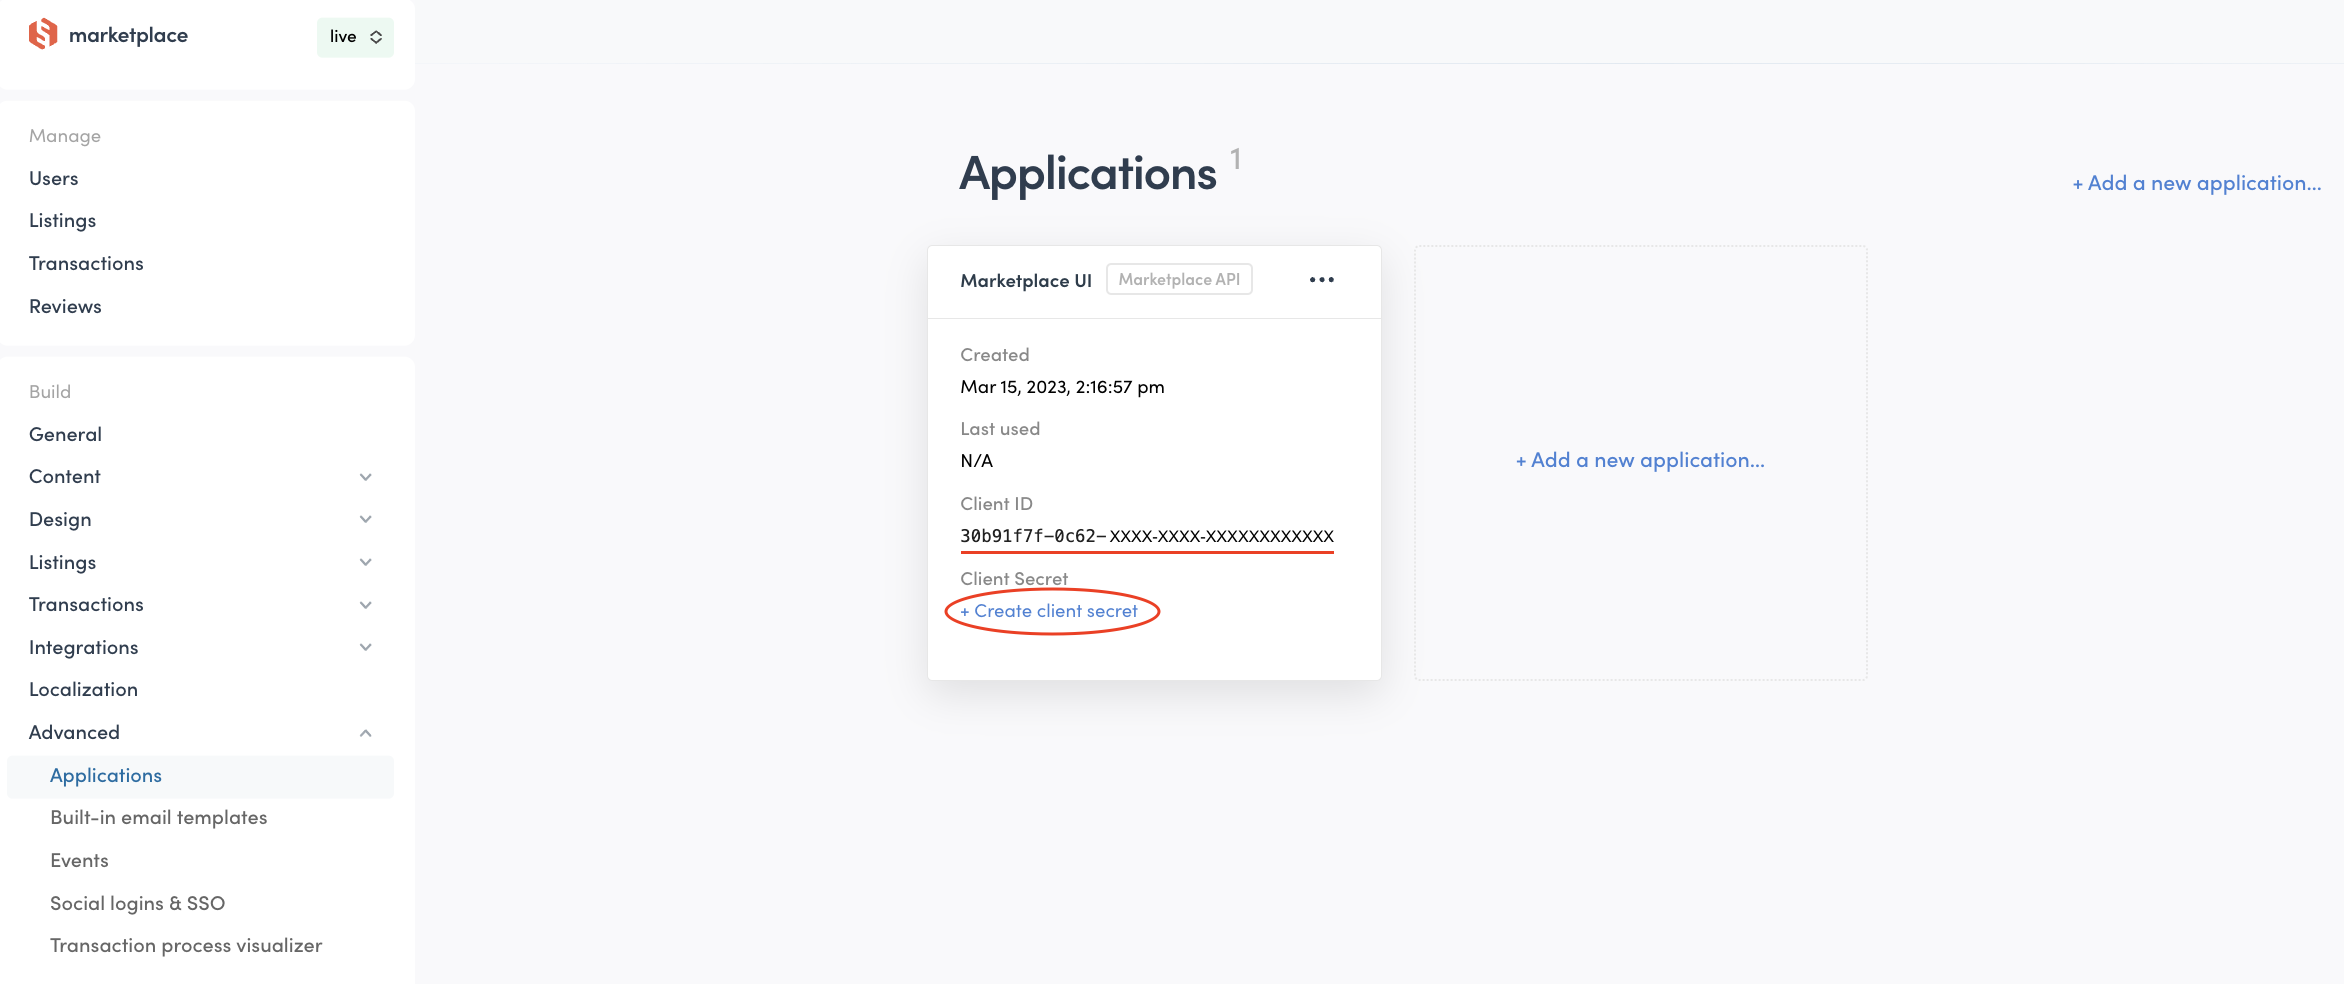
Sharetribe client ID and client secret
To use the Marketplace API, you will need a client ID. You can sign up for your free Sharetribe account here .
When you get access, you will be able to log into Sharetribe Console and
check the client ID.
Sharetribe Console: Build > Advanced >
Applications
In addition, Sharetribe Web Template uses transaction processes that include privileged transitions. This makes it possible to customize pricing on the Node server that’s included in the template. The client secret is needed to make this secure call from the template’s own server to Sharetribe API.
Add Environment Variables
Start the config script:
yarn run configThis command will prompt you to enter the three required environment variables that you you collected in the previous step.
After that, it will create .env file to your local repository and
guide you through setting up the rest of the required environment
variables. If the .env file doesn’t exist the application won’t start.
This .env file is only created for the local development
environment.
See the template environment variables for more information on the environment variables.
Start the server
Start the development server:
yarn run devRunning yarn run dev uses
Webpack’s dev-server
with
Hot Module Replacement .
This will automatically open http://localhost:3000 in a browser:

The Sharetribe Web Template fetches no-code content and configurations from the Sharetribe backend using the Asset Delivery API .
Read more about how no-code assets are handled between the Sharetribe Console and the client application in our asset reference documentation.
As you browse your marketplace and create listings, you may notice that the search filters do not work. You can activate the filters by creating a search schema that corresponds to your template.
Summary
In this tutorial, we used the Sharetribe Web Template to get a marketplace running. Here’s a summary of those installation steps:
git clone https://github.com/sharetribe/web-template.git
cd web-template/
yarn install
yarn run config
yarn run dev
As you can see from http://localhost:3000, Sharetribe Web Template is
a fully ready and polished marketplace application that is running on
top of the Marketplace API. Client app customization is in your control,
and you can change it to fit your marketplace needs. Check the
tutorial to learn how to customize the Sharetribe Web
Template.