Last updated
Create a new transaction process
This guide describes how to create a new transaction process and how to take it into use on the FTW-daily template.
Table of Contents
Create a transaction process
In this tutorial, we'll create a new transaction process for the CottageDays marketplace. It will be a daily booking process in contrast to the default nightly process. We make this for demonstration purpose since it might not be a smart move for an actual cottage-rental marketplace.
In addition, we also add a new decline transition for the operator and update the client app so that it uses the new process.
Clone Flex example processes repository
Writing process.edn file and email templates from scratch is a bit tedious task. We'll make our life a bit easier by cloning Flex example processes repository:
git clone https://github.com/sharetribe/example-processes.gitAnd then we move to that directory:
cd example-processes/There are several processes listed in that directory. The one we are going to use as a basis for our new process is flex-default-process. It has privileged transitions in use and it is therefore compatible with FTW-daily v8.0.0 or later.
In the example processes repository, there's another process that specifically named as daily booking (preauth-daily-booking). It's an old process (created before privilege transitions feature) and its speciality was about how it counted total price with :action/calculate-tx-daily-total-price. However, with privileged transitions, the pricing is set on the client app - so, there is no need for process changes between nightly and daily booking.
Create a new process
To get up and running with Flex CLI, see the Getting started with Flex CLI guide in Flex Docs.
Let's see what the subcommand help gives us about process create:
$ flex-cli help process create
create a new transaction process

USAGE
  $ flex-cli process create

OPTIONS
  --path=LOCAL_PROCESS_DIR          path to the directory where the process.edn file is
  --process=PROCESS_NAME            name for the new process that is created
  -m, --marketplace=MARKETPLACE_ID  marketplace identifier
So, if we would like to create a new process, we need to specify a path to the local directory. That directory should contain process definition (process.edn file) and templates subdirectory containing correct email templates for the email notifications defined in that process. We already have those since we cloned the example-processes repository.
Then we just need to define a name to that process and specify the marketplace environment, where the new process should be created. We'll use "cottagedays-daily-booking". Our final command for the cottagedays-dev marketplace would look like this:
flex-cli process create --path=./flex-default-process --process=cottagedays-daily-booking --marketplace=cottagedays-devNote: you need to modify the command to use your own dev marketplace ID, which you can find from the Flex Console.
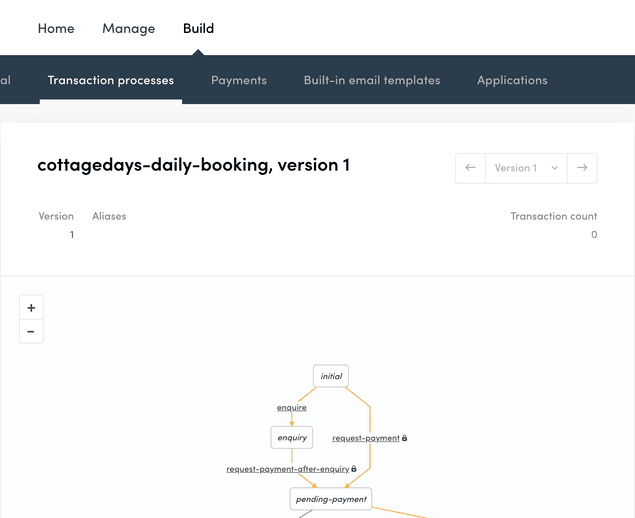
After executing that command, you can go to the Flex Console (Build -> Transaction processes tab) and see that the "cottagedays-daily-booking" process is there.
Create process alias
The process is created, but we still can't reference that process from our client app, since it doesn't have process alias set. We can create an alias for our new process with Flex CLI command:
flex-cli process create-alias --process=cottagedays-daily-booking --version=1 --alias=release-1 --marketplace=cottagedays-devWith that command, we are creating a new alias "release-1" and point it to the previously created process and its version 1.
After that you should see the alias in the Console:
cottagedays-daily-booking/release-1.
At this point, we have essentially just copied the default process under a different name.
Modify transaction process
One transition that should be considered carefully, is the operator's ability to cancel a transaction. If the operator needs to cancel a transaction in a certain state, there needs to be a transition defined for it in the transaction process. Let's add a new operator transition to the process.
Pull the existing transaction process
Before we modify our transaction process, it's better to ensure that we have most the up-to-date version of the process. You can fetch any process version with flex-cli:
flex-cli process pull --process=cottagedays-daily-booking --alias=release-1 --path=./cottagedays-daily-booking --marketplace=cottagedays-devNow, we can open the process.edn file from the new directory with a text editor and inspect it a bit. You can get familiar with edn format by reading our reference document about it.
There's one existing cancel transition defined for operator in that file. That cancel transition can be called when the transaction is in the state: accepted.
  {:name :transition/cancel,
   :actor :actor.role/operator,
   :actions
   [{:name :action/cancel-booking}
    {:name :action/calculate-full-refund}
    {:name :action/stripe-refund-payment}],
   :from :state/accepted,
   :to :state/cancelled}
Let's add another similar transition there:
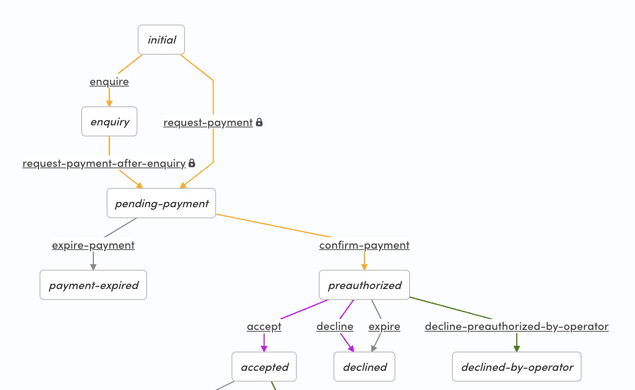
  {:name :transition/decline-preauthorized-by-operator,
   :actor :actor.role/operator,
   :actions
   [{:name :action/decline-booking}
    {:name :action/calculate-full-refund}
    {:name :action/stripe-refund-payment}],
   :from :state/preauthorized,
   :to :state/declined-by-operator}
With this configuration, we are creating a new transition called :transition/decline-preauthorized-by-operator for the operator. Because it's called before the provider has accepted the booking, it's using :action/decline-booking instead of :action/cancel-booking. Otherwise, the actions are the same as in :transition/cancel. We calculate refunds and refund the payment through Stripe. If you want to check all the possible actions, you should read this document: Transaction process actions.
In the preauthorized state, the money hasn't left the customer's bank account. There is just a cover reservation made for the future capture of the payment. This is done to avoid insufficient funds error. Stripe can hold this preauthorization for 7 days and, therefore, we have an automatic expiration in the preauthorized state.
In these declines and expire transitions, :action/stripe-refund-payment will release the cover reservation, but if it's called after the payment is captured, it will refund the payment. And to be more specific, then both transfers are reversed:
- Commission (aka application fee) is returned from platform account to the provider.
- Then full payment is returned from the provider's account to the customer.
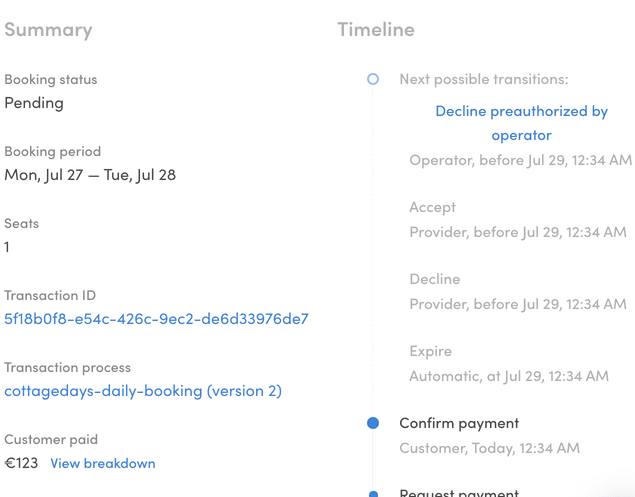
The operator can call this transition from Console (from transaction
card's Timeline column) or alternatively through Integration API. This
transition is only possible when a transaction is in the
preauthorized state. The last line
:to :state/declined-by-operator}, creates actually a new state called
declined-by-operator. It is going to be one of the final states for
any transactions since there's no transition away from that state.
Push a new transaction process
Updating a transaction process is a similar process than creating a new one. This time we use push command:
flex-cli process push --process=cottagedays-daily-booking --path=./cottagedays-daily-booking --marketplace=cottagedays-devAnd if you go to Console, you notice that there's a new version (2) created of the cottagedays-daily-booking process. However, the alias is still pointing to the first version. We need to update the alias too:
flex-cli process update-alias --alias=release-1 --process=cottagedays-daily-booking --version=2 --marketplace=cottagedays-devNow, if you open the process graph from the Flex Console, you'll see that the new transition and state are visible in the updated version of the process.
Here's a screenshot of the transaction card in the Flex Console. It shows a transaction in the preauthorized state - the decline link for the marketplace operator is on the right-side column.
Update client app
After we have changed the transaction process, we also need to take the new process into use in our client app.
In this tutorial, we assume that we don't need to care about ongoing transactions. It is important to consider this before taking a new process version into use. When a transaction is created, it is tied to the version of the process that was in use at that time. Therefore, you might need to update your client app, so that it supports several different process versions.
FTW-product's config.js has been moved into src/config/config.js and some of the process related configs have been changed. E.g. bookingProcessAlias is renamed as transactionProcessAlias and bookingUnitType is renamed as lineItemUnitType.
FTW-product has a different transaction process graph compared to FTW-daily. This means that rest of this tutorial is not really applicable on top of FTW-product.
Update config.js
└── src
    └── config.js
Since we have created a new process, we need to update bookingProcessAlias variable in config.js. This variable defines what transaction process is used when a new transaction is created from the web app.
const bookingProcessAlias = 'cottagedays-daily-booking/release-1';In the same file, we need to also update variable: bookingUnitType. It defines some UI changes (mostly about microcopy) - i.e. is this booking about nights, days, or some other units.
const bookingUnitType = 'line-item/day';Update transaction.js
The web app needs to understand how the connected transaction process works and, therefore, the process graph is actually duplicated in the current versions of FTW templates.
└── src
    └── util
        └── transaction.js
So, we need to make the transaction process change also there.
Step 1: Create a new transition variable:
TRANSITION_DECLINE_BY_OPERATOR.
// When the provider accepts or declines a transaction from the
// SalePage, it is transitioned with the accept or decline transition.
export const TRANSITION_ACCEPT = 'transition/accept';
export const TRANSITION_DECLINE = 'transition/decline';

export const TRANSITION_DECLINE_BY_OPERATOR =
  'transition/decline-preauthorized-by-operator';
Step 2: Create a new state variable: STATE_DECLINED_BY_OPERATOR.
const STATE_DECLINED = 'declined';
const STATE_DECLINED_BY_OPERATOR = 'declined-by-operator';
Step 3: Update the process graph.
Variable stateDescription
contains the same process graph in Xstate format. As a first thing,
you could also update the id of the graph.
The mandatory change is that we need to add the new state and transition into that process description:
    [STATE_PREAUTHORIZED]: {
      on: {
        [TRANSITION_DECLINE]: STATE_DECLINED,
+       [TRANSITION_DECLINE_BY_OPERATOR]: STATE_DECLINED_BY_OPERATOR,
        [TRANSITION_EXPIRE]: STATE_DECLINED,
        [TRANSITION_ACCEPT]: STATE_ACCEPTED,
      },
    },

    [STATE_DECLINED]: {},
+   [STATE_DECLINED_BY_OPERATOR]: {},
Step 4: Update relevant helper functions.
-
txIsDeclined needs to be updated
const transitionsToDeclined = [ ...getTransitionsToState(STATE_DECLINED), ...getTransitionsToState(STATE_DECLINED_BY_OPERATOR), ]; export const txIsDeclined = tx => transitionsToDeclined.includes(txLastTransition(tx)); -
isRelevantPastTransition needs to be updated too
// Check if a transition is the kind that should be rendered
// when showing transition history (e.g. ActivityFeed)
// The first transition and most of the expiration transitions made by system are not relevant
export const isRelevantPastTransition = transition => {
  return [
    TRANSITION_ACCEPT,
    TRANSITION_CANCEL,
    TRANSITION_COMPLETE,
    TRANSITION_CONFIRM_PAYMENT,
    TRANSITION_DECLINE,
    TRANSITION_DECLINE_BY_OPERATOR,
    TRANSITION_EXPIRE,
    TRANSITION_REVIEW_1_BY_CUSTOMER,
    TRANSITION_REVIEW_1_BY_PROVIDER,
    TRANSITION_REVIEW_2_BY_CUSTOMER,
    TRANSITION_REVIEW_2_BY_PROVIDER,
  ].includes(transition);
};
Update components
Now, the last and most important step is to go through all the components that import 'util/transaction'. I.e. we need to figure out if those components need to be updated so that they can handle the changed process.
In this tutorial, we'll just update ActivityFeed component, which is shown on the transaction page.
└── src
    └── components
        └── ActivityFeed
            └── ActivityFeed.js
The new transition needs to be imported there and then a new microcopy key should be added into resolveTransitionMessage function:
    case TRANSITION_DECLINE_BY_OPERATOR:
      return <FormattedMessage id="ActivityFeed.operatorDecline" />;
We'll add the microcopy key and value to src/translations/en.json file:
"ActivityFeed.operatorDecline": "The booking was cancelled.",Update pricing on server
When privileged transitions are used, the pricing changes should be made from a trusted environment. In FTW-daily template, that means the included server.
└── server
    └── api-util
        └── lineItems.js
Our changes didn't bring any new line-items, but it changed the existing booking unit type from night to day. Therefore, we need to update bookingUnitType there too:
// This bookingUnitType needs to be one of the following:
// line-item/night, line-item/day or line-item/units
const bookingUnitType = 'line-item/day';{{#eq "line-item/night" code}}with
{{#eq "line-item/day" code}}in your email notification templates. The next step in the tutorial deals with updating email notifications.
The email templates that list the full line items in the default transaction process are
new-booking-request(to provider)booking-request-accepted(to customer)money-paid(to provider)
And that's it. We have created a new process, added a new transition there and modified our client app to work with the new process.


