Last updated
Understanding Console
This article will help you understand how to navigate Console.
Table of Contents
Console is the central control system of your Sharetribe marketplace. In Console, you can change a number of general settings and manage most of the data of your marketplace related to users, listings, transactions and reviews.
When you create a Sharetribe account, you also create an organization within Sharetribe’s system. You can invite multiple people to your organization to help you manage or develop your marketplace. In fact, you can even have multiple marketplaces within the same organization.
Environments
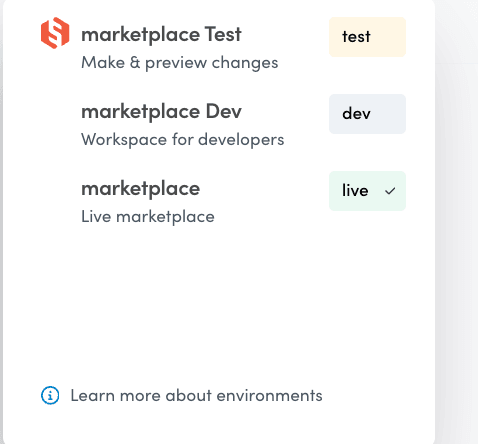
It is important to understand that Console is a way of viewing and manipulating the data on your marketplace. Each marketplace is specifically related to an environment. Each organization can have multiple environments. By default, there are three environments to consider: Test, Development (Dev) and Live. Each environment has its own data, and therefore the information that you can view and manipulate through Console will be exclusively related to the environment that you are working with. This means that the Development environment data in Console is completely separate from the data in the Live environment’s Console.
When you open your account, you have immediate access to the Test environment within the organization, and you can enable a Development environment when you want to start customizing your marketplace with code. Eventually, when you are ready to launch your marketplace, you can request a Live environment setup.
When you interact and create new users, listings, and transactions with your test application, you will see the data in the Test environment. While you cannot modify the code of the Test environment, you can start playing around with it and see the changes you make reflected in the Test environment’s Console. You can create users, new listings, and even transactions and reviews. You can also configure your marketplace without code.
To interact and see data in your development environment’s Console, you first need to set up the frontend application for your development marketplace.
It is easy to change environments in the top of the sidebar.
Sections
Console is divided in three main sections: Home, Manage and Build.
Home
In the Home section, you find information about working with Sharetribe. You can find links to various resources that will help you understand, test, and build your custom marketplace. These include:
- Your setup checklist for configuring your Test environment marketplace without code
- Links to further resources to learn more about setting up your marketplace
- Instructions on how to set up your local Sharetribe instance and links to the Sharetribe documentation and API reference, all of which you will need when you want to start developing your marketplace.
- Access to our Slack channel, where you can ask technical questions and engage with our technical team and the community.
Manage
In the Manage section, you can find and engage with data about your users, listings, transactions, and reviews. This is the section you will use most in the day-to-day operations of your marketplace. You can delete users or listings, ban users, and edit default listing and user information. You can also export all this information into a CSV file to use as you see fit. Perhaps most important of all, you can add and modify the extended data of your marketplace elements in the Manage section. You can read more about extended data.
Build
In the build section you can modify some marketplace settings. The Build section will mostly be used by your developer, so you might not need to worry about this specific section of your marketplace. It’s good to know the basics, nonetheless, so here is a brief overview of what the Build section includes.
General contains basic information about your marketplace: your marketplace ID, URL and name. Here, you can also configure an outgoing email address, where all notifications to your marketplace’s users will be sent from.
Information
Note that for marketplaces in custom code mode, marketplace name is not
defined through Console. Instead, you need to define it in the correct
environment variable,
REACT_APP_MARKETPLACE_NAME.
Content is where you can modify your marketplace content and configurations. You can modify your marketplace and email texts, create content pages, and configure your marketplace footer.
Design allows you to modify the branding and layout of your marketplace.
Listings contains configurations related to your marketplace listing types, listing fields, and listing search conventions.
Transactions related configurations include minimum transaction size as well as provider and customer commissions.
Integrations allows you to configure third party integrations such as analytics and Stripe payments.
Payments has information about your Stripe configuration. Your Stripe secret key is added here. The public key is configured within the code of your frontend application by your developer.
Advanced has more technical configuration and development options.
Applications compiles all applications that have access to the Sharetribe APIs through your marketplace. At minimum, this tab includes your frontend application, but can also have applications for integrated services.
Built-in email templates includes all emails that are sent from your marketplace as a part of the default user flow. They are essential to the operation of the marketplace and are designed to be sent at the crucial moments of the user onboarding flow and are not related to the transaction process. The structure visual style of these emails can be edited with HTML directly in this tab of the Build section. You can edit the content of the built in emails in Build > Content > Email texts.
Events has a summary of what the Events feature is about as well as some quick links to the relevant documentation. It also mentions the Zapier integration and shows the main command to view events with Sharetribe CLI.
Social logins & SSO contains all identity provider clients, that is, the third-party solutions your users can sign up with on your marketplace. They could be Facebook Login, Google Login, or maybe your own identity provider.
Transaction process visualizer shows the different kinds of transaction processes your marketplace has. You can toggle between the different processes in the left-side selection and see how many transactions have used each process. You can also inspect the components of the transaction processes. Read more about transaction processes in Sharetribe.
Side bar
In Console, you navigate between the different environments and sections through links in your side bar.
On the top of the side bar, you can switch between the environments of your organization: Test, Development, and Live.
On the bottom of the side bar, you can manage your account and organization by clicking your email address. You can change your password and generate personal API keys that you need for the Sharetribe command-line interface (CLI). You can also log out of Console here.
This is also where you add new admin users – the people who help you develop or manage your marketplace.
Above your email address, you find links to our Help Center, as well as a link to contact our support.
Action buttons
In addition to the side bar, you still have a few action buttons on the top right of your screen:
View marketplace takes you directly to the address you have defined as your Marketplace URL in Build > General.
Copy changes to... is visible in your Test environment, and it will open a dialog that allows you to copy your configurations from the Test environment to either Live or Dev.
Go live allows you to set up your Live environment.