[Developer Blog](/developer-blog/)
# Add transaction filtering to your marketplace inbox page
New filtering options in the Sharetribe APIs make it possible to filter and sort transactions. In this article, we share some examples on how you can use existing filtering components and combine them with these new transaction filtering parameters to add filtering capabilities to your inbox page.
Jul 30, 2025

[](/author/sari-saariaho/)
Sari Saariaho
Developer Advocacy Guild Lead
**Note: The implementation in this article is built on top of [Sharetribe Web Template v8.6.0](https://github.com/sharetribe/web-template/releases/tag/v8.6.0), so if you are working on a later version, you may need to make some adjustments.**
In early 2025, our team at Sharetribe released more options for filtering transactions in Marketplace API and Integration API through the transactions/query endpoints.
Marketplace API and Integration API now have these new parameters
* hasBooking
* hasStockReservation
* hasPayin
* hasMessage
* bookingStates
* stockReservationStates
* bookingStart
* bookingEnd
Integration API also introduced parameters that were earlier only available in Marketplace API:
* lastTransitions
* processNames
Both Marketplace API and Integration API also support filtering listings on transaction extended data, i.e. protected data and metadata, as well as sorting transactions on
* lastTransitionedAt
* lastMessageAt
* bookingStart
* bookingEnd
This opens up a lot of new use cases that you can implement in your custom developed marketplace. On the Integration API side, these new parameters allow you to create more elaborate analytics and integrations. On the Marketplace API side, you can allow your customers and providers to filter and sort their transactions.
In the Sharetribe Web Template, the main page where a user interacts with all of their transactions is the inbox page. In this article, we share some examples on how you can use the existing filtering components, already used by default on the search pages, and combine them with these new transaction filtering parameters to add filtering capabilities to your inbox page.
## Inbox page filtering logic
In this section, I will describe the general logic of setting up inbox page filtering, from search parameter handling to creating local configurations.
### Search parameter handling
The search page filtering behavior uses a pattern where each filtering action navigates the user to the same search page, but with new query parameters. When adding filtering to the inbox page, you can follow this same pattern.
This means that every filtering action also causes a new data load for the page. In practice, you would handle this so that in the _InboxPage.duck.js_ _loadData_ function, you get the search parameters from the _search_ param, and pass them to the API call.
...
dispatch(fetchOrdersOrSalesRequest());
const { page = 1, ...otherSearchParams } = parse(search);
const apiQueryParams = {
only: onlyFilter,
lastTransitions: getAllTransitionsForEveryProcess(),
...otherSearchParams,
include: [
'listing',
'provider',
...
In the _InboxPage_ component, whenever a user selects new filtering parameters, you use _history.push()_ to trigger navigation with the new query parameters. History is available with the _useHistory()_ hook. You will also need to have the route configuration available for some of the existing navigation helpers, and you can get that with the _useRouteConfiguration()_ hook.'
const history = useHistory();
const routeConfiguration = useRouteConfiguration();
You can then get the current page search parameters from the page location, and save them in page state. Location is available with the _useLocation()_ hook.
const location = useLocation();
const [currentFilters, setCurrentFilters] = useState();
if (currentFilters !== location.search) {
setCurrentFilters(location.search);
}
Once you have the current page search parameters, you can use them as initial values for your filter components, and combine them with any new filter values with a subsequent _history.push()_.
At its simplest, the filter update function could look something like this:
const updateFiltering = (values) => {
const currentSearch = parse(currentFilters);
history.push(
createResourceLocatorString(
'InboxPage',
routeConfiguration,
{ tab },
{ ...currentSearch, ...values }
)
);
};
You can use the _parse_ helper from _util/urlHelpers.js_ to convert the search string to an object with the search values as attributes.
/**
* currentFilters: "?bookingStates=pending&hasBooking=true"
* currentSearch: {
* "bookingStates": "pending",
* "hasBooking": true
* }
*/
The _createResourceLocatorString_ helper constructs the query path based on the inbox tab, the current search, and the new values.
### Configurations
The search page uses the listing field and listing search configurations created in Console or in the template’s local config files. Currently, there are no such configurations for transactions, so you will need to create your own local transaction search configuration. To use existing filter components, it makes sense to adhere to a similar structure:
* Add key, label, and schemaType – use the SCHEMA\_TYPE\_… -schemas where possible
* If the field you want to enable has options, add an array of options with the attributes option and label
The following examples will include some search configuration examples as well. You can create the transaction search configuration in the _InboxPage_ component or in a separate file.
To implement the configurations, the search page has a _FilterComponent_ element that takes a single field config as a prop and then returns the corresponding filter. To replicate the same idea, you can create an _InboxFilterComponent_ that has a similar flow, and you can add different filter implementations into the _InboxFilterComponent_ depending on which use cases you want to enable. You can then map your local filter configuration to an array of these filter components.

Photo by [Haengho Lee](https://unsplash.com/@lufill?utm%5Fcontent=creditCopyText&utm%5Fmedium=referral&utm%5Fsource=unsplash) on [Unsplash](https://unsplash.com/photos/a-coffee-pot-filled-with-liquid-on-top-of-a-stove-gqyJj7vomrc?utm%5Fcontent=creditCopyText&utm%5Fmedium=referral&utm%5Fsource=unsplash)
## Implementing individual filters
In this section, we will look at a few examples of implementing individual filter types that will use the logic described above.
### Add a boolean filter
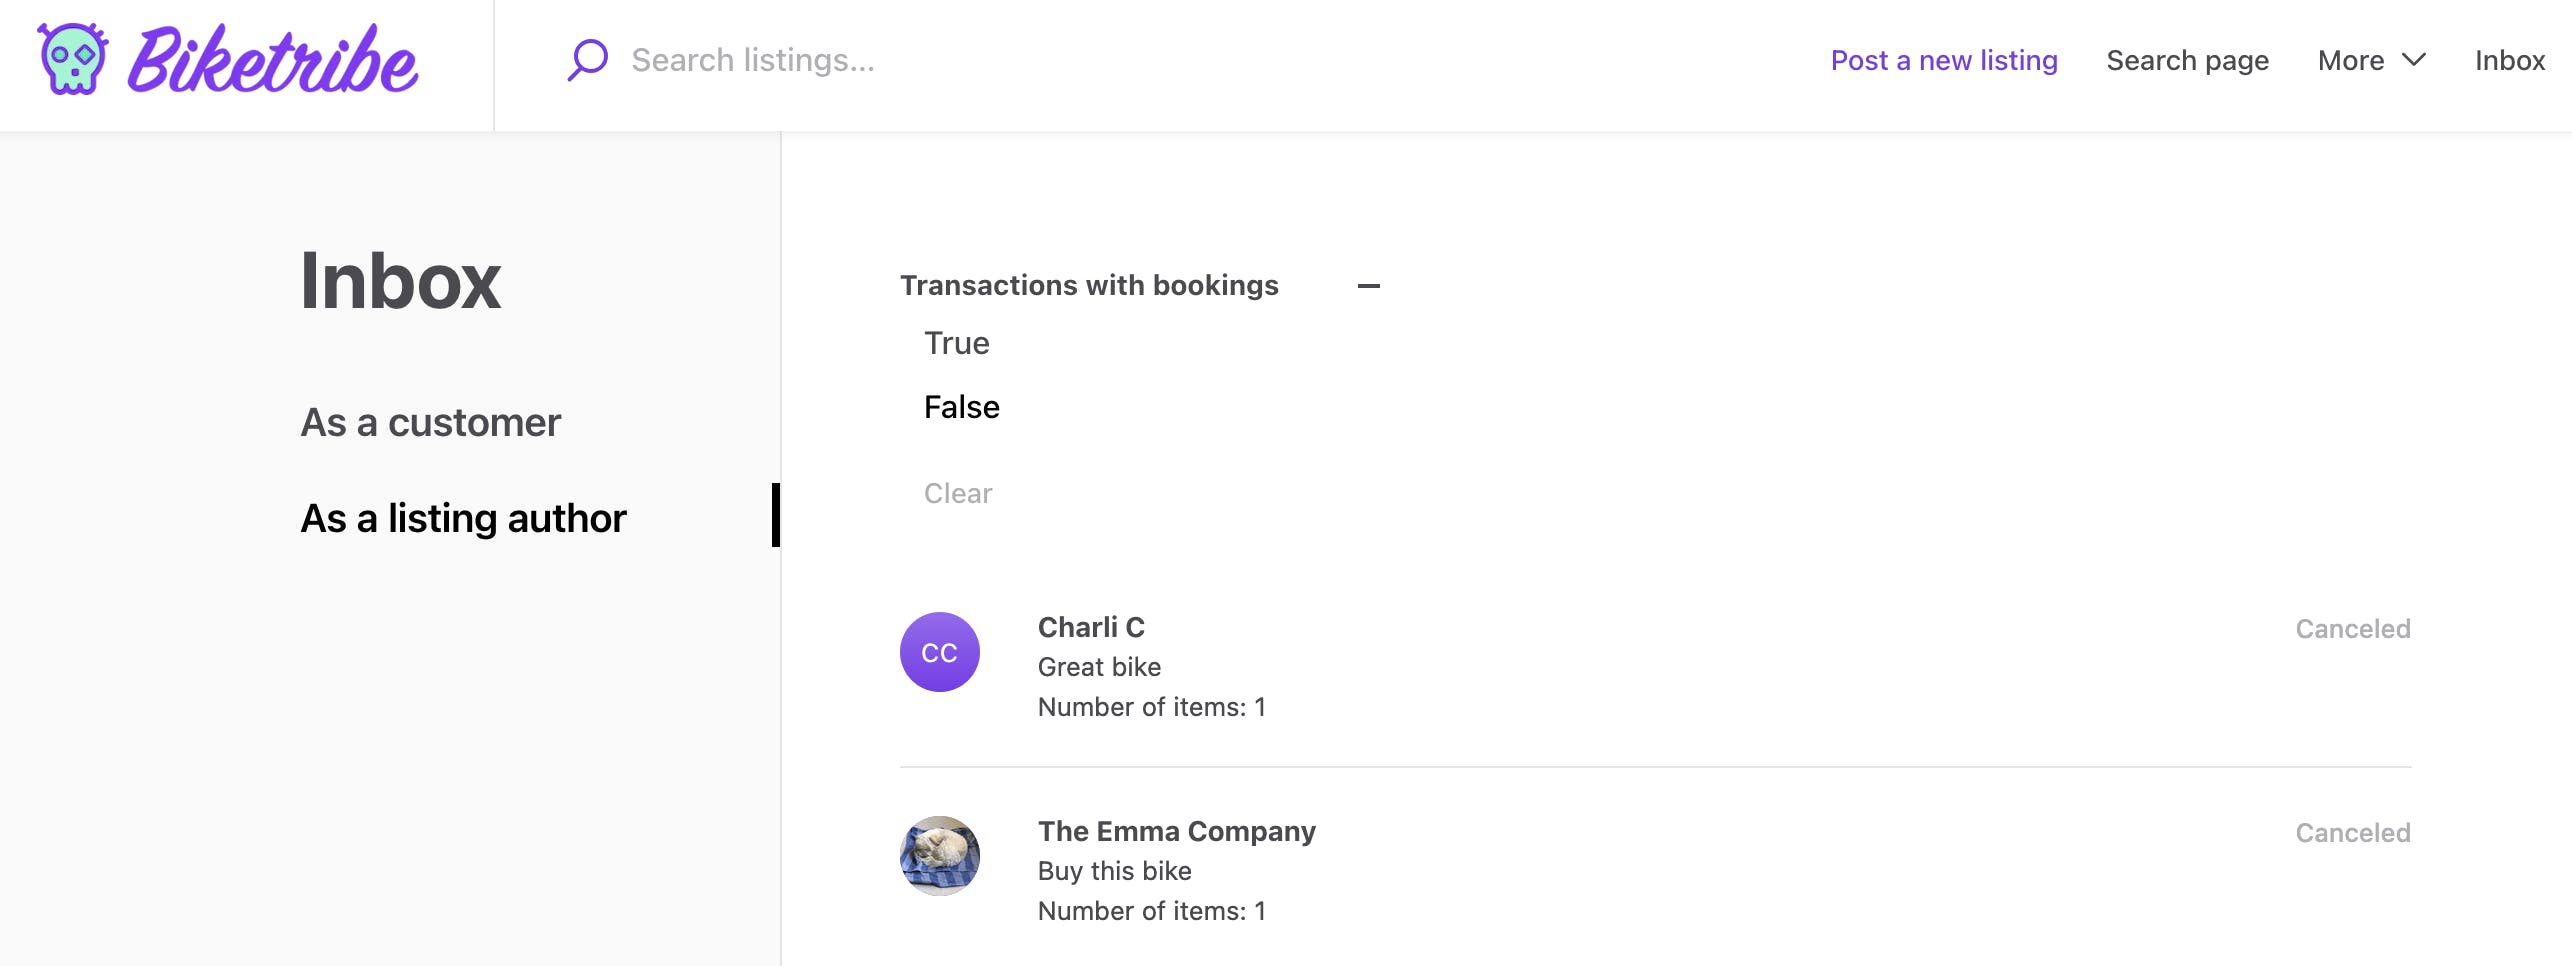
When you add a boolean filter, such as _hasBooking_ or _hasMessage_, you can use the _SelectSingleFilter_ component with a search configuration that has options ‘true’ and ‘false’. That way, you enable the users to only search with one of the options, as well as clear the search completely
const filters = [{
key: 'hasBooking',
label: 'Transactions with bookings',
schemaType: SCHEMA_TYPE_ENUM,
options: [
{ option: 'true', label: 'True' },
{ option: 'false', label: 'False' }
],
}];
The _SelectSingleFilter_ component clears the previous option by default, so you don’t end up searching with both _true_ and _false_ values.
The simplest version of the _InboxFilterComponent_ would then contain only the _SelectSingleFilter_:
const InboxFiltersComponent = props => {
const { config, onHandleChangedValueFn, ...rest } = props;
const { key, schemaType, label } = config;
switch (schemaType) {
case SCHEMA_TYPE_ENUM: {
const { options } = config;
return (
);
}
default: {
return null;
}
}
};
Note that since the initial values from the current filters are passed as booleans and not strings, the _SelectSingleFilter_ doesn’t highlight the selected option by default. To add the highlighting to the filter, you will need to add a conversion from boolean to string values when passing _props.initialValues_ to the _SelectSingleFilter_ component.
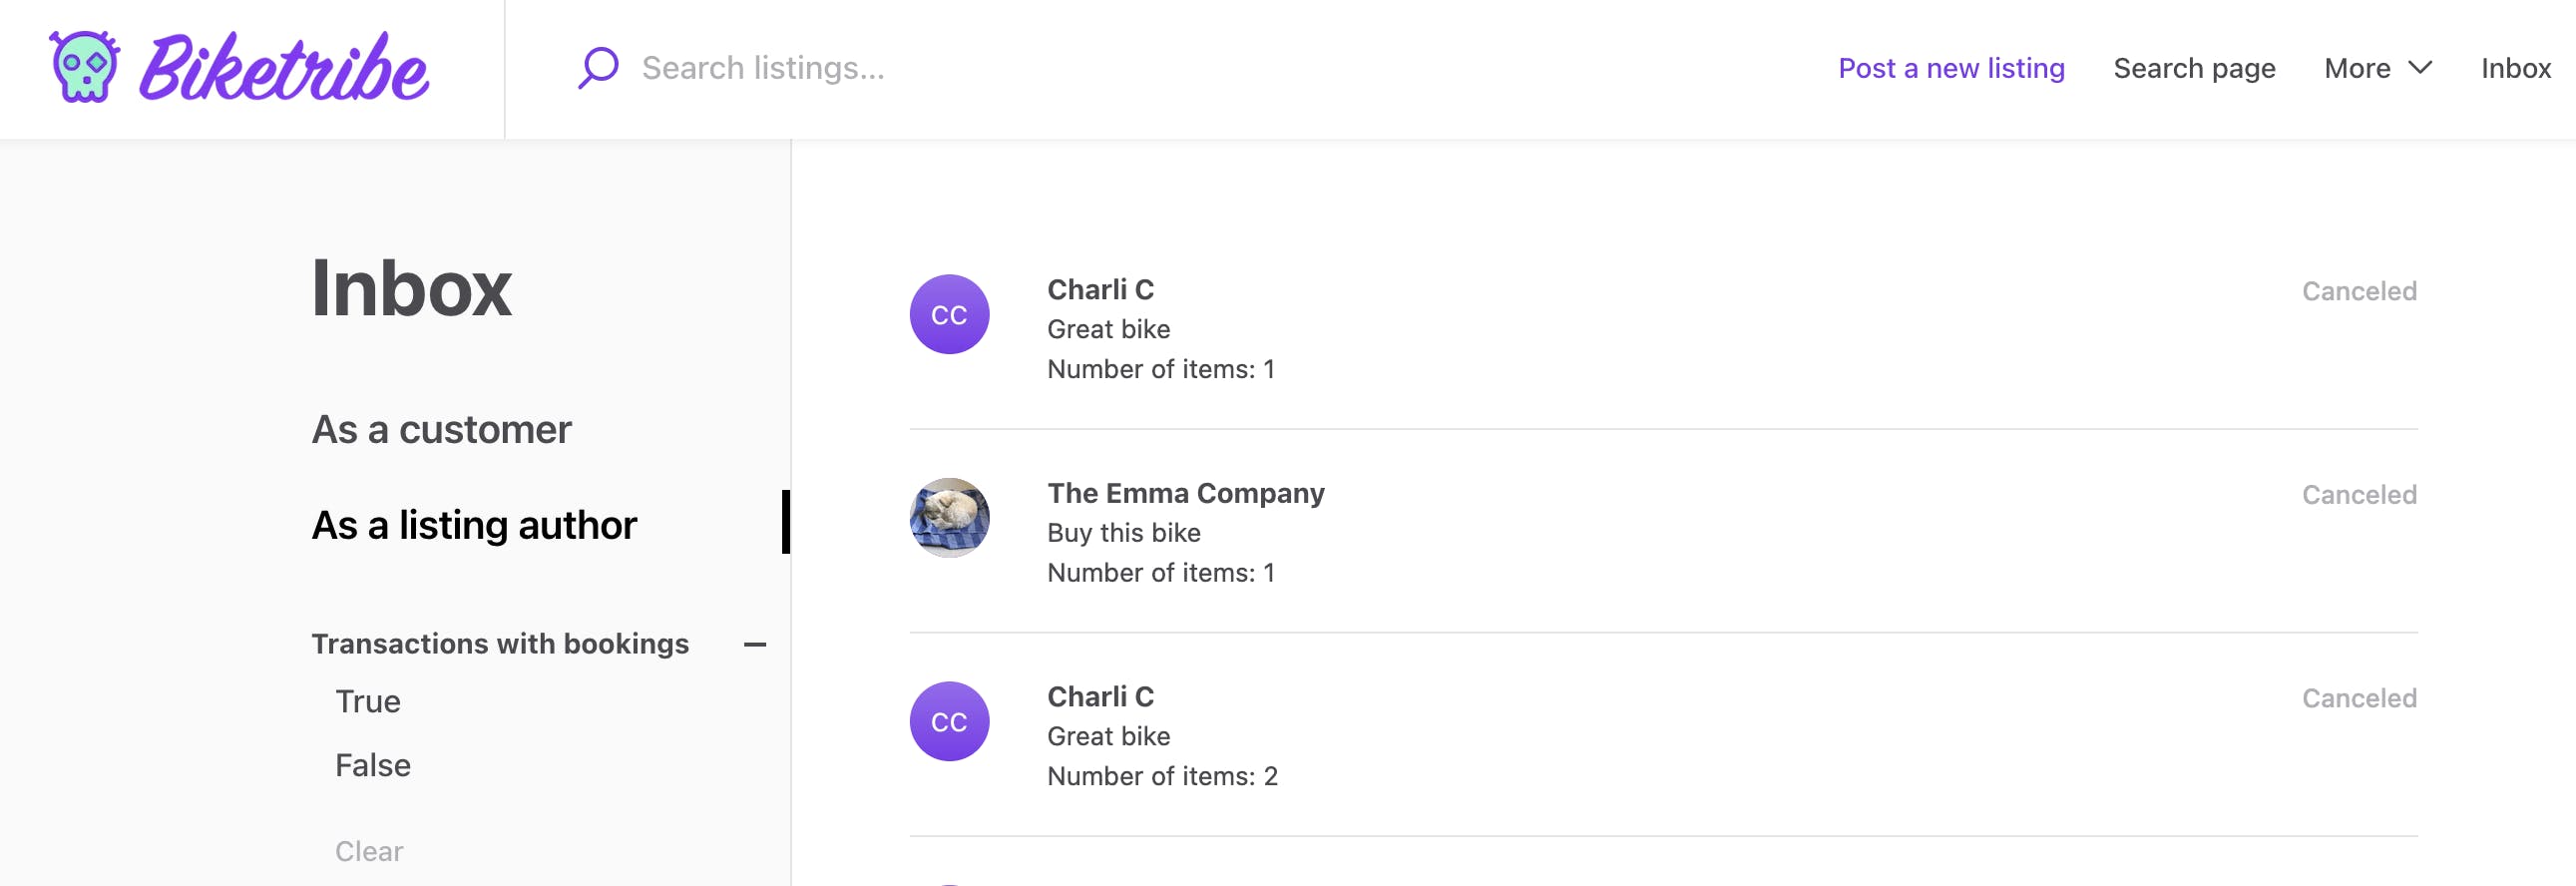
Once you have set up the functionality of your filters, you can style the array of individual _InboxFilterComponent_ elements to the main Inbox page. Here, the _filters_ array contains the individual transaction search configurations.
...
footer={}
>
{filters.map(f => (
))}
{fetchOrdersOrSalesError ? (
...
Alternatively, you can pass them to the side bar as a part of the _sideNav_ prop to _LayoutSideNavigation_. This way, you can have a similar filtering experience to the grid-layout search page.
sideNav={
<>
{' '}
{filters.map(f => (
))}
}
### Add a filter with multiple options
When you add a filter for _stockReservationStates_ and _bookingStates_, where you can query with multiple options, you can use the SelectMultipleFilter.
In your filter definition, you’ll need to define the available options. Both stock reservations and bookings have the same five possible states: _pending_, _proposed_, _accepted_, _declined_, and _cancelled_.
{
key: 'bookingStates',
label: 'Booking states',
schemaType: SCHEMA_TYPE_MULTI_ENUM,
options: [
{ option: 'pending', label: 'Pending' },
{ option: 'proposed', label: 'Proposed' },
{ option: 'accepted', label: 'Accepted' },
{ option: 'declined', label: 'Declined' },
{ option: 'cancelled', label: 'Cancelled' },
],
},
You can then add the _SelectMultipleFilter_ to the _InboxFiltersComponent_ switch case for the SCHEMA\_TYPE\_MULTI\_ENUM case.
case SCHEMA_TYPE_MULTI_ENUM: {
const { options } = config;
return (
);
}
case SCHEMA_TYPE_MULTI_ENUM: {
const { options } = config;
return (
);
}
### Add a dates filter
Adding date filtering is a bit more involved, but you can still achieve it with the existing filtering components.
The configuration for a date based search is simple, because no options need to be configured. However, you do need to configure a filter for both the booking start and booking end dates, because they can be filtered independently.
{
key: 'bookingStart',
label: 'Booking dates start',
schemaType: 'dates',
},
{
key: 'bookingEnd',
label: 'Booking dates end',
schemaType: 'dates',
},
In the _InboxFilterComponent_, you can again create a new case for ‘dates’ schemaType, and return a _BookingDateRangeFilter_ with the necessary props.
case 'dates': {
return (
)
}
The next step is to convert the _dates_ parameters to ISO 8601 format, complete with hours and minutes instead of just days, because that’s the format the API expects.
The helper file _src/util/dates.js_ contains a lot of different helper functions for modifying dates, so it already imports the _moment.js_ library that has functions for managing dates and times. If you create a new helper function in _dates.js_ and export it from there, you don’t need to add extra imports for _moment.js_ elsewhere in the template. For example:
// src/util/dates.js
export const getISOString = (date, timeZone = null) =>
timeZone
? moment(date)
.tz(timeZone)
.toISOString()
: moment(date).toISOString();
Now, you can import this helper in _InboxPage.duck.js_ and use it to format the incoming dates parameters to an API-friendly format. For example:
const parseDates = (dateParam, paramKey) => {
const [start, end] = dateParam.split(',');
const { timeZone } = Intl.DateTimeFormat().resolvedOptions();
return {
[paramKey]: `${getISOString(start, timeZone)},${getISOString(end, timeZone)}`,
};
};
...
export const loadData = (params, search) => (dispatch, getState, sdk) => {
...
const {
page = 1,
bookingStart: bookingStartRaw,
bookingEnd: bookingEndRaw,
...otherSearchParams }
= parse(search);
// If the parameter exists, return the function output, otherwise return an empty object
const bookingStartMaybe = bookingStartRaw ? parseDates(bookingStartRaw, 'bookingStart') : {};
const bookingEndMaybe = bookingEndRaw ? parseDates(bookingEndRaw, 'bookingEnd') : {};
const apiQueryParams = {
only: onlyFilter,
lastTransitions: getAllTransitionsForEveryProcess(),
...bookingStartMaybe,
...bookingEndMaybe,
...otherSearchParams,
include: [
...
## Conclusion
Inbox filtering can be a useful tool on your marketplace, especially if you have power users who have a lot of transactions. Users can filter to only view paid transactions, or only bookings that are starting within the next month, for example.
In this article, I shared an overview of how you can implement inbox filtering in Sharetribe Web Template using the existing filter components already available in the codebase. If you implement some or all of these use cases, let us know by sending a message to hello at sharetribe.com, or through your Console chat widget!
## You might also like...
[Modify listing card thumbnails](/developer-blog/modify-listing-card-styles/)[Custom section components on Sharetribe’s CMS, Pages](/developer-blog/custom-cms-section/)[Content Security Policy](/developer-blog/content-security-policy/)
## Liked this? Get email updates on new Sharetribe Developer Blog posts.
[Subscribe](#subscribe-dev-blog)